This checklist was created by Alexandr Lushin. Alexandr creates and promotes websites since 2008, manages his small team. Technical site audits are his favorite part of SEO.
The longer a website exists, the more likely it is to be moved. Changes in search engine requirements, the market situation, the growth of traffic on your site – all this can lead to the necessity of moving the site to a new domain, web host, content management system or combining several sites into one.
The website migration should be carefully planned and executed according to the checklist. This helps prevent drop of rankings in search engines, or at least minimize it, and restore previous positions quickly enough.
The website migration plan template consists of five stages: planning, preparing, testing, launching and monitoring the site after migration. In this checklist you’ll find out how to perform each of them in detail.
Note! If you can avoid site transfer, then do it. Otherwise, plan it carefully, as any mistake can lead to a drop in traffic or worsening of user experience.
<…>In the past it was definitely the case that [a site migration] was more visible in that you would move to a new domain and it would take several months for everything to settle down.
Nowadays our systems are pretty good in that if you move to a new domain, you follow all of the steps in our Help Center then sometimes within a day or two things will just switch over and you’ll see pretty much no change with regards to search.<…>
<…>Any domain migration, a bigger change of URLs within a website, are always a scary situation for me still. I would really be careful about what you do there and make sure that you really follow step by step the Help Center guides.
If you do everything right, a domain migration is just a matter of a day or so and everything will look really effortlessly. But there are lots of ways that you can do things wrong and there are lots of other types of site migrations that you can do which do end up taking a much longer time.<…>
John Mueller, Webmaster Trends Analyst at Google
Link to YouTube
Reasons to move the website
1. Website relocation
- Moving from HTTP to HTTPS. Search engines are currently paying particular attention to website security and in most cases site migration to the HTTPS protocol is widespread and essential. Migrating to a secure protocol leads to a protocol change in the URL, i.e. the page http://site.com/page/ migrates to https://site.com/page/.
- Changing the domain name. Sometimes sites change the domain name to a more appropriate one due to the expansion or change of the business line, change of the brand name or the opportunity to buy a more appropriate domain name. A change of domain name entails a change of URLs, i.e. the page https://oldname.com/page/ will be replaced by https://newname.com/page/.
- Changing a mobile version of the site. Previously, the mobile version of the website could be placed on a subdomain, e.g. http://m.site.com/, but now the main website https://site.com/ has become adaptive and there is no need for a separate mobile subdomain anymore.
- Moving to a new web host. A change in hosting may be caused by inadequate performance of the current hosting provider, requirements for security or speed of hosting, a desire to host the site in a particular country, or economic efficiency.
- Combining several websites. In the case of purchasing another business, it may be necessary to combine the purchased site with the main one or vice versa, which results in the necessity of website transfer planning.
- Moving from the multi-domain architecture of your website to the usage of a single domain.
2. The change of the content management system
- The change of CMS. You have decided to change your content management system as the existing CMS doesn’t meet your requirements for safety, speed and functionality or is not supported anymore. This is one of the most popular reasons to move the site.
- Updating the CMS version. Updating the version is usually carried out without any particular problems, but you should be extremely careful.
3. The change of content
a) Adding or removing pages
Adding pages to the website can lead to a number of problems:
- cannibalization of keywords when a newly created page starts competing with existing pages on the site for certain keywords;
- the appearance of orphan pages, i.e. those without internal backlinks;
- the appearance of pages which do not contain links to other pages of the site, i.e. the page doesn’t redistribute the internal weight of links to other pages.
Therefore, if you add the pages, you should plan the audit of the internal links and pages structure as well as prevent the cannibalization of keywords.
When deleting pages, you should develop a strategy for redirecting to pages which respond to a similar user intent, and if they don’t exist, you should install a 410 server response for the deleted pages. Internal links should also be audited to avoid 301 and 410 errors.
Carry out an audit of internal links
Find all pages with problems and correct them before you start migrating
b) Adding or removing the content
If there is a need to update content, add new important information or delete outdated details, remember that this can also have a negative impact on page ranking or lead to cannibalization of keywords.
Although this process is a natural part of the website operation, it is advisable to keep track of the pages being changed.
c) Combining the content or pages
When combining content, its donor pages may be deleted. To save traffic, you should install 301 redirections and check the link structure so that to prevent 404 or 301 errors.
When combining the content, you should control its amount on the donor page and try to avoid its duplication.
The example of tests in Sitechecker that help you find duplicate pages.
But remember that duplicate content may not always be a problem, because blocks of the same content can complement the content of pages, or a small amount of content can be quite acceptable, for example, on a page with video lessons. Therefore, you should analyze each such page on an individual basis.
4. The change of website structure
- A change in the site architecture. The website migration process is caused by the revision of the URL structure and the website in general. In order to keep current positions, you should match and subsequently redirect old URLs to the new URL and notify the search engine. For example, your architecture does not have categories anymore and all URLs of the kind https://site.com/category-name/page/ migrate to https://site.com/page/.
- Change of URL form. In cases when it is necessary to change the URL form, for example, remove .html at the end and replace https://site.com/page.html with https://site.com/page/, or to change the URL generation template by removing the year from it. For example, to change https://site.com/2020/01/01/page/ into https://site.com/page/, that is frequently used in the CMS.
5. The change of design
a) Website redesign
The need to redesign the site may arise since the existing design is not satisfactory, or it is time to update the site to meet the latest design trends.
A design modification can also lead to changes in the site ranking, so you should monitor how the most important pages are ranked after the redesign. The determination of top website pages will be discussed below.
It is also quite common that a new design doesn’t contain any blocks of references or headings. Therefore, it is crucial to involve SEO specialists at the stage of developing a new design.
b) Changes for improving website loading speed
Typically, work on improving the speed of site loading runs smoothly, but it is advisable to monitor the top site pages and the availability of all blocks of content, headings, title tags and indexing settings after work is completed.
Website migration planning
At the very beginning of a planning stage, you should define the goals of site moving. The main goal is to maintain and subsequently increase traffic and conversion rates on the website. But don’t forget that for example, migrating a site to another web host and changing the URL structure have different goals.
Follow the steps below:
- Plan the migration and make sure it is really essential. Discuss the future site migration with your SEO team and all employees affected by the process: content managers, copywriters, system administrators, designers, business analysts and so on.
- Define the site pages and sections which will be subject to changes. This can be either the whole site or its separate categories.
- Select the team to perform the migration and assign the roles. Make sure you appoint a person responsible for the entire migration process. This person will control the process and all members of the temporary team.
- Discuss possible risks and ways to minimize them with all members of the migration team. Notify everyone about the probability of a temporary drop in traffic and worsening the site positions.
- Ask all team members for their migration suggestions. Perhaps you can do more actions in one migration than you have planned. For example, you could migrate to the HTTPS protocol and delete a year in the URL in one go. Multiple actions in one migration bear more risks, but at the same time you can immediately solve more problems, that will finally bring more benefits to your site and reduce the costs.
- Identify the tasks to be performed during the website migration and assign one person responsible for each of them.
- Set a time for migration to begin. It is advisable to carry out the migration at the beginning of the week and avoid it at hours of maximum website traffic. Remember that if something goes wrong, your whole team should quickly implement the necessary changes. Therefore, starting the site migration on Friday night is not a good idea.
Preparing for migration
This is the most important stage. At this stage, you create a roadmap to follow during the migration process.
1. SEO technical requirements
At this stage, you should describe all the requirements for technical SEO which should be kept or implemented during the migration. The following parameters should be described.
a) URL structure
If the URL structure is changed, all old and new URLs should be matched in one table. For sites with thousands of pages this may be impossible, so when changing the URL, try to use a template that is easy to implement.
For instance:
An old URL: https://site.com/cat-name/page/
A new URL: https://site.com/page/
It is obvious that the category name has been removed from the URL and you can easily match all new URLs using a template.
Note! In case the usage of a template is impossible, you can match old and new URLs by unique Title and Н1 pages and use a unique product ID if one is available. This method is more complex and may be inaccurate if there are Title and H1 duplicates on the site, nevertheless it can make the job easier if there is no correlation between the new URLs and the old ones.
b) Metadata
You should save the metadata, including the dynamically generated defaults, and in case they were generated by a formula, you should save this formula. When the CMS is changed, different short codes can be used for generation, which should be taken into account.
For example, the SEO plugin for CMS generates the following meta description tag:
<meta name="description" content="Buy iPhone at the best prices in our shop +180777777777 page 2 of 10">For this purpose the following formula is used in the CMS settings:
%%Title%% %%text%% %%phone%% %%page%%
where
%%Title%% = Buy iPhone
%%text%% = at the best prices in our shop
%%phone%% = +180777777777
%%page%% = page 2 of 10
This formula is specified in the CMS settings and in case of a CMS change you have to create this formula using the short codes available on your new platform.
For example, the popular SEO plugin Yoast for CMS WordPress uses the short codes described here.
c) Structured data
Microdata in various formats, such as schema.org, help the search engine understand page content more accurately. This data may be lost during migration that is likely to have a negative impact on the ranking of the site.
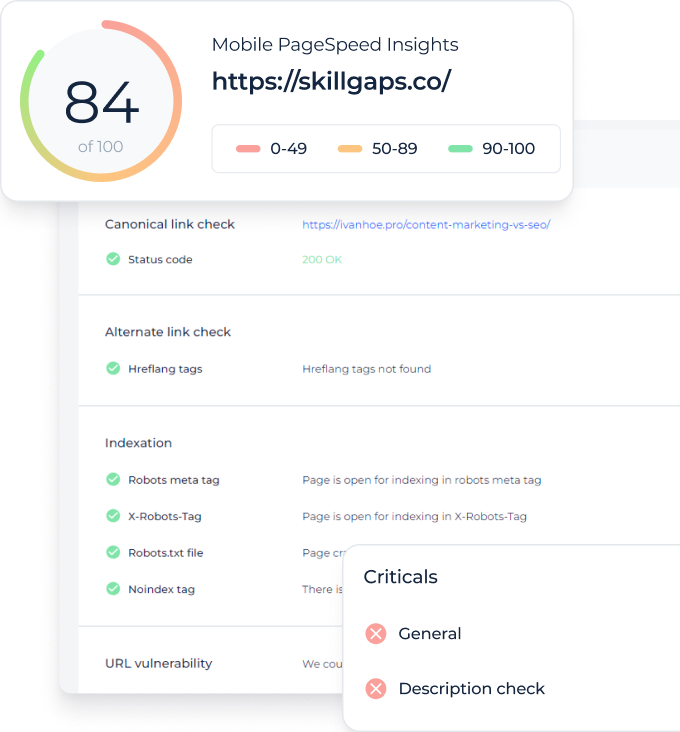
Microdata on all standard pages should be checked before and after the website migration, and the data should be collected in the table. You can use Google Structured Data Testing Tool for checking.
d) Canonical directives and meta robots
It is essential to describe and monitor the saving of these directives, as an error can lead to the list of junk pages that in turn will have a negative impact on the ranking of the website.
e) Headings
Page content includes headings of different levels (H1-H6 tags) and an error in their migration can negatively affect the ranking of pages. All headings have to be moved precisely.
f) Navigation
Site navigation is linked to pages and when URL format is changed, appropriate modifications should be provided for in the site navigation.
g) Internal links
The significance of internal pages also depends on the links to particular pages. Changes in the URL structure may affect the performance of internal links.
All internal links should be matched to the new URLs and changed according to the new structure. This is crucial for avoiding a large number of 404 pages and disturbance of the site functionality.
h) Pagination
Describe the pagination settings. If the URL or CMS are changed, the generation of pagination as well as the Title pages of pagination may also be modified.
i) XML sitemaps
During site moving, it is recommended to save the XML sitemap with old URLs until the search engine indexes all new URLs. By saving the old sitemap, you help the search engine find redirection from old to new pages more quickly.
j) HTML sitemaps
In case of URL modification, changes in the HTML sitemap should be taken into account. If the HTML sitemap is generated automatically, you have to start the generation process and check that new URLs are included in the HTML sitemap.
For small sites using the manually generated HTML map, you need to adjust it to the new URL structure.
The main task is to make sure that the HTML sitemap contains only indexed URLs with the 200 server response.
k) Hreflang tags
If your website has several language versions, you should make sure that all settings related to hreflang tags are correctly migrated.
l) Mobile version (app, AMP, PWA)
If AMP pages are used, you should make sure that they are moved and saved after site migration. Use the Google AMP testing tool to check them.
m) Redirection
It is one of the most important aspects when moving a website. The plan for saving the redirections will be discussed in detail below.
n) 404 Page
The 404 page should give a server’s response 404 and be executed in the overall website design. Make sure that these requirements are met after the website migration.
o) JavaScript, CSS and image files
The website may contain script and style files for individual interactive elements such as a calculator. Make sure that all styles, scripts and images are moved and the functionality of such elements is preserved.
p) Page loading time (for PC and mobile devices)
Loading speed is crucial for both user experience and search engines. Create a spreadsheet and measure the basic parameters of loading speed for the most important website pages identified earlier. Make sure that these parameters have not worsened after site transfer.
Do not forget that each CMS has its own features which should be considered:
- setting up user’s URLs and default values;
- page headings and templates for their formation;
- meta descriptions;
- h1-h6 headings;
- canonical default tags;
- default meta robots values: index / noindex, follow / nofollow;
- alt attributes for images;
- Open Graph, Twitter Open Graph default values;
- default robots.txt file.
2. Design
If the website redesign is included in the site migration plan, the list of requirements should be agreed with SEO specialists before starting to develop the new layout. This is an important point, which should take into account the availability of headlines on the page, their position in the content and other suggestions made by SEO specialists.
3. Top pages identification
Although our goal is often to move all pages of the site, we should identify the most effective and top-priority ones for maximum control. This is especially relevant for large websites. For this purpose, the following stages must be completed.
a) Scan the old site
It is necessary to find all website pages, their title, meta tags, H1 headings, redirections, idle pages. We need to collect and save as much data as possible.
Scan the old site
Get the list of all pages, their headings, meta tags and errors
Note! Retain the scan file for several months after migration, and this will help you make quick changes if required.
Scan the whole site. For this purpose, you may need to change the scanner settings as follows:
- to ignore robots.txt;
- to follow the links with the nofollow attribute;
- to scan all subdomains;
- to use the Googlebot user agent.
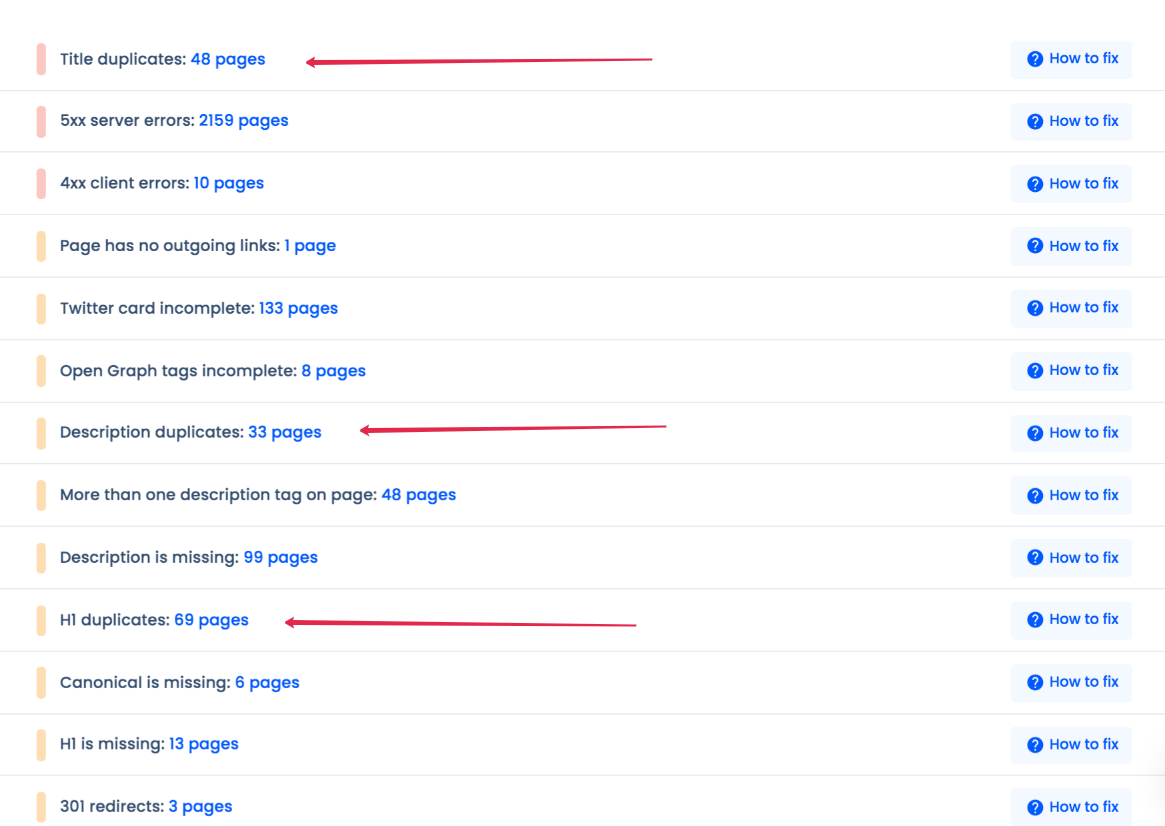
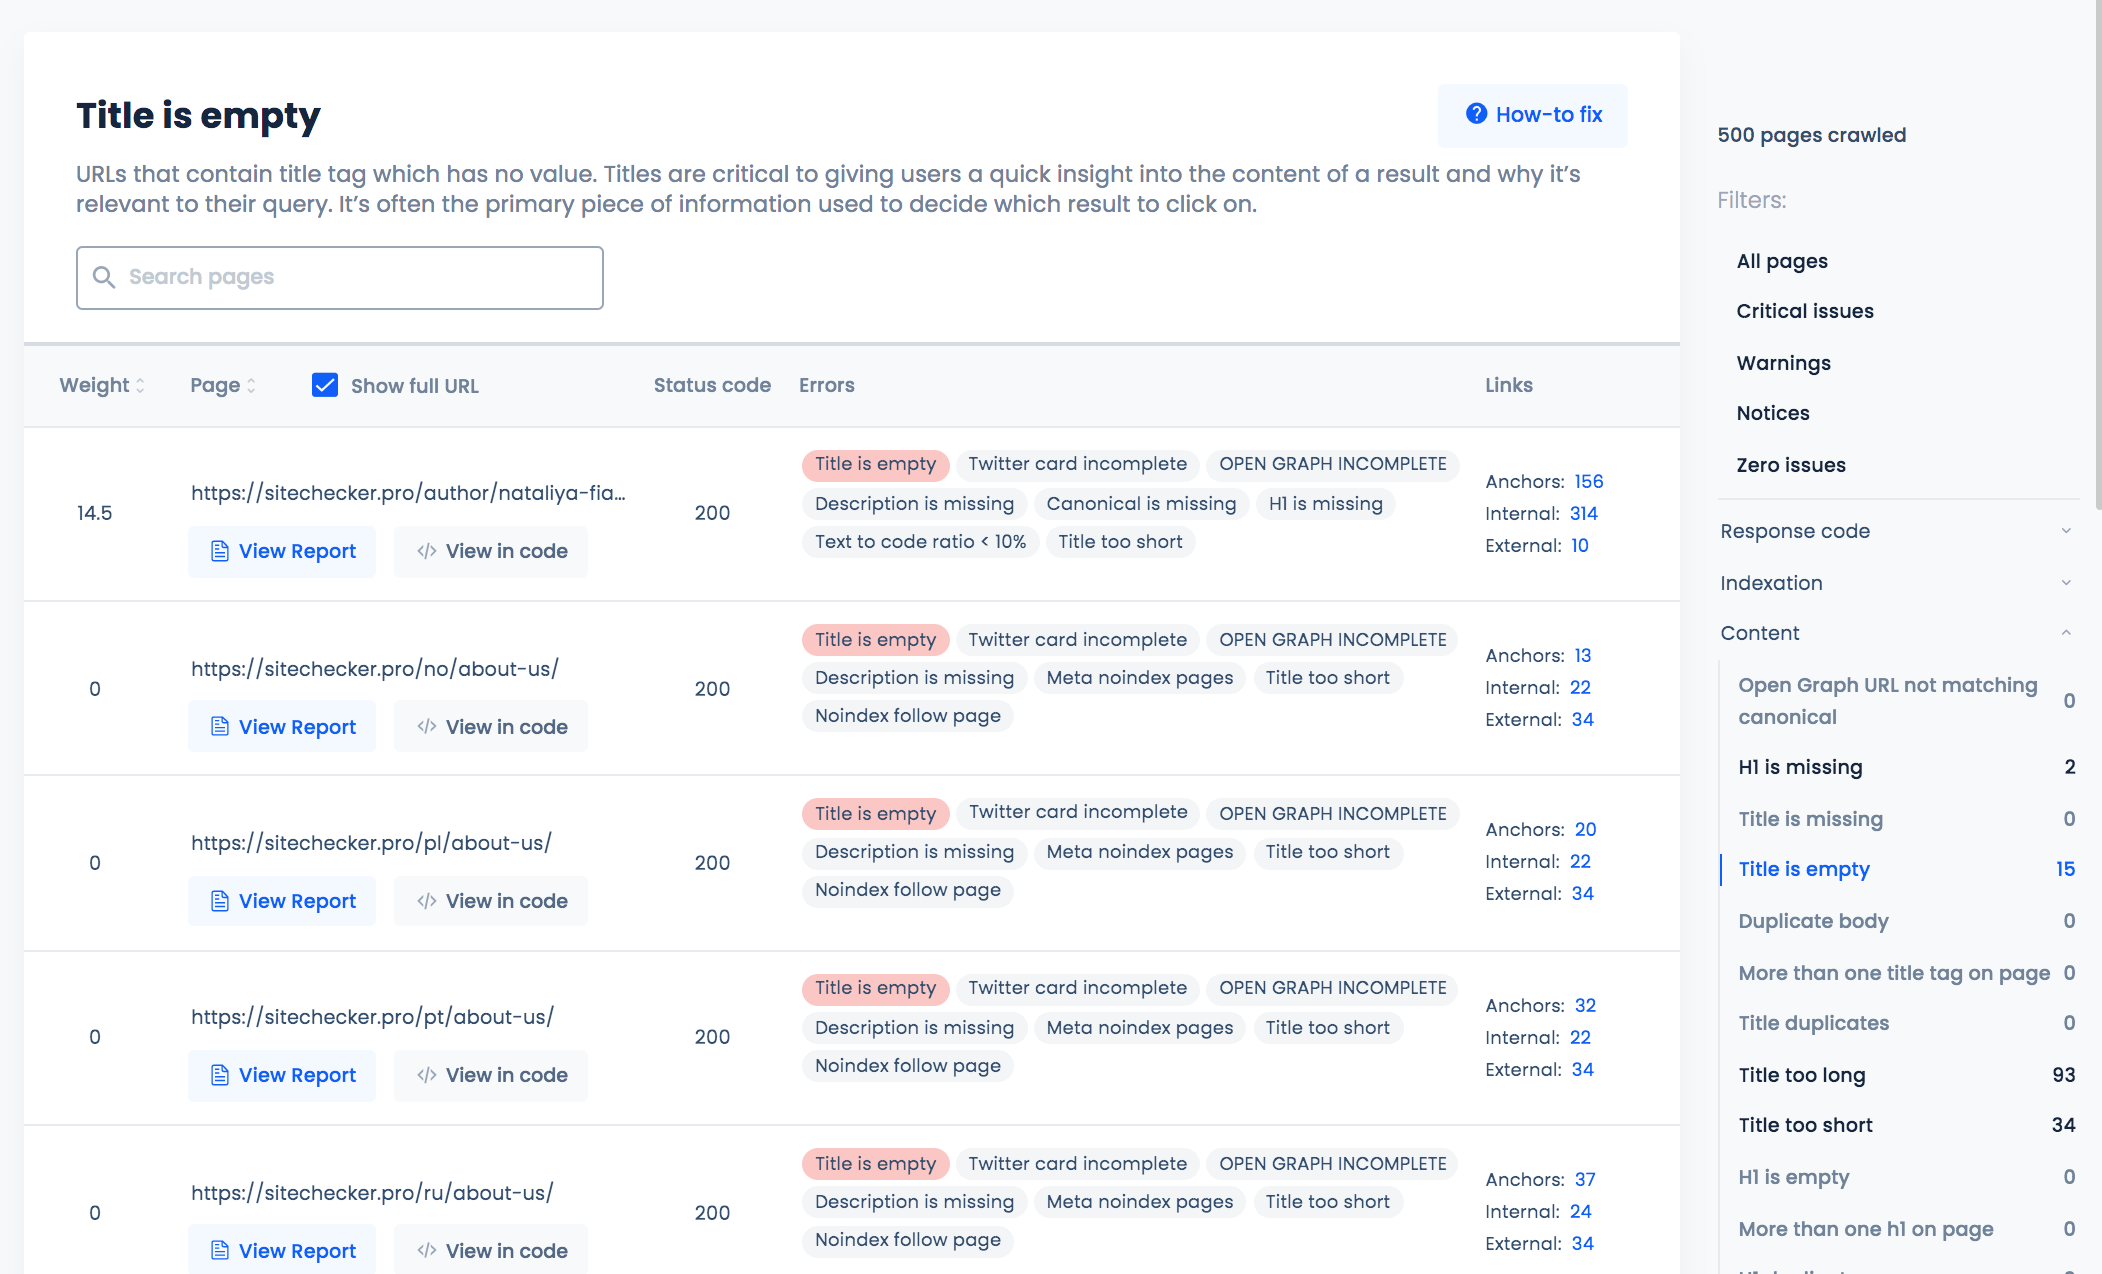
A list of all website pages with errors, server response codes and data on internal links in Sitechecker.
b) Select only the indexed pages
Export the results and filter the pages which:
- return the 200 server response;
- do not contain the canonical tag to another page;
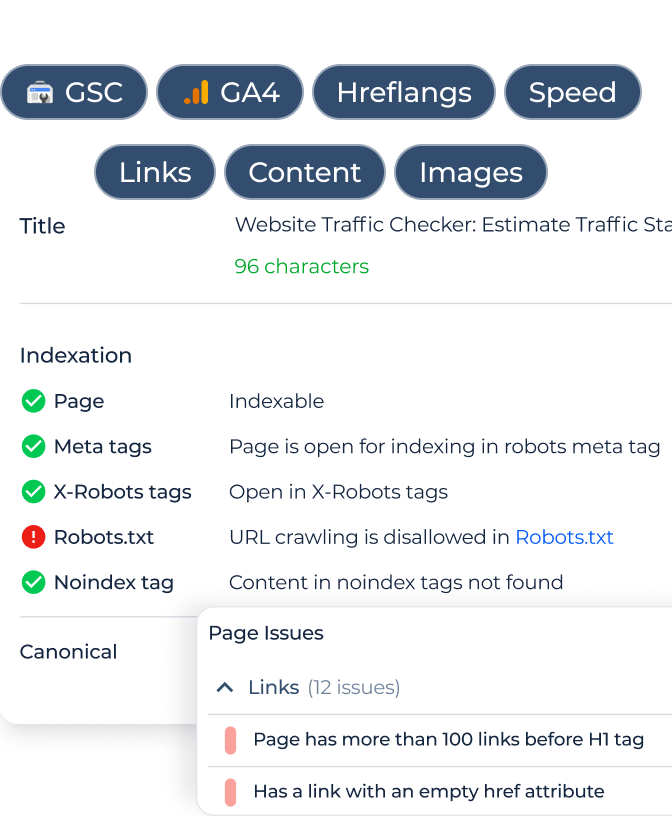
- are not prohibited for scanning in the robots.txt file;
- are not prohibited for indexing in meta robots or with x-robots-tag.
c) Identify the most efficient pages
It is recommended to create a spreadsheet with the following columns for your convenience:
- The old site URL.
- Organic visits over the last 3 months. Data should be obtained from Google Analytics.
- Conversions and targeted actions over the last 3 months. Data should be obtained from Google Analytics.
- The number of clicks over the last 90 days. Data should be obtained from the Google Search Console.
- The number of backlinks. Data should be obtained from Ahrefs or Majestic.
Now you are able to analyze the pages and select the ones with the best performance. Ideally, all these pages should be available on the site after migration.
If these pages are not available for any reason, it is necessary to set up a 301 redirect to the most relevant pages which correspond to a similar need of the user.
If you don’t do the redirection, you will lose traffic and the weight of external links that will have a negative impact on the ranking. Avoid redirects to the main page of the site. For products, redirection to the category page may result in a soft 404.
4. Preparation of redirections
The development of a redirection plan is an essential step on which the success of migration depends greatly.
If URLs are changed during the site migration, the absence of redirects will result in a large number of 404 pages, a drop in the rating and bad user experience, as the users will not find the page responding to their request.
By creating a redirect, you will save traffic, the impact of external links and page ranking. It will also help the search engine find new URLs faster.
Thus, an error during the creation of redirections messes up all SEO efforts and causes enormous damage to the site after migration.
a) Types of redirects
In the vast majority of migration cases, you should use the 301 redirect. This type of redirection informs the search engine that the page has been moved on a permanent basis, so all ranking signals should be transferred to the new page.
There are several other types of redirects:
- Redirection by the 302 server response. Visually, the effect on the user does not differ from 301 redirects, but the 302 server response indicates that the page has been moved temporarily that is probably fundamentally incorrect in the case of URL changes.
- Meta and JS redirects may not be considered during migration, but you should still know that this type of redirection exists. Such redirects have no SEO effect and therefore should not be used.
Note! When you create redirections from one domain to another, in case of combining the sites, Google filters on the redirected domain can have a negative impact on the main site ranking.
b) A table to save old redirects
It may be necessary to create a redirection table if any pages are not moved or if the URL structure is changed.
A separate table should be created for each situation.
To preserve existing redirections, a table with 3 columns should be created:
|
The old redirection |
The old URL |
The new URL |
| https://site.com/2020/pages1/ | https://site.com/2020/page1/ | https://site.com/page1/ |
Thus, we must preserve the redirect and avoid a chain of redirects when the old redirect links to the old URL and then redirects to the new URL.
In our case, the redirect should be modified so that the old redirect https://site.com/2020/pages1/ refers directly to https://site.com/page1/ and the old URL redirects separately to the new one, i.e. https://site.com/2020/page1/ redirects to https://site.com/page1/. In this way, each old redirect will be divided into two new ones.
It can be shown schematically in this way:
Situation before migration:
PageA -> redirect to -> PageB
Situation after migration:
Page B -> redirect to -> PageC
In order to retain the redirection from PageA to PageB and not to create a chain of redirects PageA -> redirect to -> PageB -> redirect to -> PageC, we have to redirect PageA directly to PageC and create a redirect from PageB to PageC.
c) A table to create new redirects
To create new redirects a table with two columns is used:
|
The old URL |
The new URL |
| https://site.com/2020/page1/ | https://site.com/page1/ |
d) Creation of general redirects
Remember to set up general redirections:
- the site should only be accessible via one protocol, i.e. all pages with the HTTP protocol are redirected to the corresponding HTTPS pages;
- URL in upper case redirects to the corresponding URL in lower case;
- each page is accessible only by one URL, i.e. pages are accessible only with a trailing slash at the end or without it;
- the site is only accessible with a www version or without it.
e) Redirects of images
If the images were moved, be sure to create redirects for them on the top-priority pages identified earlier.
f) Changing the URL outside your site
If your website uses contextual advertising, social media advertising or the specification of the website URL in social media profiles to attract traffic and they will not be relevant after migration, changes will have to be made.
Testing
All modifications must be checked in a test environment before migration. The creation of the test environment should not be neglected, as any malfunctions that can be created in the test environment will not affect the main website.
Before starting the migration, create a separate specialized environment and make sure that it is not available to searchers. For this purpose, you can restrict access for search engines in one of the following ways:
- to restrict access to the environment by password;
- to allow access only for certain IP addresses;
- to prohibit scanning in the robots.txt file.
Priority is given to access for certain IP addresses using a login and password.
Note! Remember to provide the robot with access to the site after migration. Keep in mind that changes may be made to the main site and they should be shown in a test environment before starting the migration.
The following settings should be checked at the testing stage.
1. Availability of the site for scanning in robots.txt file
When using the test environment, a Disallow: / instruction is often added to the robots.txt file, informing the search robot that the site does not need to be scanned. This was mentioned above in the information about setting up the test environment.
Migration of the site with the Disallow: / instruction in the robots.txt file is a typical migration error. At this stage you need to check:
- availability of scanning for the entire site and absence of the Disallow: / directive;
- availability of scanning of all website pages for which traffic is planned to be received;
- availability of JS and CSS files;
- the contents of the old robots.txt file was moved if required;
- there is a link to the sitemap.
2. Correct operation of redirects
Check the redirects from two tables created earlier. All of them should work without creating chains of redirects.
3. Accuracy of the new URL structure
Check whether the new structure has been implemented for all URLs and whether there are no page templates left which use the old URLs.
4. Title and metadata
Make sure that all title and description tags have been moved correctly. Title is an important tag and migration errors can affect the ranking of the site.
If you created new pages, make sure that they have optimized title and metadata and that no internal page competition is formed which may lead to cannibalization of keywords.
5. Н1 headings
Make sure that pages have preserved H1 headings. Errors in H1 migration may also have a negative impact on the ranking of the site.
6. Content
Do all pages have the full content? Are there any pages without content or with content that is displayed incorrectly?
7. Internal links lead to new URLs
All internal links in the content, recommended articles block, top and bottom menus and any other places should refer to new URLs.
This is an important check, as errors in internal links can cause links to non-existent pages or internal redirections.
8. Menu
All menu items should point to new URLs. This check is similar to the one for internal links, but we have singled it out as a separate stage because the website menu is just as important as its other elements.
9. Canonical URL
It is essential to detect pages without a canonical tag and set it by indicating the current page. For pages indicating another canonical page, it is necessary to check whether it is correct and you really want to canonize these pages.
All canonized pages should lead to the canonical page which:
- return the 200 server response;
- does not contain <meta name=”robots” content=”noindex” /> or x-robots-tag: noindex in the server response;
- s not prohibited for scanning in the robots.txt file.
10. Indexing status
The website pages do not contain <meta name=”robots” content=”noindex” /> or x-robots-tag: noindex in the server response.
All website pages to which you plan to attract traffic should be available for search engines. An exception is for pages that have been banned on purpose.
11. Endless URLs are not generated
An error in the code, or CMS features, can lead to an endless generation of URLs, which in turn uses up the crawl budget and creates a large number of junk pages which can be added to the index. It is necessary to avoid this and identify this problem at the testing stage.
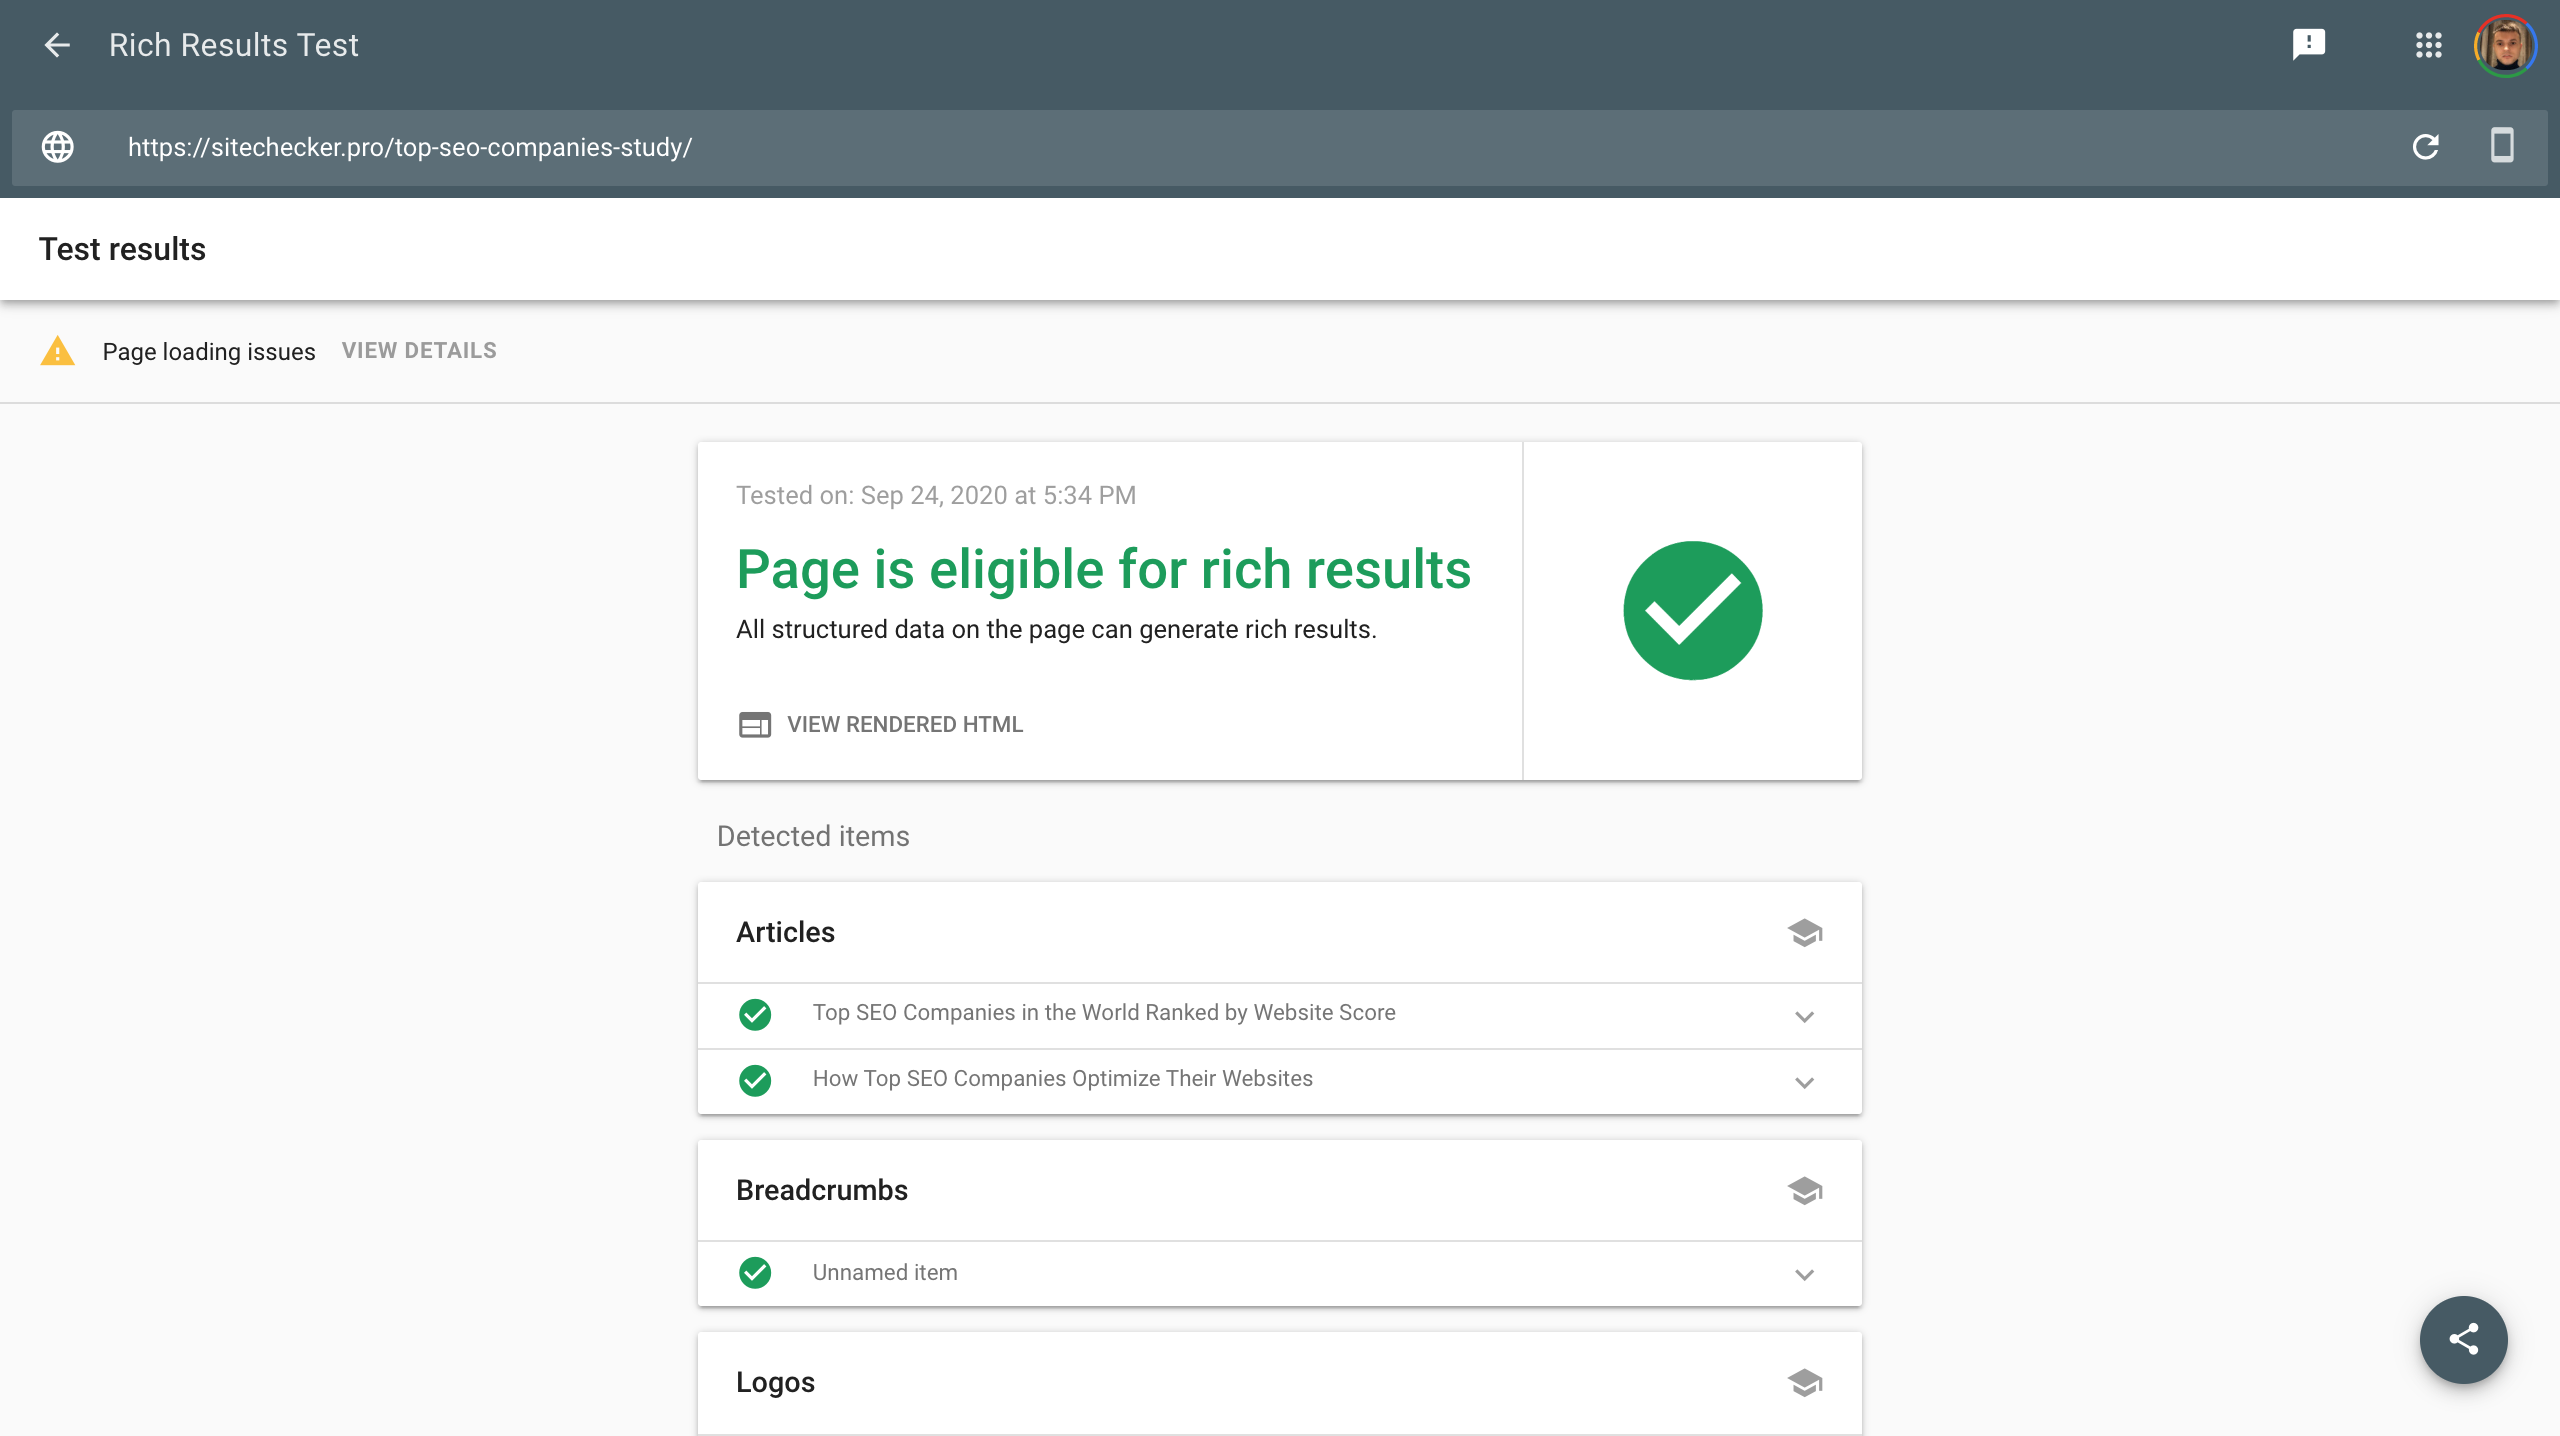
12. All microdata is valid and correctly set up
Check the page templates using an old structured data testing tool or an updated version and make sure there are no errors.
Markup validation testing for the page https://sitechecker.pro/top-seo-companies-study/.
13. Server response status
All pages on the site give a response of a 200 server, except for those which do not exist and have been removed. For remote pages it is recommended to use a 410 server response.
Only pages with a 200 server response will be indexed by the robot.
14. Internal link format
All links on the site are made with the <a> tag and by clicking on them you get a 200 server response. The bot navigates the site using the <a> tag. All links should use this particular tag to transfer the weight of the links and navigate the bot on the site.
15. Multi-language settings
For multi-lingual sites, test the availability of hreflang tags and their proper performance. Also remember that sometimes not all pages from hreflang group are crawled.
In our page analysis tool you can check these settings in detail for each page.

16. Pagination
Check pagination performance and its availability for the search robot. It is not advisable to close pagination and specify canonical for all pages to the first page of the site or use for the second and further pages <meta name=”robots” content=”noindex” />. Remember that Google has already ceased processing the prev / next directives.
17. Loading speed
It should be checked again after migration, as the test environment does not provide an objective assessment.
18. General redirects testing
Make sure that:
- The website is only accessible via one protocol, i.e. sites using HTTPS are redirected to the corresponding page using the HTTPS protocol when accessing using the HTTP protocol. For example, http://site.com/page/ redirects to https://site.com/page/ using a 301 redirect.
- URLs are only available with or without www and are redirected to the appropriate version when addressing. For example, https://www.site.com/page/ redirects to https://site.com/page/ using a 301 redirect or vice versa, depending on your URL structure.
- The page is only accessible via one URL with or without a tailing slash. For example, https://site.com/page/ redirects to https://site.com/page or vice versa using a 301 redirect, depending on your URL structure.
- URLs in upper case are redirected to URLs in lower case using a 301 redirect or canonical which points to URLs in lower case.
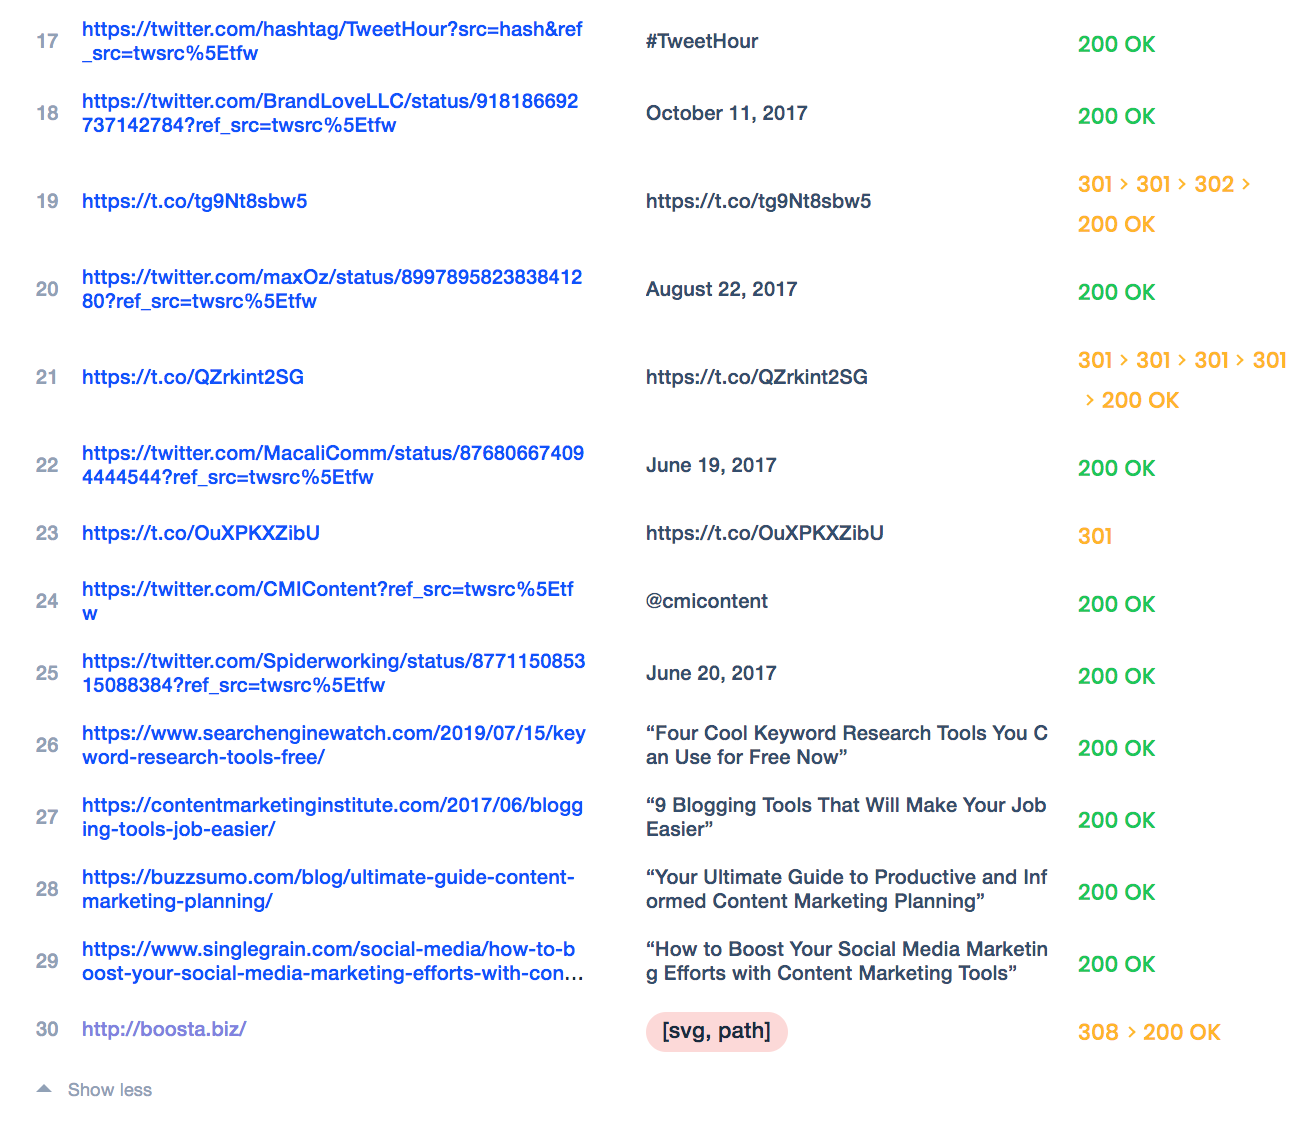
Example of a quick check of the status code of internal links on the page with Sitechecker Chrome Extension
19. XML sitemaps
You should create a sitemap with all indexed pages of the old site and a separate sitemap with all indexed pages of the new site.
A sitemap with the old addresses will help the search engine find redirections to new URLs faster, while a sitemap with new URLs will help find new page addresses.
Make sure that the sitemap meets the Google requirements:
- it contains to 50 000 URL;
- it has UTF-8 coding;
- file size does not exceed 50Mb;
- a file is available;
- a file contains only URLs indexed with the 200 server response and not canonized to other URLs.
20. HTML sitemap
Make sure that a HTML sitemap contains new and only indexed URLs.
21. Optimization for mobile devices
Make sure the site is optimized for mobile devices. This is extremely important for the search engine. All your website templates should be optimized for mobile devices and have no display problems.
Make sure that the mobile and desktop versions of the website contain the same:
- title;
- description;
- H1 heading;
- canonical tags;
- meta robots;
- internal links;
- structured data.
If you use the AMP page, check the validity using the tool https://search.google.com/test/amp.
22. Mixed content errors
If you have migrated from HTTP to HTTPS, or just had this problem before, you should definitely fix Mixed content errors.
All website content, CSS, JS, images, should only be downloaded using the secure HTTPS protocol, otherwise browsers will show a message that your website is not secure, which will lead to bad user experience.
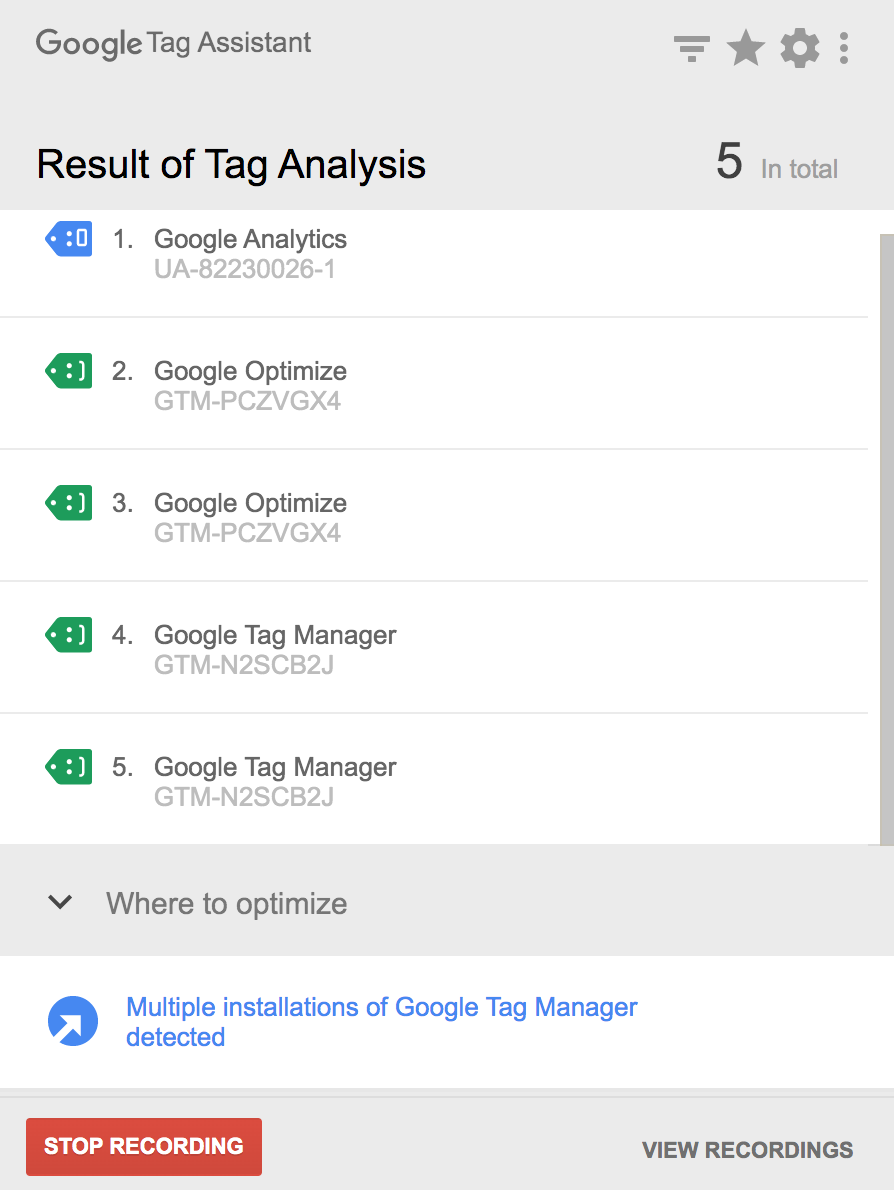
23. Third-party code
Make sure that the Google Analytics code has been moved and configured appropriately. For this purpose, you can go to Google Analytics and see the traffic in real time or use the Google Tag Assistant extension for Chrome.
Example of checking Google Analytics, Google Optimize, Google Tag Manager codes
Launching website migration
When you have identified the best launch time, mentioned at the beginning of this article, move the site as quickly as possible. As long as the site is not available, all website references should report a server response 503: Service Unavailable.
Inform users in advance about planned migration and the approximate time of the website inaccessibility. After migration, carry out spot checks to ensure that things are under control:
- Remove the IP address restriction, if you have set it.
- Remove access by login and password, if you have set it.
- Check that scanning of the site is allowed in the robots.txt file.
- Check that there is no prohibition of indexing using X-Robots-tag in the server response or <meta name=”robots” content=”noindex” />.
- Check whether the main pages of the sites are scanned and indexed and whether the content has been fully migrated to them.
- Check that all redirections are working correctly.
- Check that the canonical tags are set correctly.
- Add sitemaps to the Google Search Console.
Note! If the test environment is to become the main one, update the DNS settings so that they now point to the test environment. This should only be done if you are not copying the website from the test environment to the work one, but directly transform it into the work one.
Monitoring after migration
Once the new site is launched, you must redouble your efforts to monitor the site.
Keep track of the following parameters:
- Total site traffic.
- Traffic to the most important pages.
- Conversions.
- Bounce rate.
- Number of indexed pages of the site.
- Number of indexed pages in categories (for this purpose create separate XML sitemaps for each section and upload them to Google Search Console).
- 404 Errors.
- 301 Errors.
- Page load time.
It may take 1-2 months for the situation to be completely settled down, and you should keep your finger on the pulse all the time.
Add the site to the monitoring list
Sitechecker will audit the site every day and notify you of critical errors