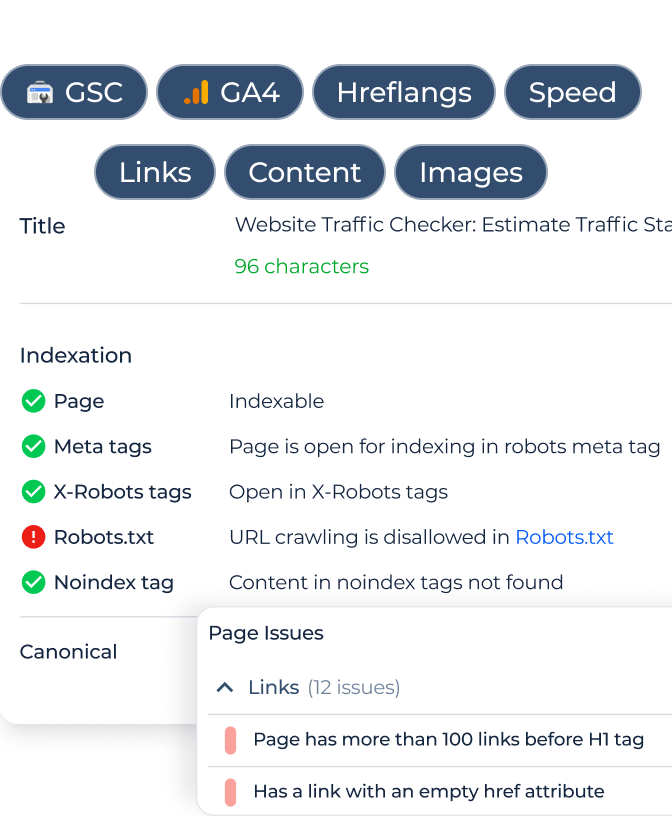
What is a Robot’s Meta Tag?
A robots meta tag is a snippet of code placed in the <head> section of a web page to provide directives to search engine crawlers (or “robots”) about how they should index or not index the content of the page. It acts as a guidepost for these crawlers, telling them what they should and shouldn’t do when they encounter the page.
For instance, if you have content that you don’t want to appear in search engine results (like a private landing page or a temporary promotion), you can use the robots meta tag to instruct search engines not to index that particular page. Alternatively, if there’s a section of your site you want crawlers to avoid altogether, the robots meta tag can also communicate this directive.
The primary use of this tag is to optimize how search engines interact with your site, ensuring that the content you want to be visible in search results is accessible, while keeping private or less relevant content out of the spotlight.
Example
To better understand how a robots meta tag functions, let’s take a look at a few common examples:
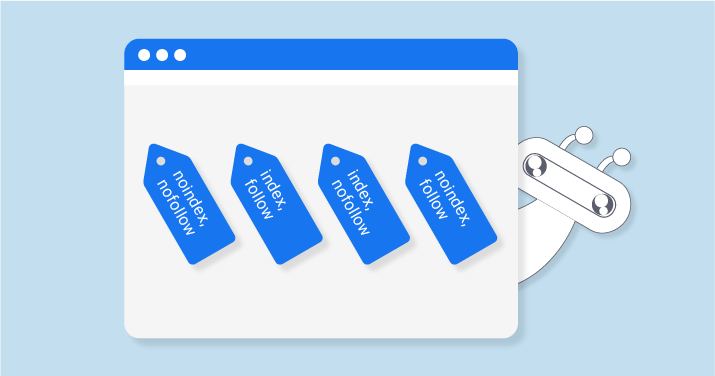
1. Noindex and Nofollow:
<meta name="robots" content="noindex, nofollow">This directive tells search engine crawlers not to index the content of the page (meaning it won’t appear in search results) and also not to follow the links on the page.
2. Index and Nofollow:
<meta name="robots" content="index, nofollow">This instruction allows the page to be indexed (and therefore appear in search results) but tells the crawlers not to follow the links on the page.
3. Noindex but Follow:
<meta name="robots" content="noindex, follow">Meta Robots vs. Robots.txt
When it comes to controlling how search engine crawlers interact with your website, both the meta robots tag and the robots.txt file play pivotal roles. However, they function in different ways and serve distinct purposes. Understanding these differences is key to optimizing your website’s visibility and ensuring crawlers access your content in the manner you intend.
Meta Robots:
- Definition: The meta robots tag is an HTML element placed in the <head> section of a web page.
- Function: It provides specific directives to search engines about how they should treat an individual page. For instance, a meta robots tag can instruct search engines not to index a page or not to follow the links on that page.
- Flexibility: Offers granular control on a page-by-page basis, allowing you to specify different directives for different pages.
- Common Directives: noindex, nofollow, noarchive, and nosnippet.
Robots.txt:
- Definition: The robots.txt is a text file placed in the root directory of a website.
- Function: It provides guidelines to search engine crawlers about which parts of the site they can or cannot access. While it can prevent crawlers from accessing certain parts of a site, it doesn’t prevent the pages from being indexed.
- Flexibility: Works at a broader level, typically controlling access to directories or entire sections of a website rather than individual pages.
- Common Directives: Disallow (to prevent crawling of specific URLs) and Allow (to permit crawling, often used after a broader Disallow directive).
Key Differences:
- Scope: Meta robots work at the page level, while robots.txt operates at the directory or site level.
- Purpose: While both can prevent crawling, only meta robots can prevent indexing of a page. A page blocked by robots.txt can still be indexed if there are external links pointing to it.
- Enforcement: robots.txt is more of a guideline, and not all crawlers respect it. In contrast, most reputable search engines will adhere to the directives in a meta robots tag.
- Visibility: The robots.txt file is publicly accessible (e.g., www.yourdomain.com/robots.txt), allowing anyone to see which sections of your site you prefer not to be crawled. Meta robots tags, on the other hand, are found within the page’s code and are less immediately visible.
In Practice: When using both tools in tandem, it’s crucial to ensure they don’t conflict. For instance, if you block a page with robots.txt, search engines won’t see the meta robots tag on that page since they can’t access it. As a result, strategic coordination between the two is essential for effective SEO management.
Why is the Robots Meta Tag Important for SEO?
Search Engine Optimization (SEO) is all about ensuring that your website gets the visibility it deserves in search engine results pages (SERPs). To achieve this, search engines must be able to access, understand, and index your content correctly. The robots meta tag plays a crucial role in this process, guiding search engines on how to treat specific pages on your site. Here’s why the robots meta tag is vital for SEO:
1. Granular Control Over Indexation:
– The robots meta tag allows website owners to exert granular control over which pages get indexed and which don’t. This is particularly useful for pages that you might not want to appear in search results, such as internal search results, private pages, or temporary landing pages.
2. Avoiding Duplicate Content Issues:
– Search engines aim to provide users with the best and most relevant content. When multiple pages with similar or identical content are indexed, it dilutes the relevance and can lead to penalties or ranking drops. With the robots meta tag, you can instruct search engines not to index specific pages, ensuring that only the most relevant and unique content gets ranked.
3. Managing Crawl Budget:
– Search engines allocate a certain amount of resources to crawl each site, known as the “crawl budget”. By using the robots meta tag to prevent indexing of unimportant or irrelevant pages, you ensure that search engines spend more of their resources crawling and indexing the important parts of your site.
4. Controlling Link Equity:
– The `nofollow` directive in the robots meta tag allows site owners to control the flow of link equity (or “link juice”) within their site. By preventing search engines from following links on certain pages, you
can better channel the distribution of internal link equity to the most important pages.
5. Enhanced User Experience:
– By ensuring only relevant pages appear in SERPs, you enhance the user experience. Users are more likely to find what they’re looking for and view your site as a valuable resource.
6. Keeping Sensitive Information Private:
– If there’s information you don’t want publicly available in search results (e.g., exclusive offers, internal data, or test pages), the robots meta tag ensures these pages remain private.
7. Flexibility and Quick Implementation:
– Unlike server-level directives or changes to the `robots.txt` file, adding or modifying a robots meta tag is relatively quick and doesn’t require server access. This makes it an agile solution for SEO professionals.
8. Staying Updated with Search Engine Changes:
– Search engines are continually evolving, and the way they interpret and act on directives can change. The robots meta tag allows for adaptability, ensuring that as search engines evolve, webmasters can easily modify their directives to suit new best practices.
In conclusion, the robots meta tag is a powerful tool in the SEO toolkit. By giving site owners the ability to communicate directly with search engines about how to treat their content, it ensures that their SEO efforts are directed efficiently and effectively. Proper usage can lead to better rankings, increased visibility, and overall improved performance in search results.H2: What are the values and attributes of a robots meta tag?
The name attribute and user-agent values
The `name` attribute in the robots meta tag specifies which user-agents (often referring to search engine crawlers) the directive is intended for. Each search engine crawler has its distinct user-agent name, such as “Googlebot” for Google’s main web crawler or “Bingbot” for Bing.
For example:
html:
<meta name="robots" content="noindex">In the above example, the `name` attribute is set to “robots,” which means the directive applies to all search engine crawlers. If you wanted to target a specific crawler, you would replace “robots” with that crawler’s specific user-agent name.
The content attribute and crawling/indexing directives
The `content` attribute contains the directives for the crawlers. These directives guide the search engines on what actions to take or avoid on a particular page. Let’s dive into some of these directives:
all
This directive allows all actions for a crawler – it can index the page and follow the links. It’s the default behavior if no other directive is specified.
noindex
This directive instructs search engines not to index the page. As a result, the page won’t appear in search results.
nofollow
Tells search engines not to follow the links on the page. However, the page itself can still be indexed.
none
A combination of `noindex` and `nofollow`. The page won’t be indexed, and the links won’t be followed.
noarchive
Prevents search engines from storing a cached version of the page.
notranslate
Informs search engines not to offer a translation of the page in search results.
noimageindex
Directs search engines not to index images from the page.
unavailable_after:[date]
Tells search engines not to show the page in search results after a specific date.
nosnippet
Prevents search engines from displaying a snippet of the page (like a description or preview) in the search results.
max-snippet:[number]
Specifies a maximum character count for the snippet shown in search results.
max-image-preview:[size]
Defines the maximum size for an image preview in search results. Sizes can be “none,” “standard,” or “large.”
max-video-preview:[number]
Indicates the maximum duration (in seconds) of a video preview in search results.
nositelinkssearchbox
Instructs search engines not to show a site-specific search box in the search results.
indexifembedded
Tells search engines to index the page only if it’s embedded in another page.
Using these directives
Effectively implementing these directives requires careful planning and understanding of your website’s content and goals. Whether you’re trying to manage duplicate content, control crawl budget, or guide search engines to the most vital pages, these directives provide the means to do so. It’s also crucial to regularly audit and update your directives to align with changing content and SEO strategies.
Other Search Engines
While the robots meta tag directives are respected by major search engines like Google, Bing, and Yahoo, it’s essential to note that not all search engines interpret or honor them in the same way. Some search engines may have their unique directives or slight variations in how they interpret standard directives. Always refer to the official documentation of each search engine to ensure you’re using the robots meta tag effectively for that particular search engine.
How to Set Up the Robots Meta Tag
The robots meta tag provides essential directives to search engine crawlers about how to treat specific pages on a website. Whether you want to prevent a page from being indexed or dictate the flow of link equity, these tags come in handy. Setting up these tags might differ based on the platform or CMS you are using. Here’s how to set them up:
Implementing robots meta tags in HTML Code
For those building websites without the use of a CMS or just want to add the tag manually via HTML:
- Decide on the Directive: Determine what you want to achieve, be it `noindex`, `nofollow`, or any other directive.
- Edit the `<head>` Section: Navigate to the HTML code of the page you want to add the meta tag to.
- Add the Meta Tag: In the `<head>` section of your page, insert the following code:
- Save and Publish: Once added, save the changes and publish the page.
- Verify: Use search engine webmaster tools or view the source code to ensure your tag has been implemented correctly.
html:
<meta name="robots" content="YOUR_DIRECTIVE_HERE">Replace `YOUR_DIRECTIVE_HERE` with your chosen directive, such as `noindex` or `nofollow`.
Implementing robots meta tags in WordPress using Yoast SEO
If you’re using WordPress, the Yoast SEO plugin makes implementing robots meta tags straightforward:
- Install Yoast SEO: If you haven’t already, install and activate the Yoast SEO plugin from the WordPress plugin repository.
- Navigate to the Post or Page: Edit the post or page where you want to add the directive.
- Access the Yoast SEO Meta Box: Scroll down to the Yoast SEO meta box below the content editor.
- Go to the ‘Advanced’ Tab: Within the meta box, click on the ‘Advanced’ tab.
- Choose Robots Meta: Here, you’ll find options to set meta robots tags like `noindex` or `nofollow`.
- Update or Publish: Once you’ve made your selection, update or publish your post/page.
- Confirm the Changes: Check the page’s source code or use SEO tools to verify that the robots meta tag has been added correctly.
Robots Meta Tags in Shopify
Shopify also offers a straightforward way to implement robots meta tags:
- Log in to Your Shopify Admin Panel: Access the backend of your Shopify store.
- Navigate to Online Store: From the side menu, choose “Online Store.”
- Go to Themes: Here, you’ll see your active theme and possibly other saved themes.
- Edit Code: Next to your active theme, click on the “Actions” button and then choose “Edit code.”
- Access the Template: Navigate to the template you want to edit, such as `product.liquid` or `page.liquid`.
- Insert the Meta Tag: In the `<head>` section, add your robots meta tag, similar to the HTML method.
- Save: Once done, save your changes.
- Verify Implementation: Always make sure to check the live page to ensure your meta tag is correctly implemented.
Remember, while these methods ensure the implementation of the meta tag, the search engines ultimately decide how to interpret and act on them. It’s always good practice to regularly check and audit these tags to ensure they align with your SEO strategy and goals.
What is an X-Robots-Tag?
The X-Robots-Tag is an HTTP header response that provides directives to search engine crawlers about how to index or not index specific content. While the robots meta tag is placed in the HTML of a webpage, the X-Robots-Tag is part of the HTTP header, making it a powerful tool to control indexing for non-HTML content such as PDFs, images, and other files.
Key Characteristics of the X-Robots-Tag:
- Versatility with Content Types: One of the main advantages of the X-Robots-Tag is its ability to provide directives for a wide range of file types, not just HTML pages. This is especially useful for content such as PDFs, videos, images, and other media that don’t have a traditional `<head>` section in which to place a robots meta tag.
- Similar Directives as Robots Meta Tag: The directives you can use with the X-Robots-Tag are essentially the same as those you’d use with the robots meta tag. For instance, you can specify `noindex` or `nofollow` directives.
- Server-Level Implementation: Because the X-Robots-Tag is part of the HTTP header, you usually set it up at the server level. This might involve editing .htaccess files on an Apache server or making configurations in other types of web servers.
Example of X-Robots-Tag Usage:
Imagine you have a PDF on your website that you don’t want search engines to index. When the search engine crawler requests that PDF, the server can respond with an HTTP header like this:
    HTTP/1.1 200 OK

    Date: Thu, 20 Oct 2023 12:00:00 GMT

    X-Robots-Tag: noindex

    Content-Type: application/pdf
In this example, the `X-Robots-Tag: noindex` directive informs search engines not to index the PDF.
The X-Robots-Tag offers a robust way to control how search engines handle your content, extending the functionality of the more commonly used robots meta tag. It’s a must-know for SEO professionals, especially those dealing with diverse content types and formats beyond just standard web pages.H2: How to set up the X-Robots-Tag
Using X-Robots-Tag on an Apache Server
Apache servers are one of the most popular web servers in use today. If you’re using an Apache server, you can control search engine behavior by adding directives to the `.htaccess` file to leverage the X-Robots-Tag.
Steps to Implement X-Robots-Tag on Apache:
- Access .htaccess File: Locate and open the `.htaccess` file on your server. This file is typically located in the root directory of your website.
- Add Directives: To prevent search engines from indexing a specific file type, say PDFs, you can add the following lines:
- Multiple Directives: If you wish to add multiple directives, you can separate them with a comma. For example, `Header set X-Robots-Tag “noindex, noarchive”`.
- Save and Upload: After making your desired changes, save the `.htaccess` file and upload it back to the server if necessary.
- Verify Implementation: It’s a good practice to check if the HTTP headers are correctly set by using tools like `curl` or by inspecting network traffic in browser developer tools.
        <FilesMatch "\.pdf$">

        Header set X-Robots-Tag "noindex, nofollow"

        </FilesMatch>
This code instructs search engines not to index or follow links in any PDF file on your website.
Using X-Robots-Tag on an Nginx Server
Nginx is another widely used web server. Implementing the X-Robots-Tag on an Nginx server involves editing the server configuration file.
Steps to Implement X-Robots-Tag on Nginx:
- Access Configuration File: Navigate to your Nginx server’s configuration file, typically located at `/etc/nginx/nginx.conf` or within the `sites-available` directory.
- Add Directives: To add the X-Robots-Tag to a specific location or file type, you can use a configuration like:
- For All Files: If you want to set the X-Robots-Tag for all files and locations, you can place the `add_header` directive within the `server` block without a specific location.
- Save and Restart: After adding your directives, save the configuration file and restart the Nginx server to apply changes. This can typically be done with a command like `sudo service nginx restart`.
- Verify: As with Apache, ensure you verify the correct implementation using tools like `curl` or browser developer tools.
    location ~* \.pdf$ {

        add_header X-Robots-Tag "noindex, nofollow";

    }
This directive will prevent search engines from indexing or following links in PDF files.
In both cases, whether using Apache or Nginx, it’s crucial to test and verify the functionality of any changes made to ensure there are no adverse effects on your website’s accessibility or performance.
When to Use the Robots Meta Tag vs. X-Robots-Tag?
The robots meta tag and the x-robots-tag serve similar purposes: they provide directives to search engine crawlers on how to treat specific content. However, the manner and context in which they are used can differ. Let’s explore scenarios in which you’d choose one over the other.
Non-HTML files
- Robots Meta Tag: This tag is placed within the <head> section of an HTML document. Therefore, its primary application is for web pages. It can’t be used for non-HTML files like images, videos, PDFs, etc.
- X-Robots-Tag: Since it’s an HTTP header, it can be applied to any file type that a server serves, including non-HTML files. If you want to prevent search engines from indexing a PDF or an image, for instance, the X-Robots-Tag is the tool for the job.
Key Takeaway: Use the robots meta tag for HTML content and X-Robots-Tag for non-HTML content.
Applying directives at scale
- Robots Meta Tag: To apply a directive using the robots meta tag, you’d need to add the tag to each individual page. This can be cumbersome if you’re dealing with a large number of pages.
- X-Robots-Tag: This tag can be set at the server level to apply to multiple files or file types at once. For example, you can configure your server to add the X-Robots-Tag to every PDF or every image it serves, which can be efficient for large-scale directives.
Key Takeaway: If you need to apply a directive on a large scale or across file types, the X-Robots-Tag may be more efficient.
Traffic from search engines other than Google
- Robots Meta Tag: All major search engines, including Bing, Yahoo, Baidu, and others, recognize and respect the robots meta tag. Its directives are standardized and understood across the industry.
- X-Robots-Tag: Similarly, the X-Robots-Tag is recognized by all major search engines. It’s part of the HTTP standard, so it’s not specific to any one search engine.
Key Takeaway: Both tags are effective across all major search engines. Your choice between them should be based on other criteria, such as content type and scale of application.
Deciding between the robots meta tag and the X-Robots-Tag largely depends on the specific requirements of your content and the scale of implementation. While they can often be used interchangeably for HTML content, the X-Robots-Tag offers broader utility for diverse file types and large-scale applications. Always consider the nature of your content, the breadth of your directives, and your SEO goals when making your choice.
How to Avoid Crawlability and (de)Indexation Mistakes
Ensuring your website is properly crawled and indexed by search engines is crucial for SEO. Mistakes in this area can prevent valuable content from appearing in search results or expose content that should remain hidden. Below are some common mistakes and how to avoid them:
Mistake #1: Adding noindex directives to pages disallowed in robots.txt
- Issue: When a page is disallowed via robots.txt, search engine crawlers won’t access it. If you also add a “noindex” directive, it’s redundant since crawlers can’t see it.
- Solution: Use one method or the other, but not both simultaneously. If you want a page not to be indexed, use “noindex.” If you don’t want it to be crawled, use robots.txt.
Mistake #2: Bad sitemaps management
- Issue: An outdated or improperly structured sitemap can misguide search engine crawlers.
- Solution: Regularly update your sitemap, especially after making significant changes to your site. Ensure that the sitemap adheres to the XML standard and only includes canonical URLs.
Mistake #3: Not removing noindex directives from the production environment
- Issue: Sometimes, “noindex” directives used in staging or development environments are mistakenly left in the live production environment, leading to pages not being indexed.
- Solution: Always review and audit your production site for unintended “noindex” directives. Create a deployment checklist to ensure such mistakes are caught before going live.
Mistake #4: Adding “secret” URLs to robots.txt instead of noindexing them
- Issue: Listing URLs in robots.txt essentially highlights them, and some might access the URLs directly. It’s not a method to keep pages secret.
- Solution: Instead of listing sensitive URLs in robots.txt, use a “noindex” directive or better yet, protect them with a password or place them behind a login.
Adding Robots Directives to the Robots.txt File
- Issue: The robots.txt file is meant for crawl directives, not indexation. Adding meta robots directives here won’t have the intended effect.
- Solution: Use robots.txt only to control crawling. For controlling indexation, rely on the meta robots tag or X-Robots-Tag.
Removing Pages with a ‘Noindex’ Directive from Sitemaps
- Issue: Including “noindex” pages in your sitemap can confuse search engines and is counterproductive.
- Solution: Your sitemap should guide search engines to your most important, indexable content. Ensure that any page with a “noindex” directive is not present in your sitemap.
Not Removing the ‘Noindex’ Directive from a Staging Environment
- Issue: This is similar to Mistake #3 but from the opposite angle. When a staging environment is pushed to production without removing “noindex,” valuable content might not get indexed.
- Solution: Implement a rigorous QA process when migrating from staging to production. Double-check for any “noindex” directives and ensure they’re removed if not needed.
Maintaining optimal crawlability and indexation requires vigilance and a thorough understanding of how search engines interact with your site. Regular audits and adhering to best practices can help avoid these common pitfalls and ensure your content gets the visibility it deserves.
Discover How Many of Your Website’s Pages are Indexed with Google Index Checker
The Google Index Checker is crucial for website owners and SEO professionals, providing a fast way to check how many pages of a website are indexed by Google. This information is key to the site’s search engine visibility, as more indexed pages often mean better online presence, making the tool vital for enhancing SEO strategies.
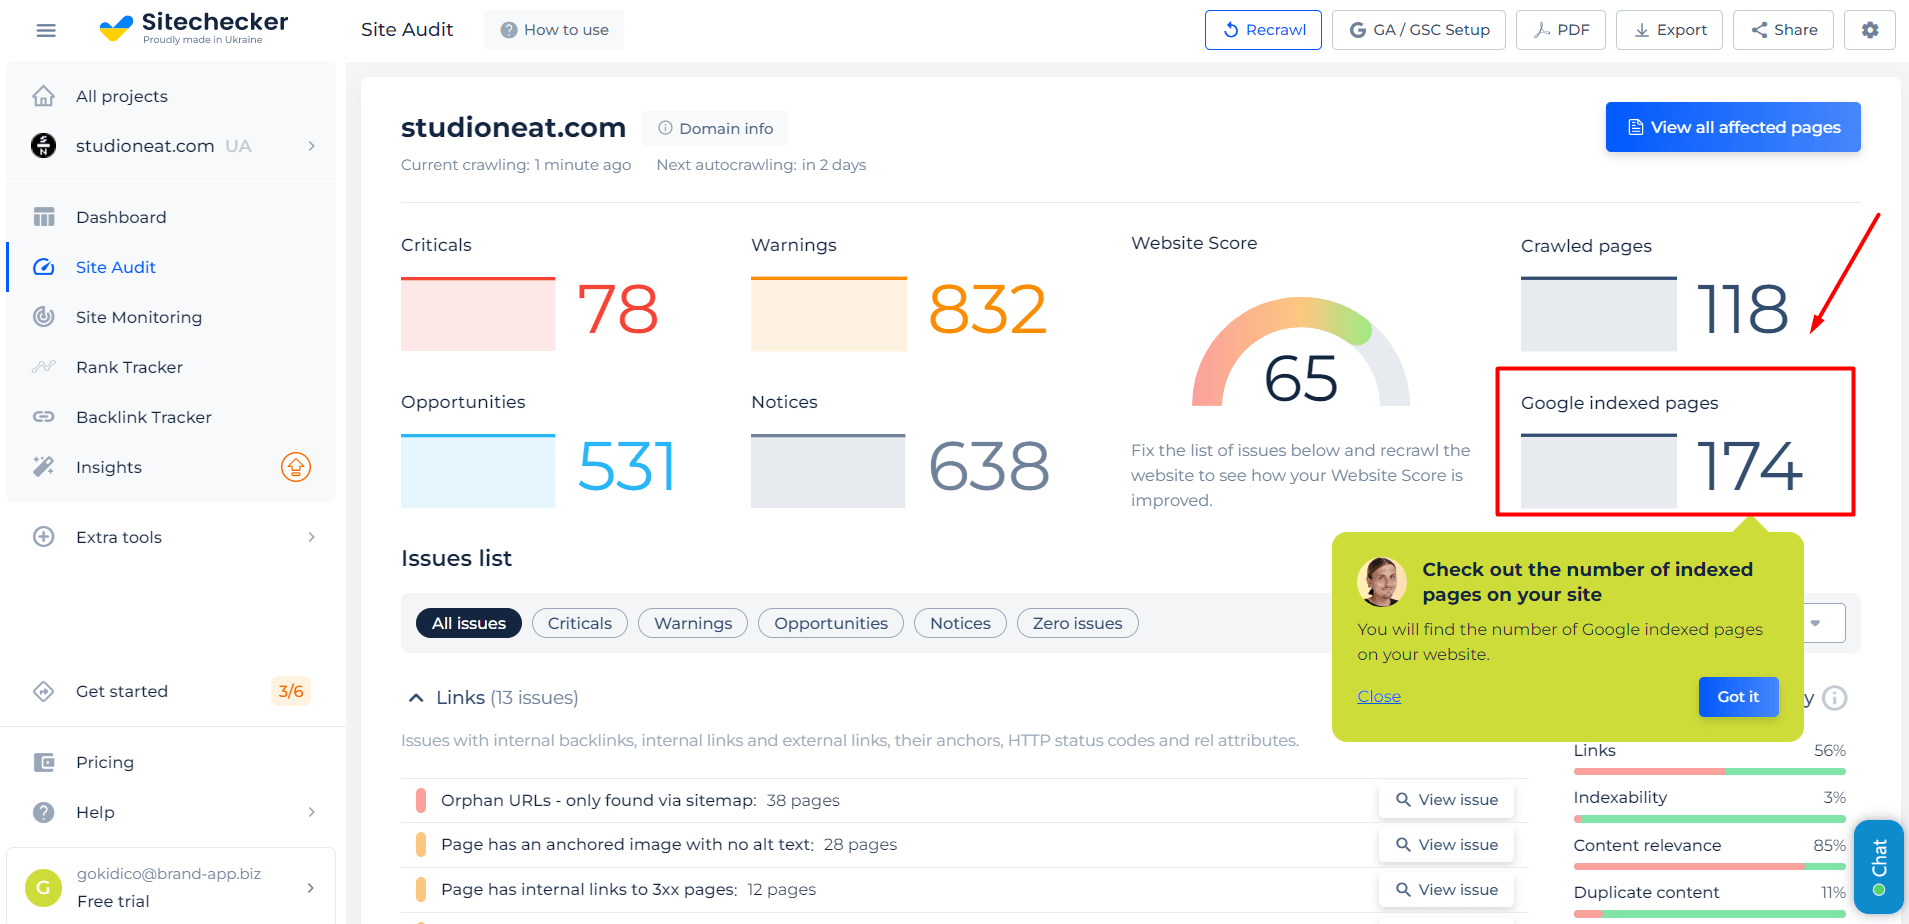
The tool not only shows the number of indexed pages but also identifies which ones are indexed, helping users pinpoint pages absent in Google’s search results for targeted SEO enhancement. Its user-friendly and efficient design makes it a valuable asset for optimizing website performance in search engines.
Check Your Google Index Status Now!
Our Index Checker quickly reveals your indexed pages for better SEO planning.
Conclusion
Ensuring proper crawlability and indexation is foundational to a website’s success in search engines. Missteps, such as unintentional “noindex” directives or sitemap inconsistencies, can have lasting repercussions on a site’s visibility. At the core, it’s about striking a balance: providing clear instructions to search engines about which content to crawl and index, while also safeguarding content that should remain private. Regularly auditing your site’s crawl and index settings and staying updated with best practices will go a long way in securing your site’s position in search results.
