What does “Excluded by ‘noindex’ tag” mean?
The “Excluded by ‘Noindex’ Tag” message in Google Search Console indicates that certain URL’s on your website are intentionally marked with the “noindex” tag. This directive prevents these pages from being indexed by Google and appearing in search results.
Pages like login forms, thank-you pages, or duplicate content are commonly marked with “noindex” to keep them out of search engine indexes. When you see this message, it means that Google has recognized the crawl block directive on these pages and has excluded them from its index accordingly.
Launch Sitechecker’s GSC Dashboard to boost your Search Console reporting!
Expand GSC Data Limits
Bypass Google’s 1,000-row cap and unlock up to 36 months of Search Console history in a single dashboard.
Common causes of the ‘noindex’ tag issue
1. Content management system (CMS) settings
Many CMS platforms, like WordPress or Shopify, automatically apply the “noindex” tag to certain pages, such as archives, search results to prevent them from being indexed.
2. SEO settings misconfiguration
Incorrect settings in SEO configurations can lead to pages being marked with the “noindex” tag, especially during automatic updates or changes in optimization rules.
3. Unintentional inclusion in page templates
Developers might accidentally include the “noindex” tag in page templates or HTML code,ʼunintentionally blocking pages from appearing in search engine results.
    <head>

        <meta name="robots" content="noindex, nofollow">

    </head>
4. Third-party plugins or tools
Some plugins or SEO tools may inadvertently add the “noindex” directive to specific pages without clear indication, especially when settings are adjusted or updated.
Fixing the ‘noindex’ tag issue
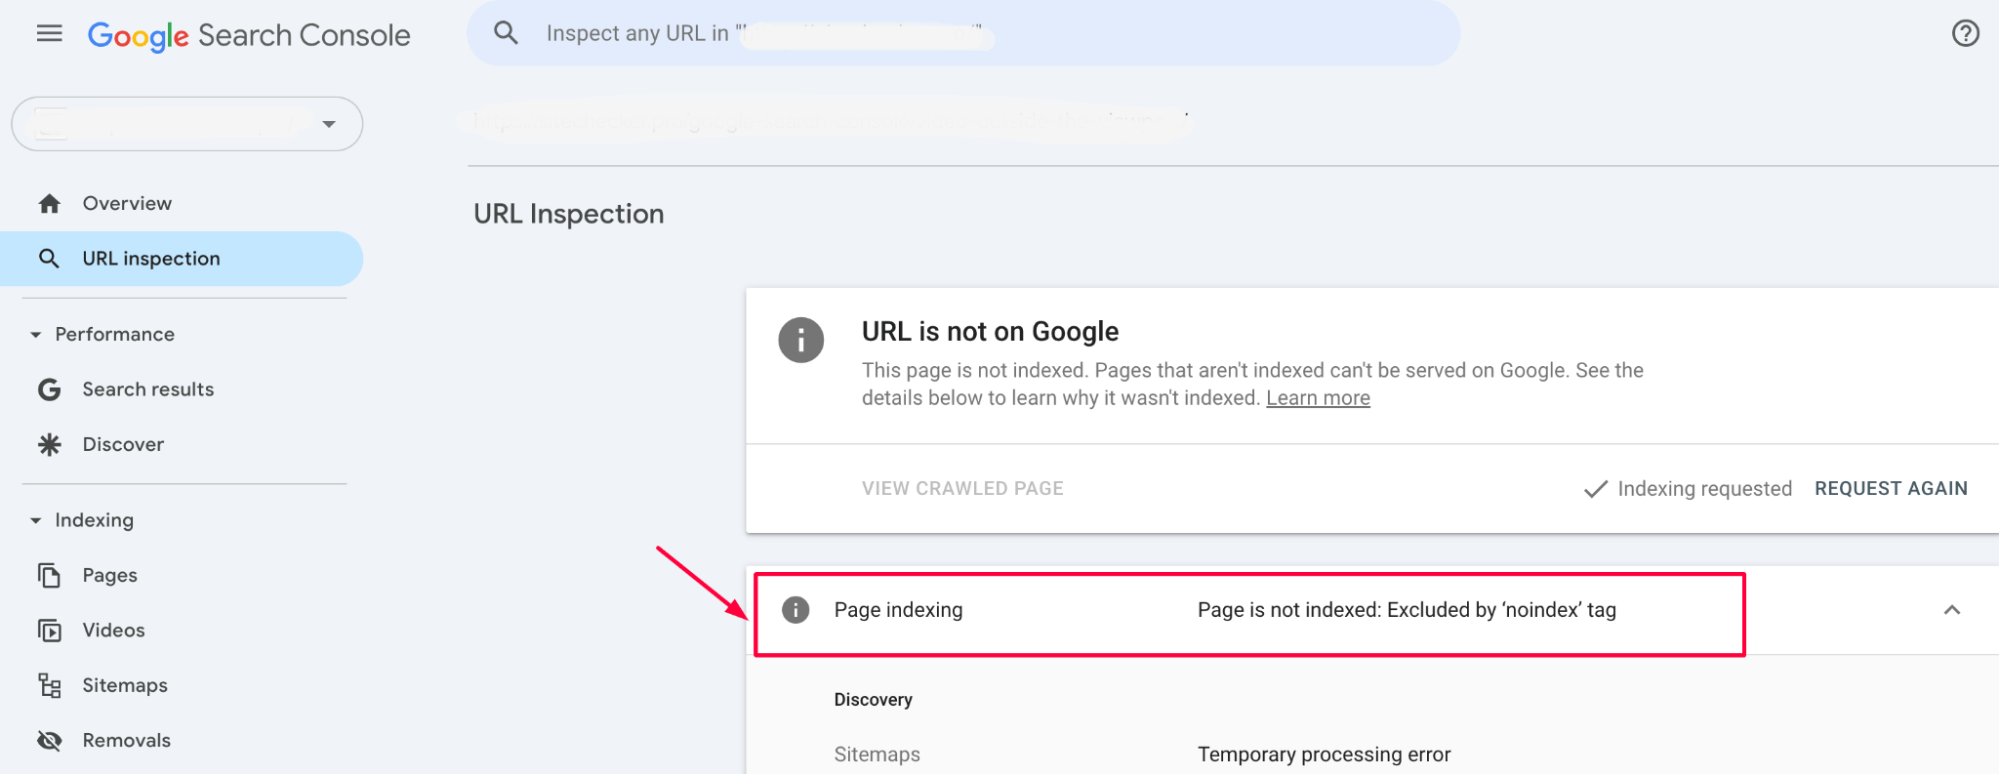
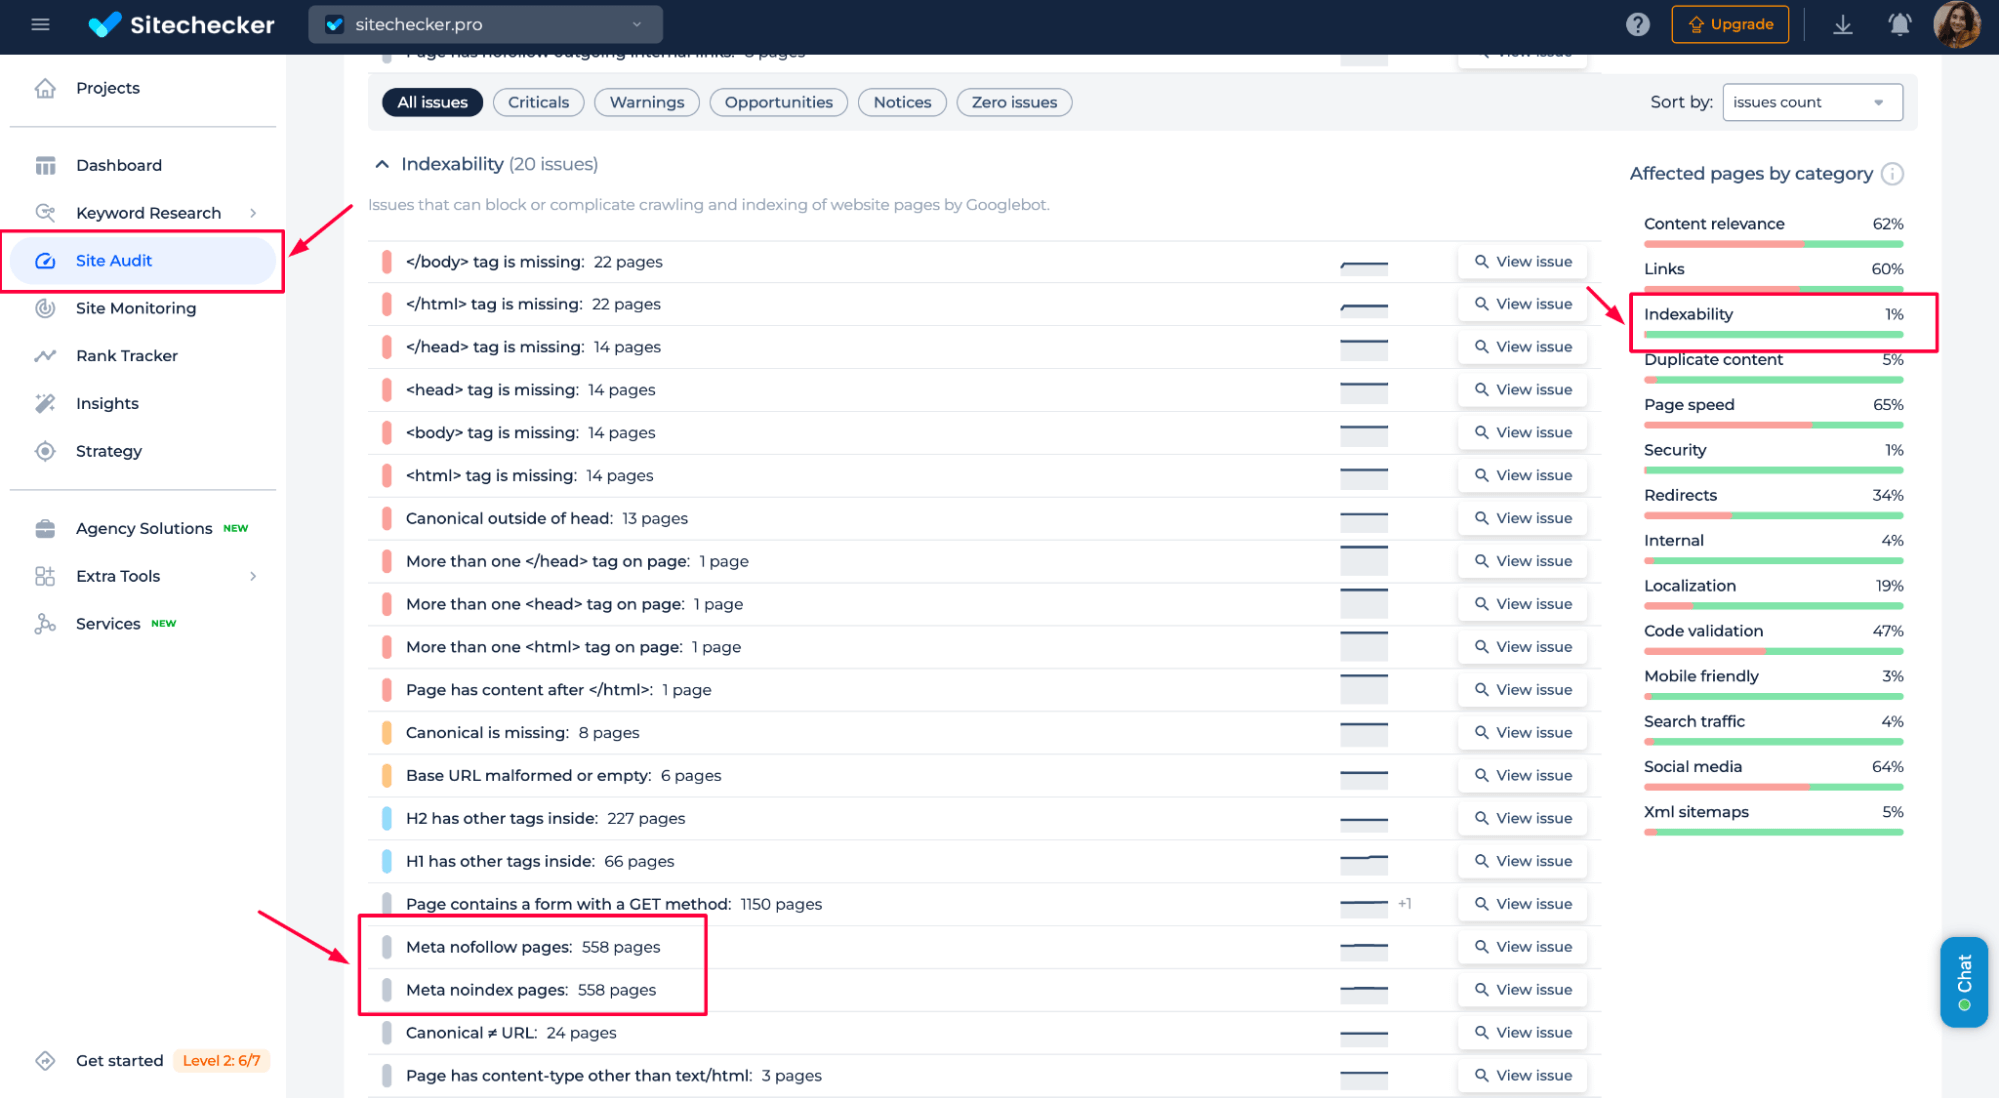
1. Identify the affected pages
Start by reviewing the list of pages marked with the “noindex” in Google Search Console (under Indexing > Pages). This will show you which URL’s are being excluded.
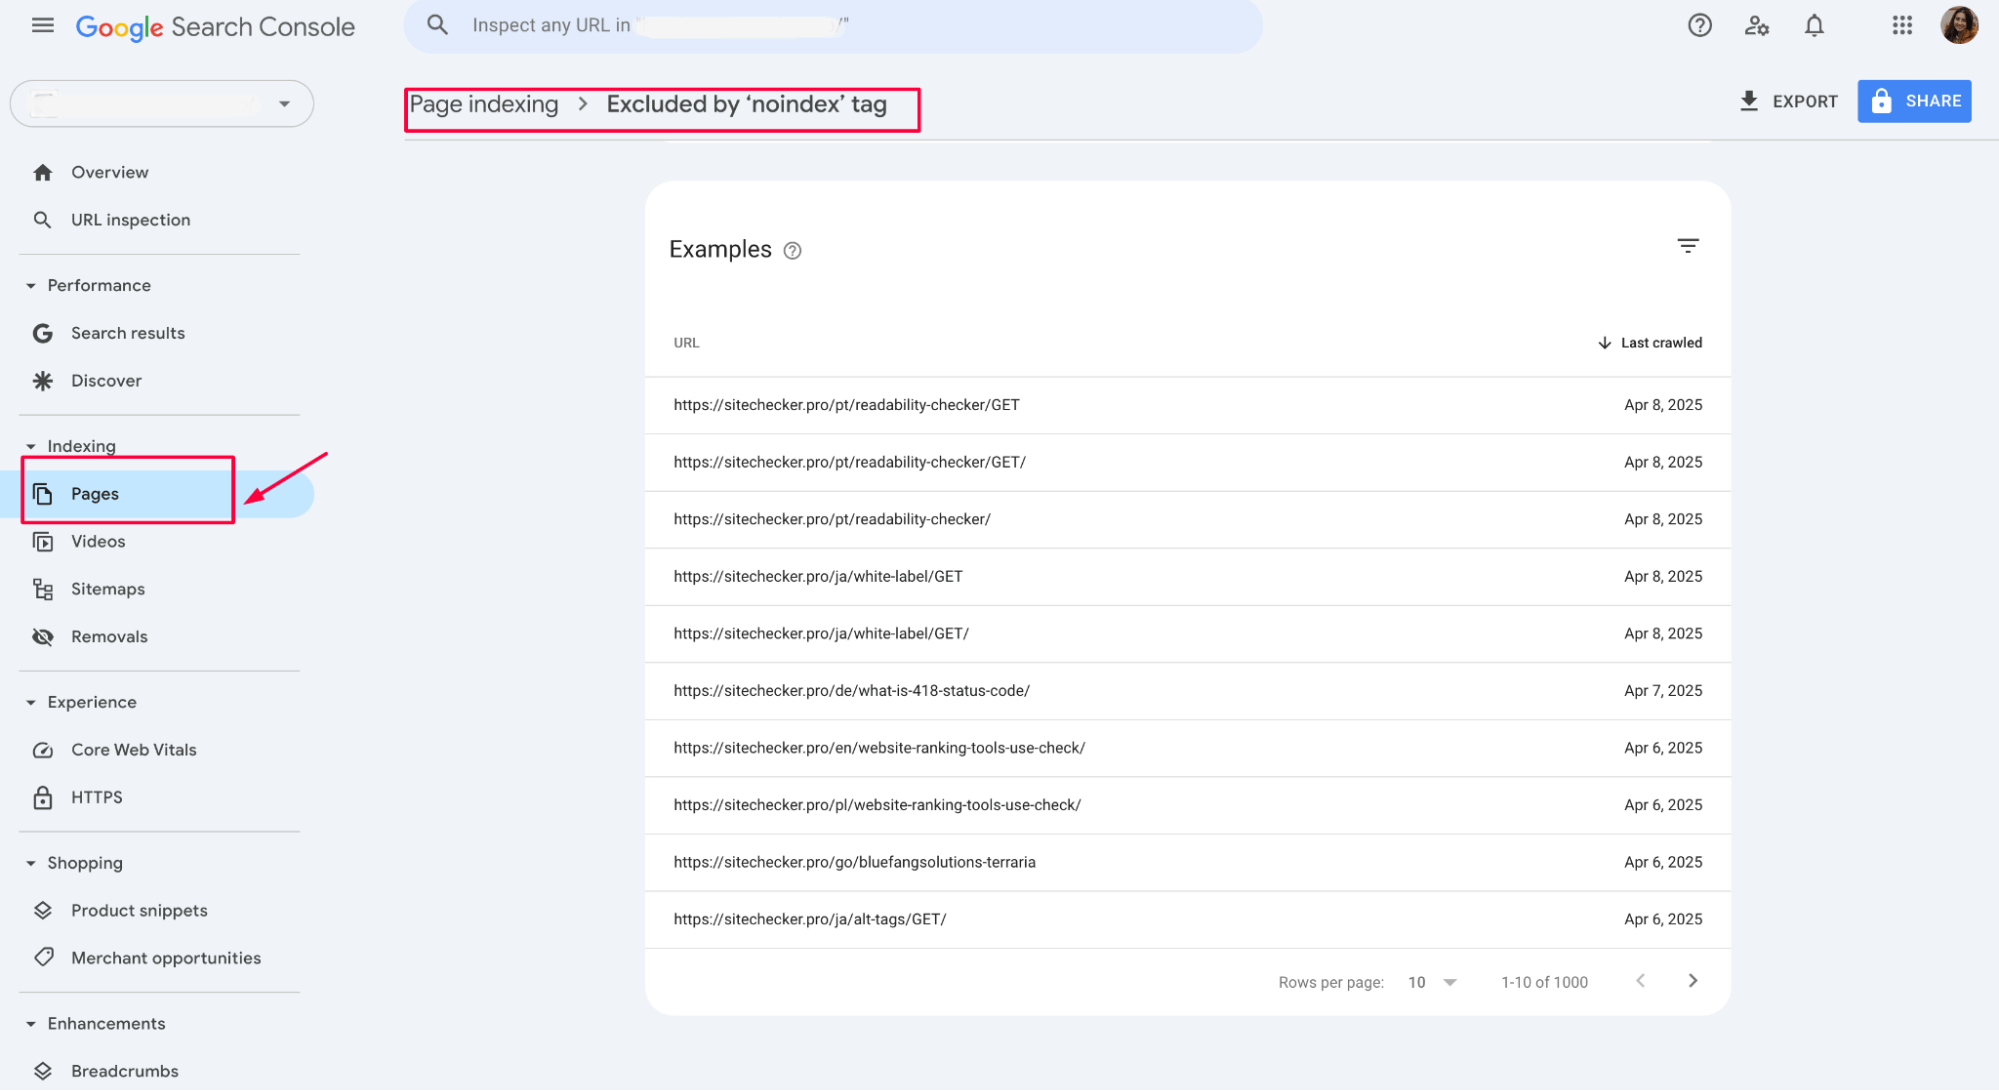
a) Access Google Search Console (GSC)
Login to your GSC account.
b) In the left-hand menu, go to Indexing > Pages
This will show you the status of your website’s pages, including any issues Google encountered during crawling and indexing.
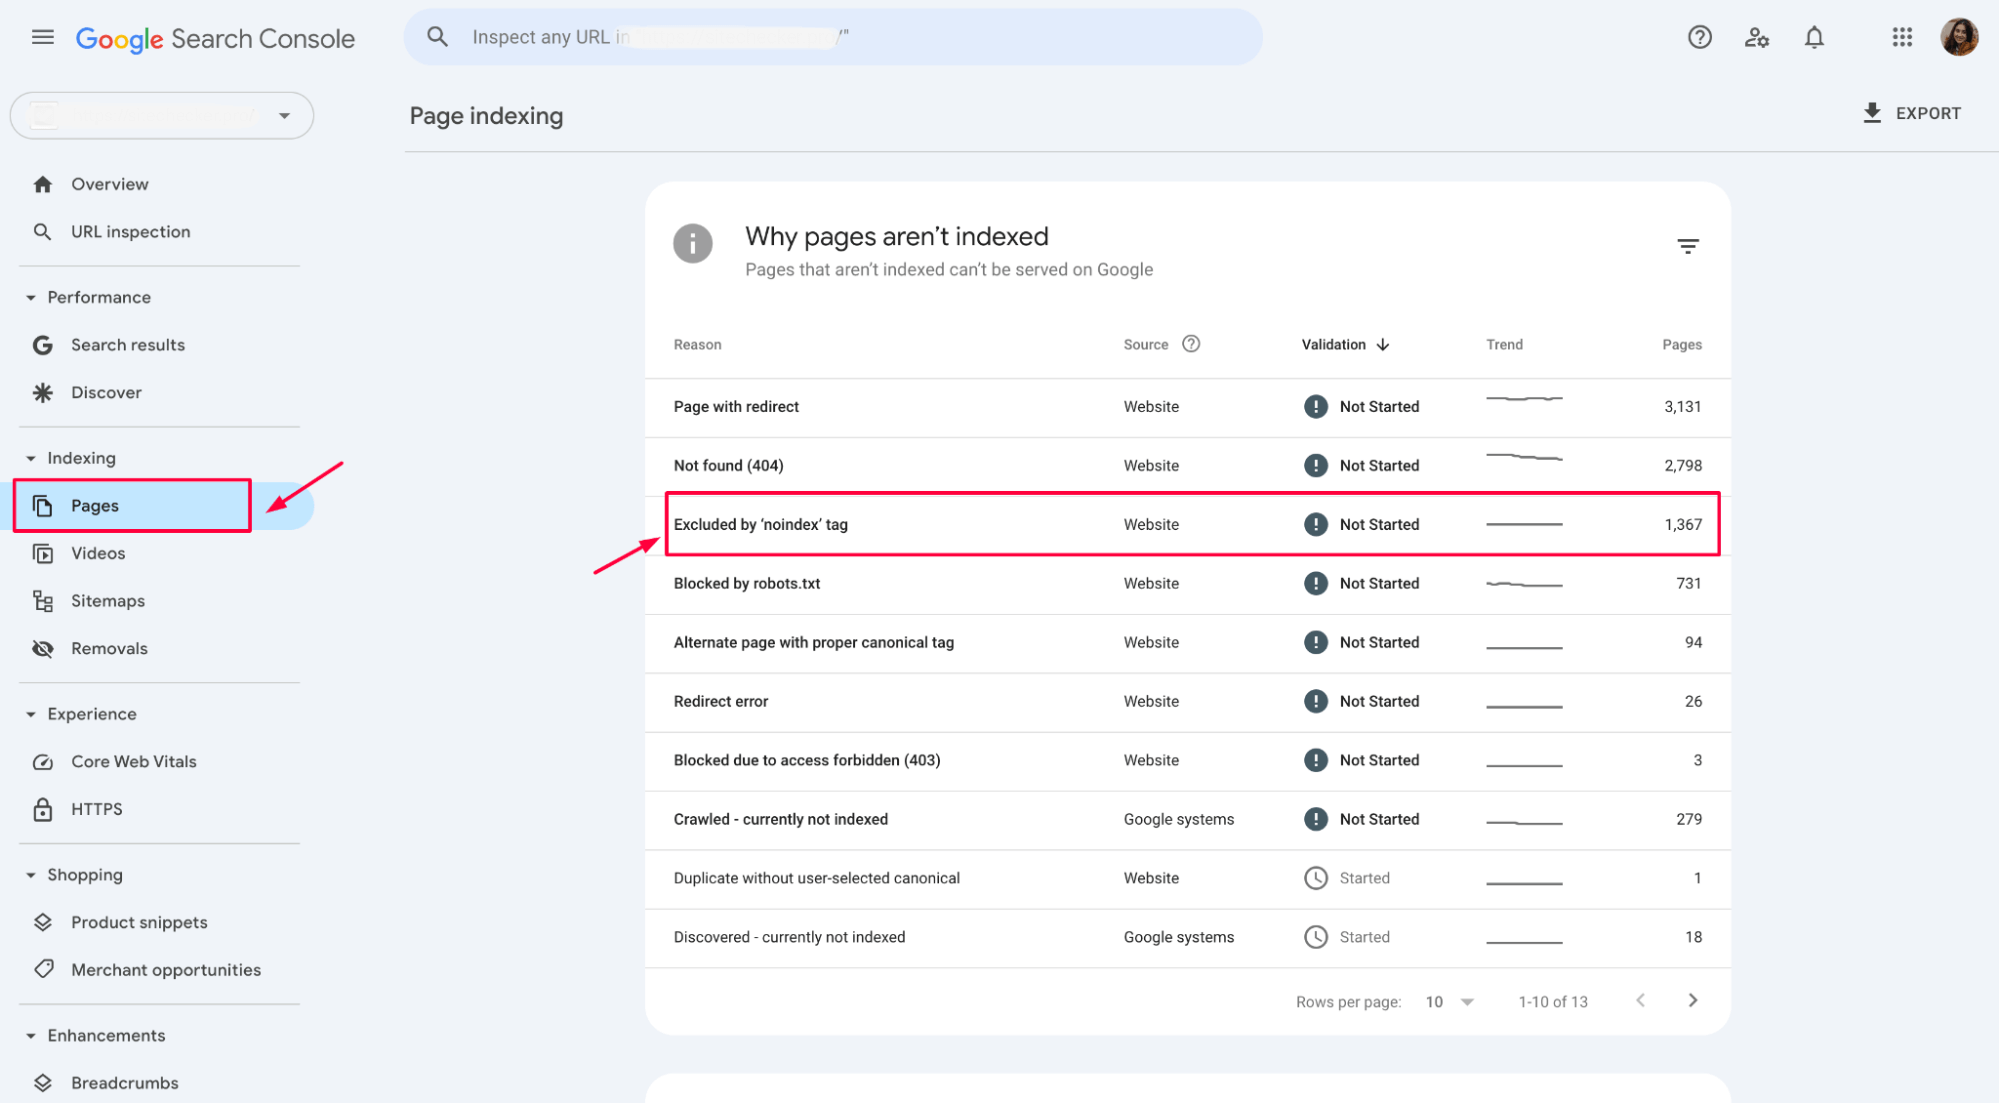
2. Review the “Excluded by ‘noindex’ tag” section
The report also provides the URL of each affected page, helping you identify and address the issue quickly:
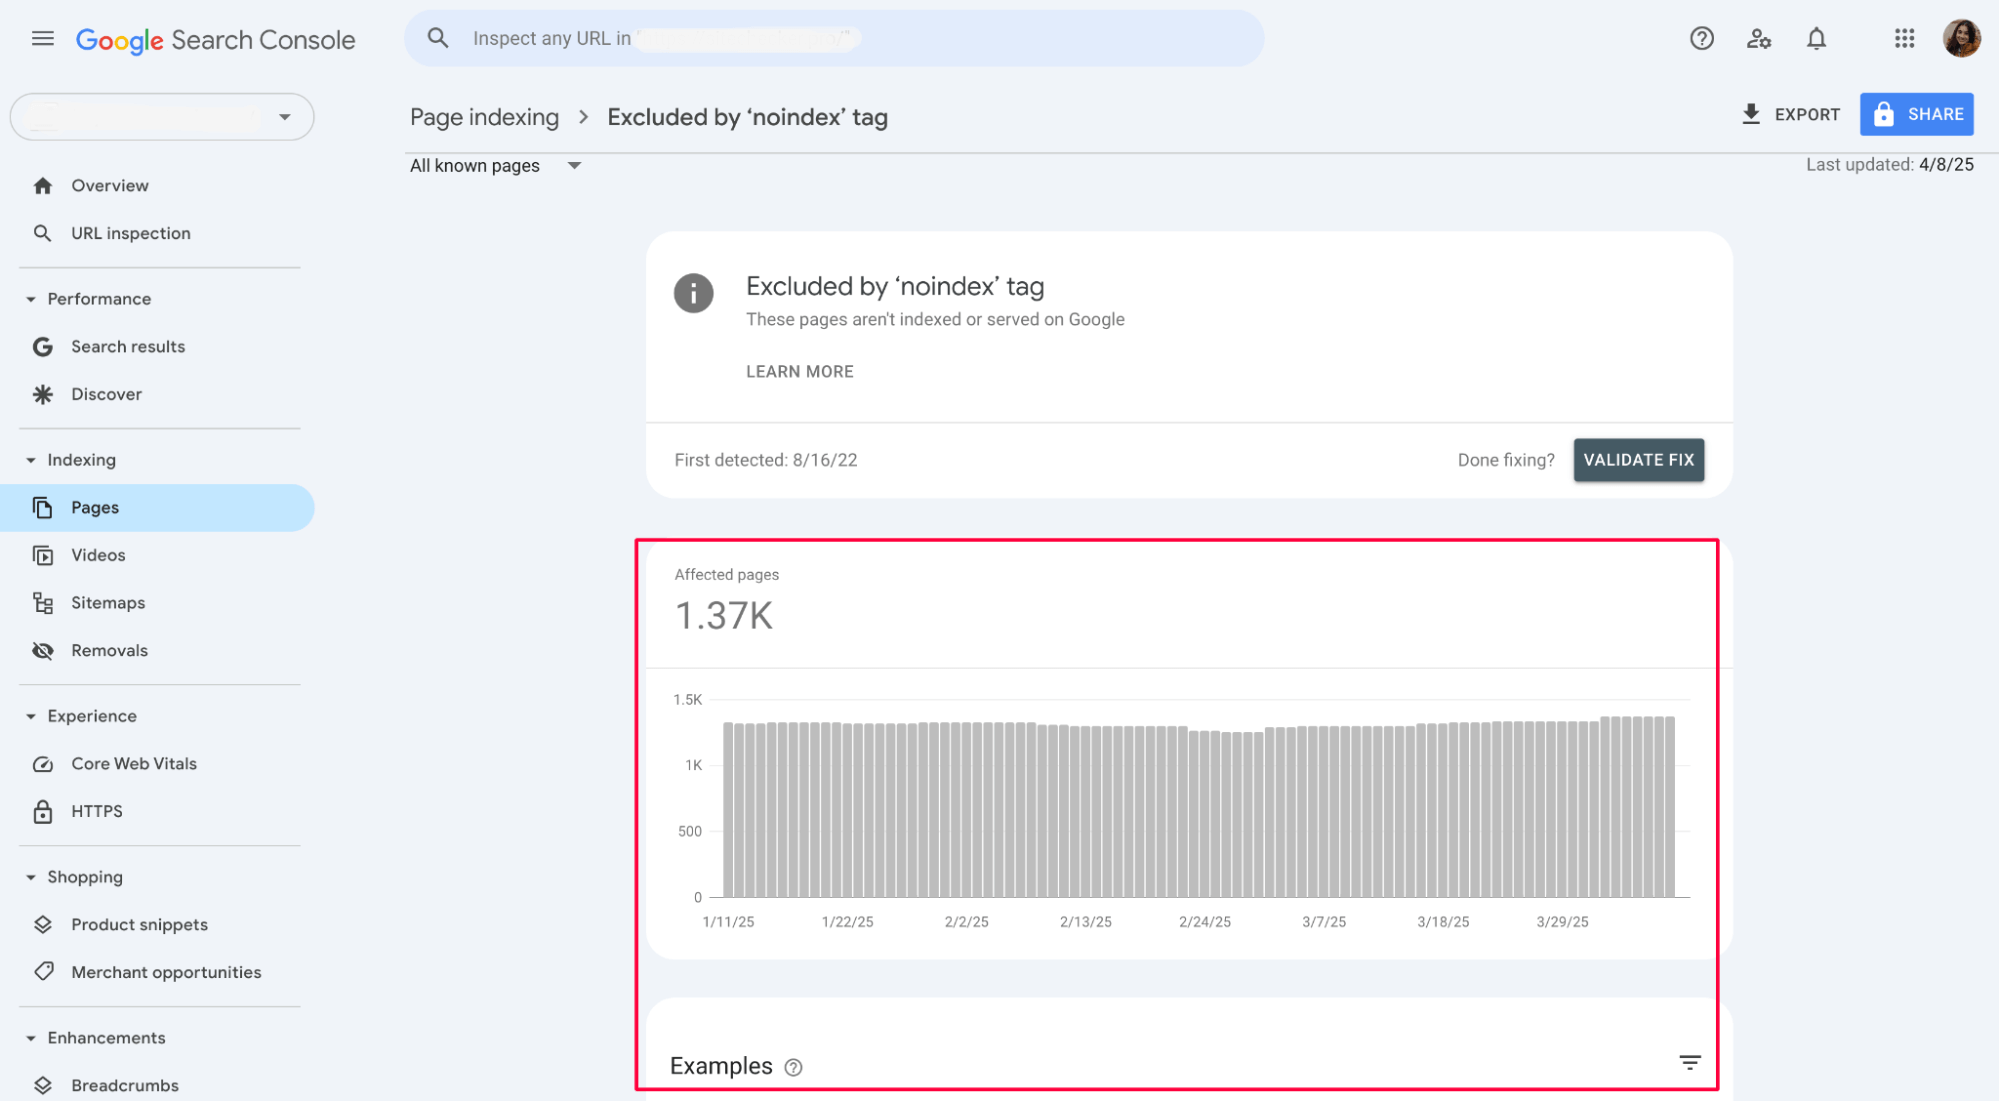
Review the URLs listed to ensure that only the intended pages are excluded from indexing. If you find any valuable pages that shouldn’t have the crawl block directive, proceed to the next steps to remove it.
3. Check the Page’s HTML and HTTP Headers
Open the affected pages and inspect their HTML source code. Look for a <meta name=”robots” content=”noindex, nofollow”> tag within the <head> section.
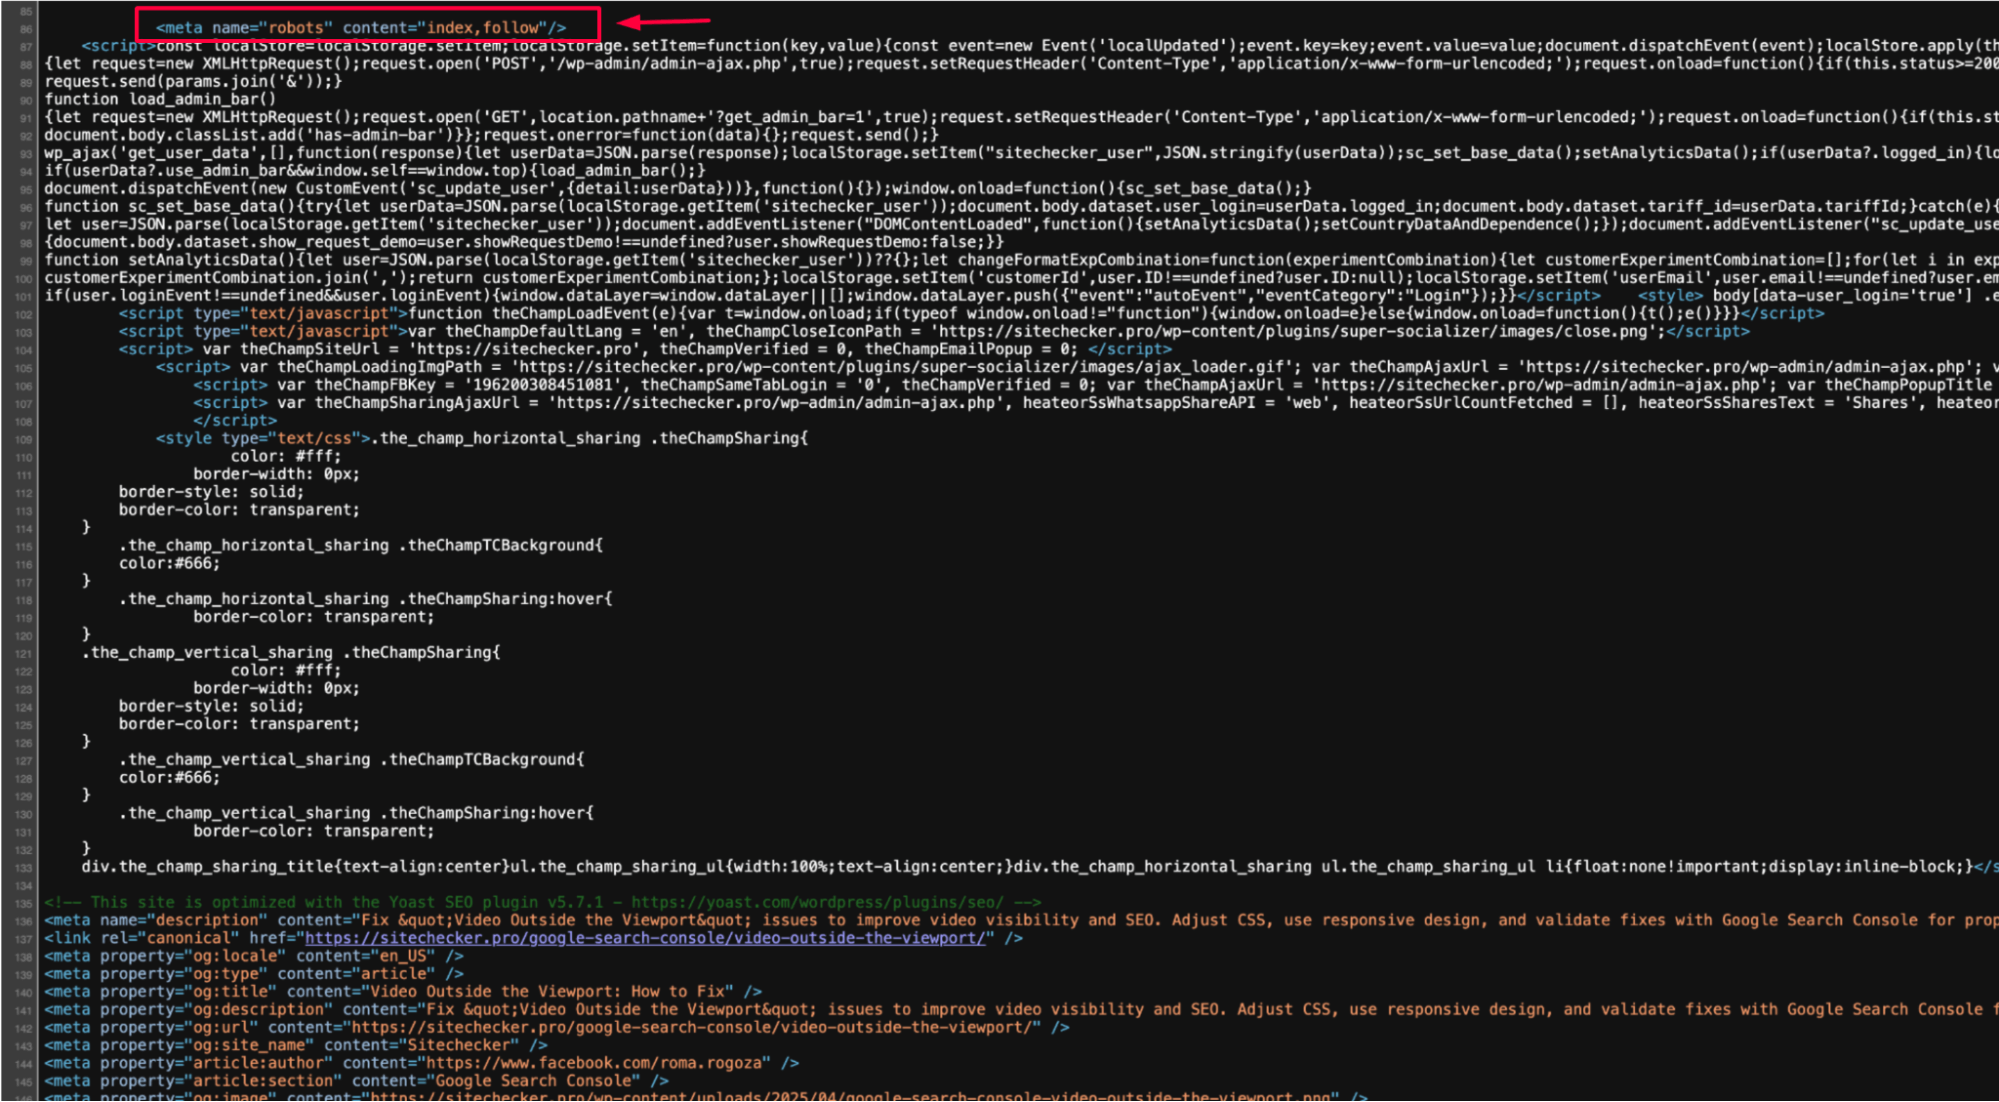
Also, check the HTTP headers for an X-Robots-Tag header that could be blocking indexing:
<!-- Check the Page's HTML for the following -->

<head>

  <meta name="robots" content="noindex, nofollow">

</head>
Additionally, you should check the HTTP headers using a tool like cURL or browser developer tools:
Example of HTTP response with X-Robots-Tag:
HTTP/1.1 200 OK

X-Robots-Tag: noindex, nofollow
This X-Robots-Tag header would also prevent the page from being indexed by search engines. If you find this header, remove it or update it as needed.
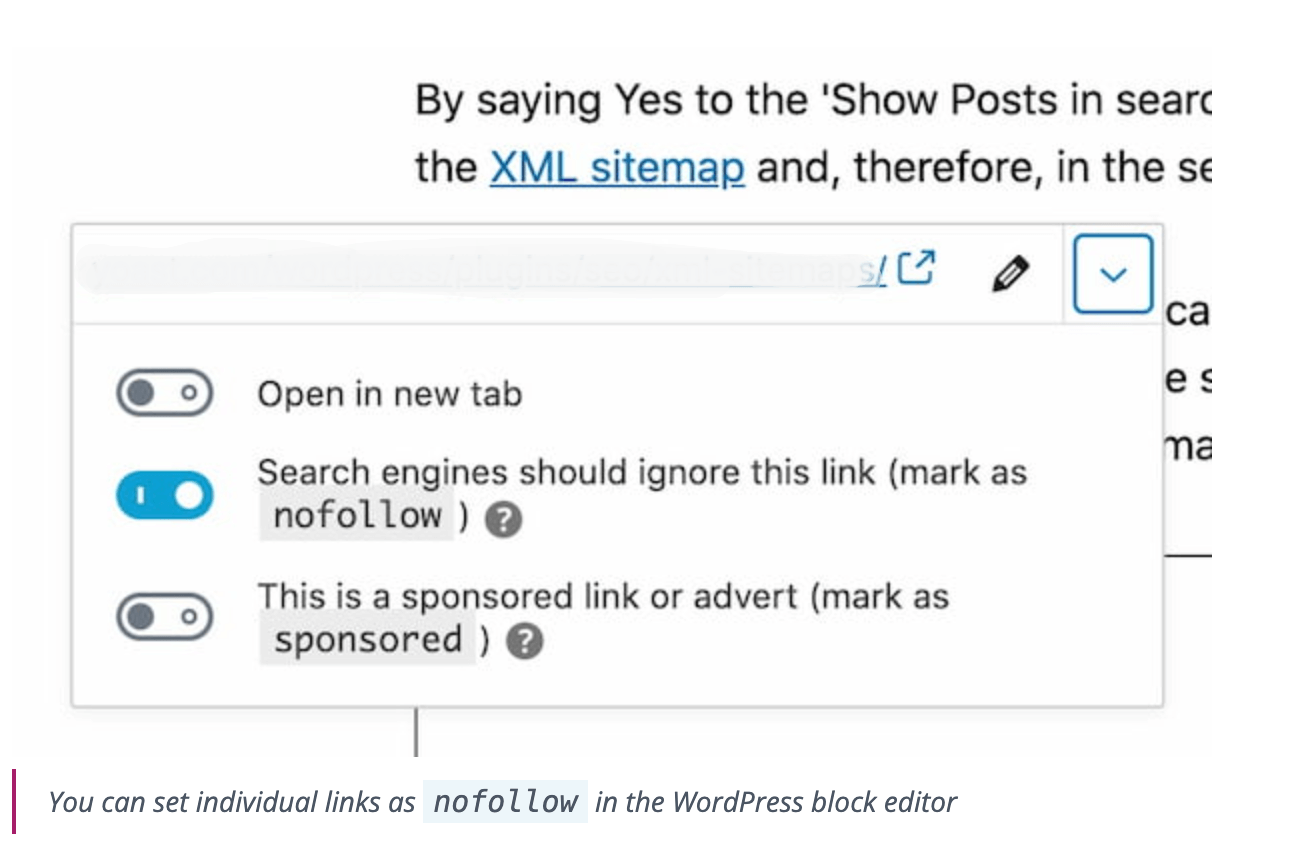
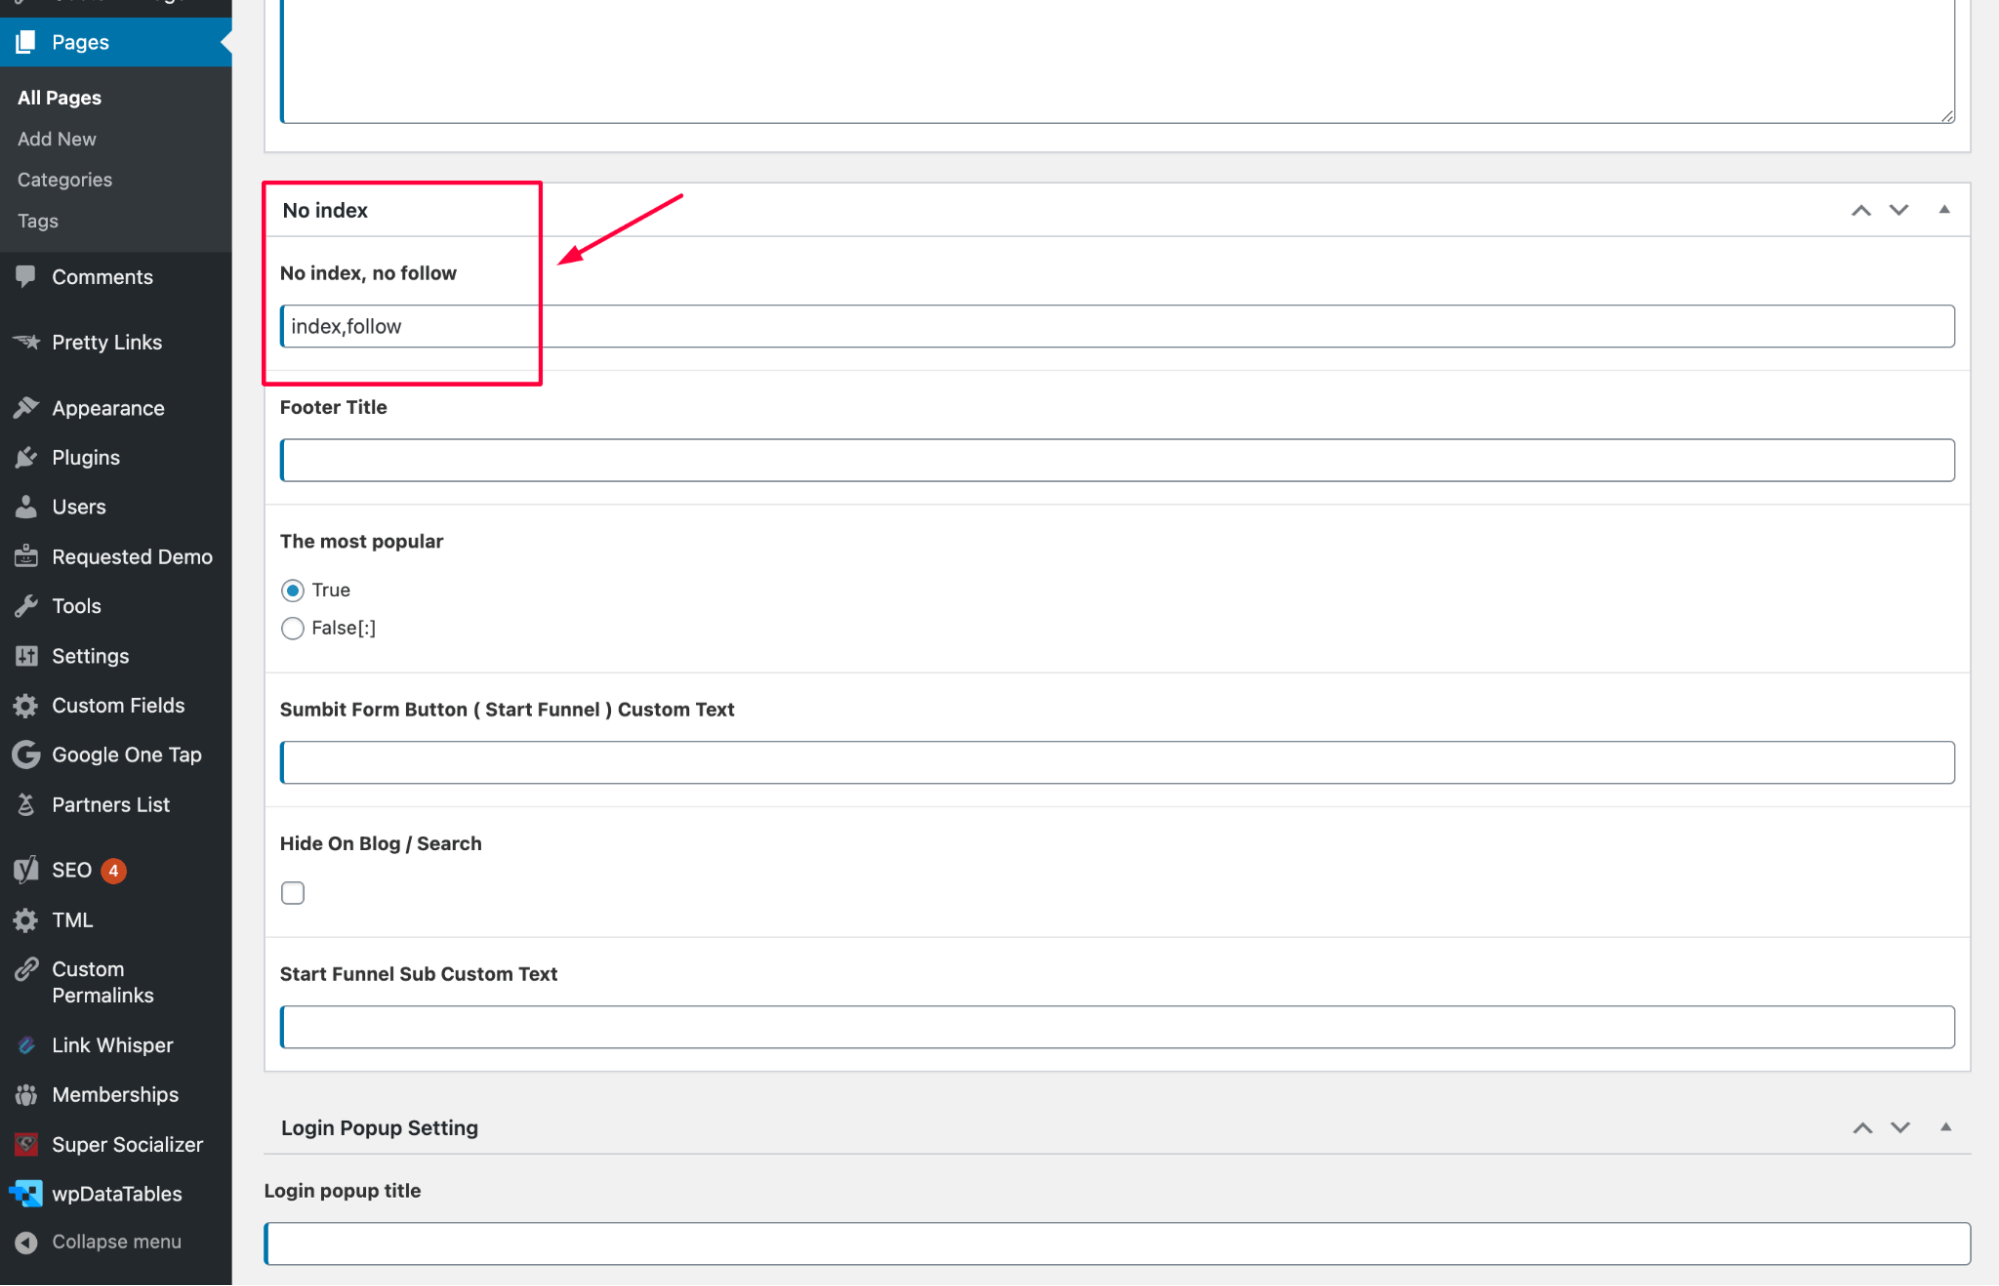
4. Remove the “noindex” tag
If you find the “noindex” tag on a URL that should be indexed, simply remove it:
    <head>

        <meta name="robots" content="index, follow">

    </head>
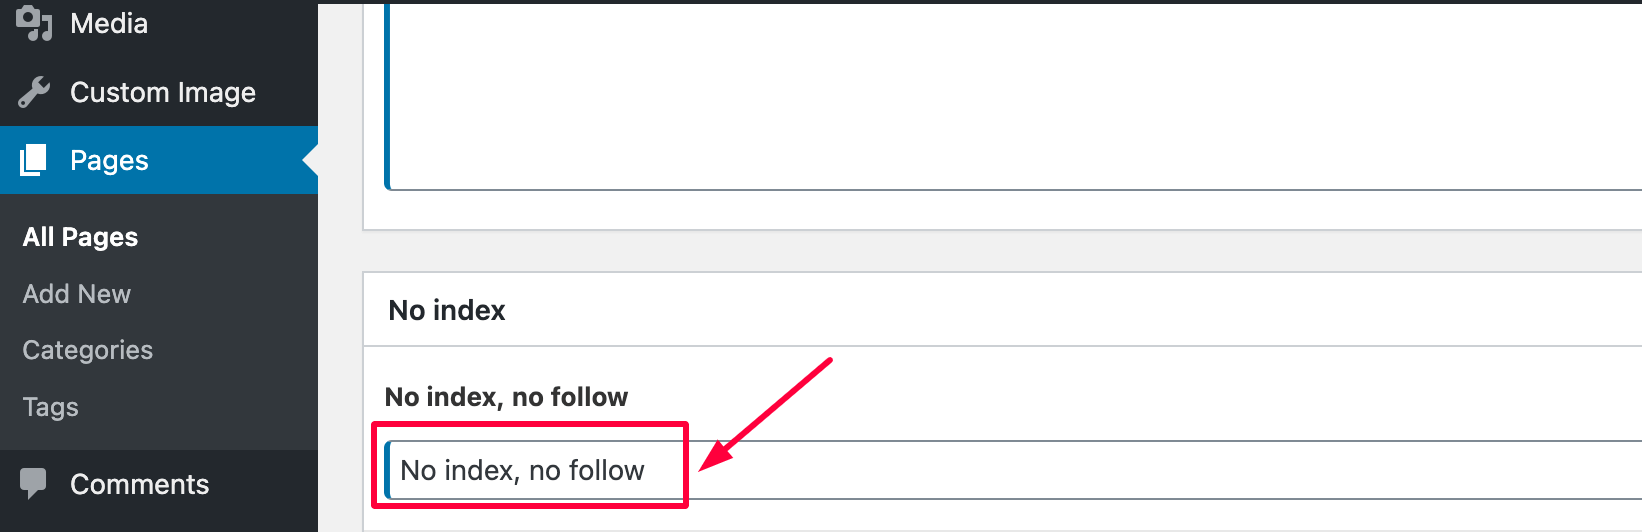
If you’re using a CMS (like WordPress or Shopify), check the settings or plugins that may have applied this directive and update them accordingly:
5. Check for other sources of “noindex”
Sometimes the crawl block directive may be added by other sources, such as your website’s robots.txt file or server-side configurations. Make sure there are no conflicting directives that prevent indexing:
Before (blocking indexing):
    User-agent: *

    Disallow: /private-page/
After (allowing indexing):
    User-agent: *

    Allow: /private-page/
6. Submit fixed pages for reindexing in GSC
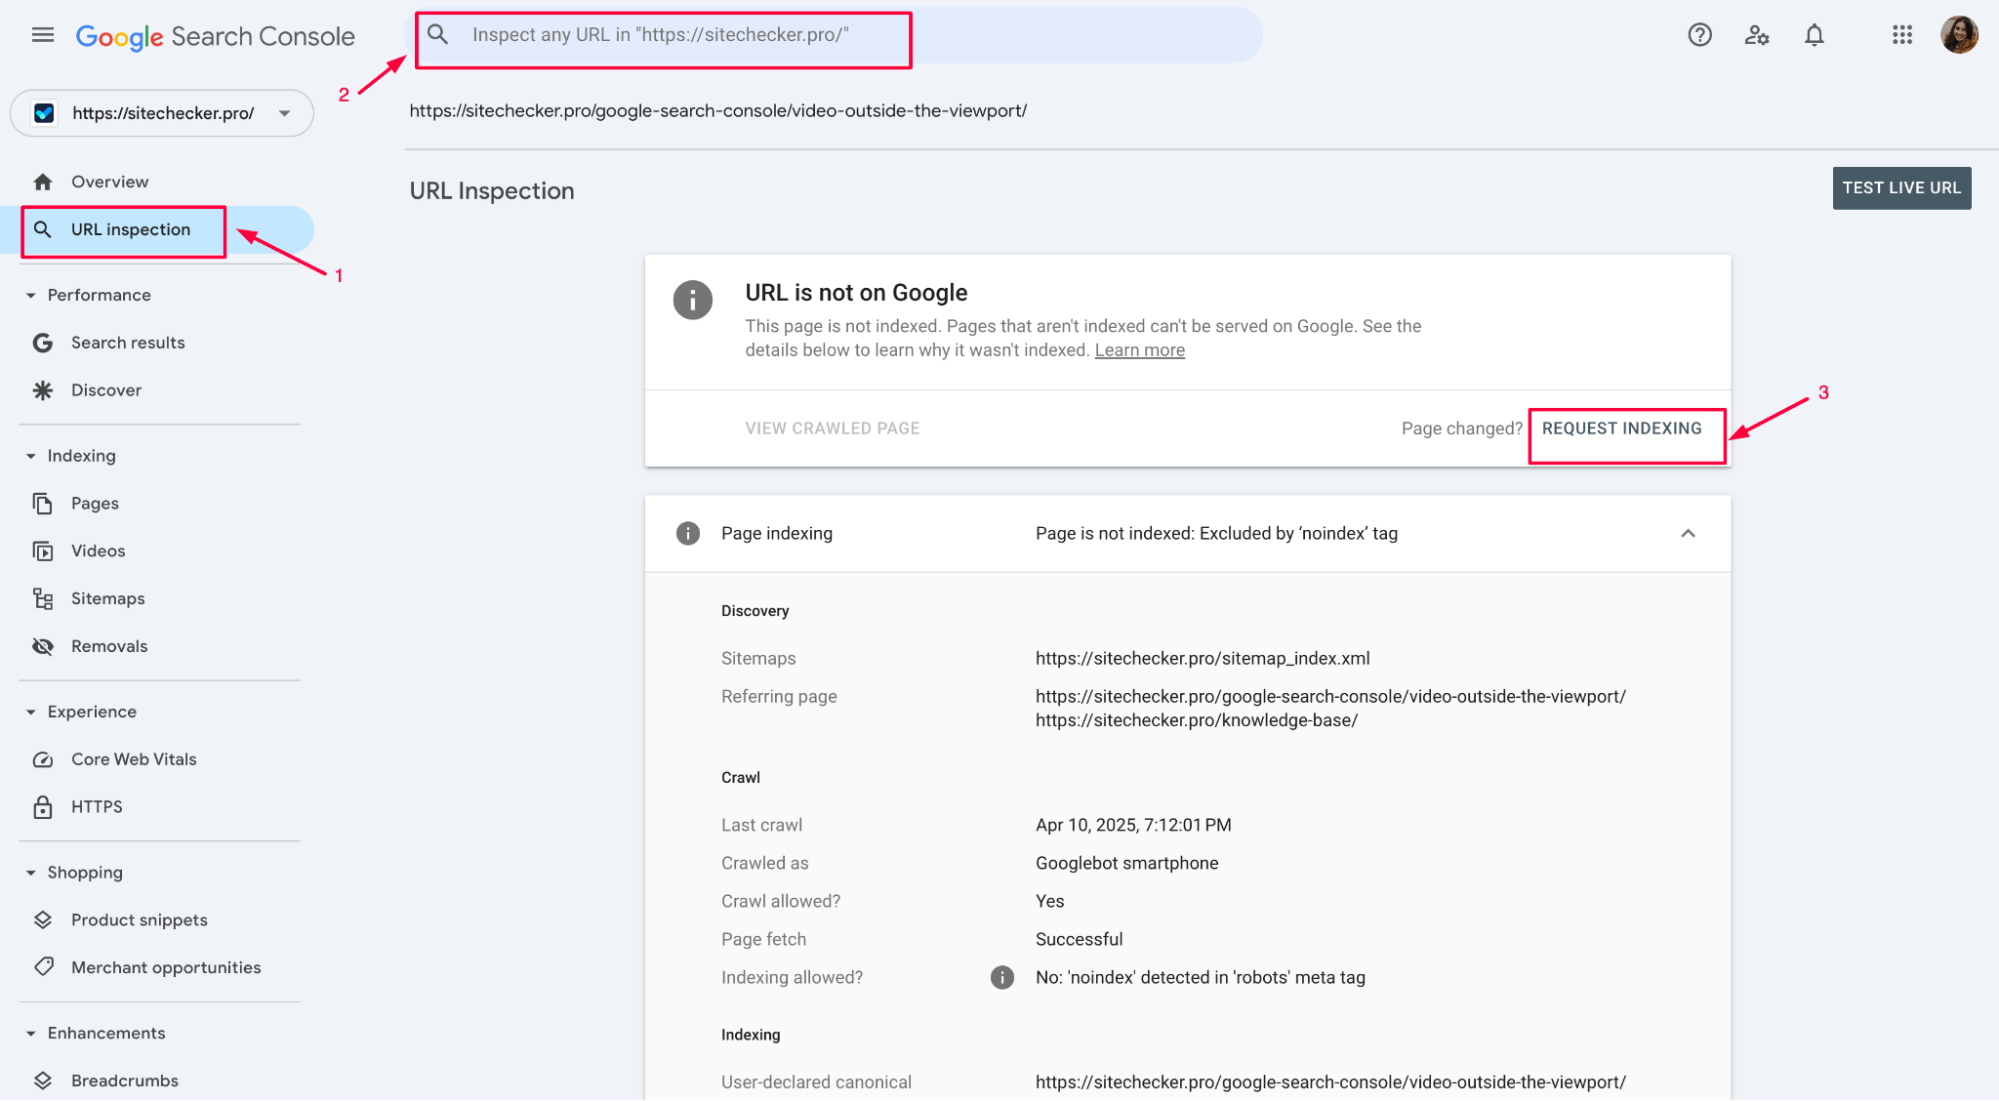
Using the Request Indexing feature in GSC can speed up this process, but keep in mind that reindexing may not happen instantly and may take some time to reflect in search rankings.
The time it takes for Google to update its index after fixing a “noindex” issue can vary. It generally takes anywhere from a few days to a few weeks for the changes to be reflected in search results, depending on factors like:
✅ The crawl frequency of your site.
✅ The importance of the page.
✅How often Googlebot crawls your site.
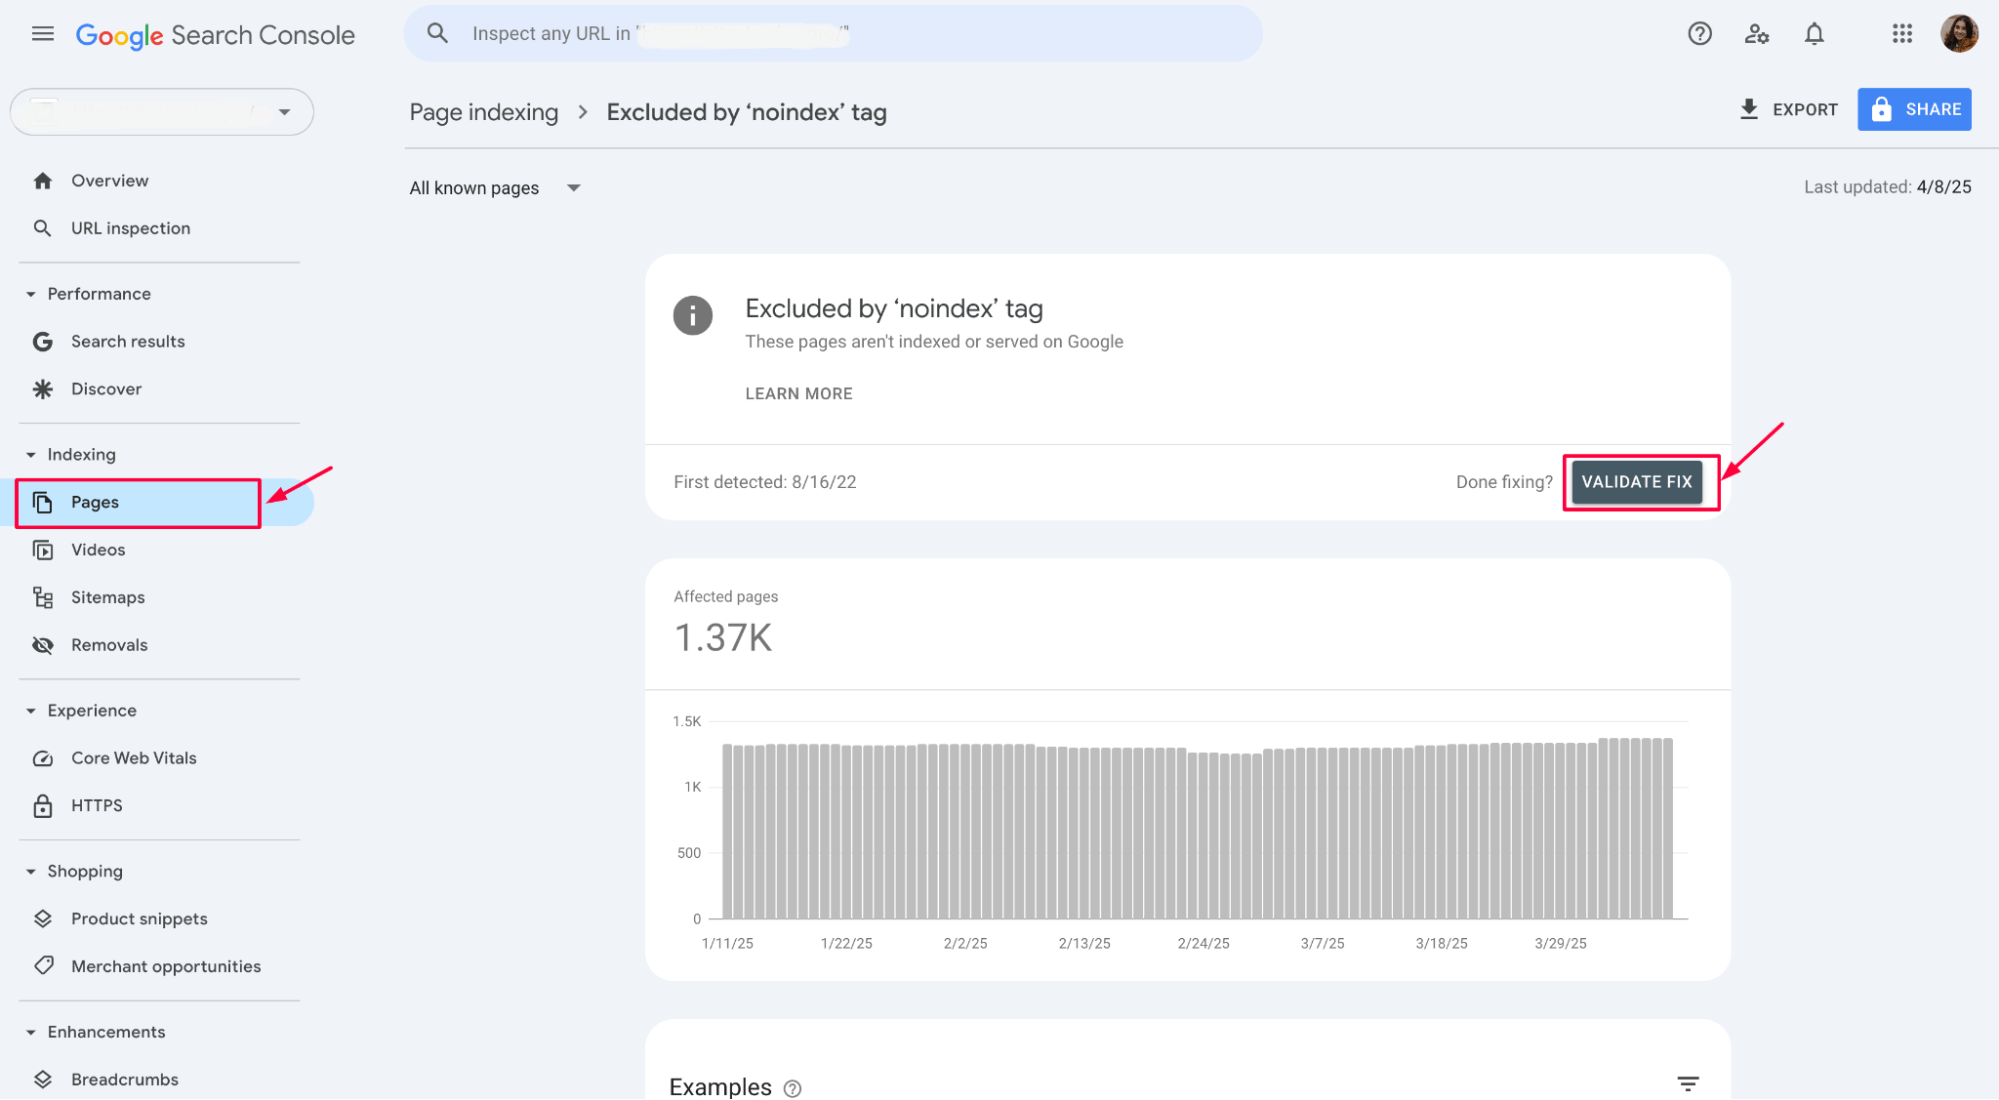
7. Update and revalidate in GSC
After removing the crawl block directive, go back to Google Search Console and click the Validate Fix button to let Google know that the issue has been addressed. Google will then re-crawl the pages and update their index status.
Regularly check Google Search Console to ensure that no other valuable pages are mistakenly marked with the “noindex” tag. This will help keep your site’s search visibility intact.
8. Monitor for future issues
You can monitor for future crawl block directive issues in Noindex Tag Checker by regularly checking the Indexing Issues section. The tool provides detailed insights into pages that may have indexing problems, including those affected by the crawl block directives.
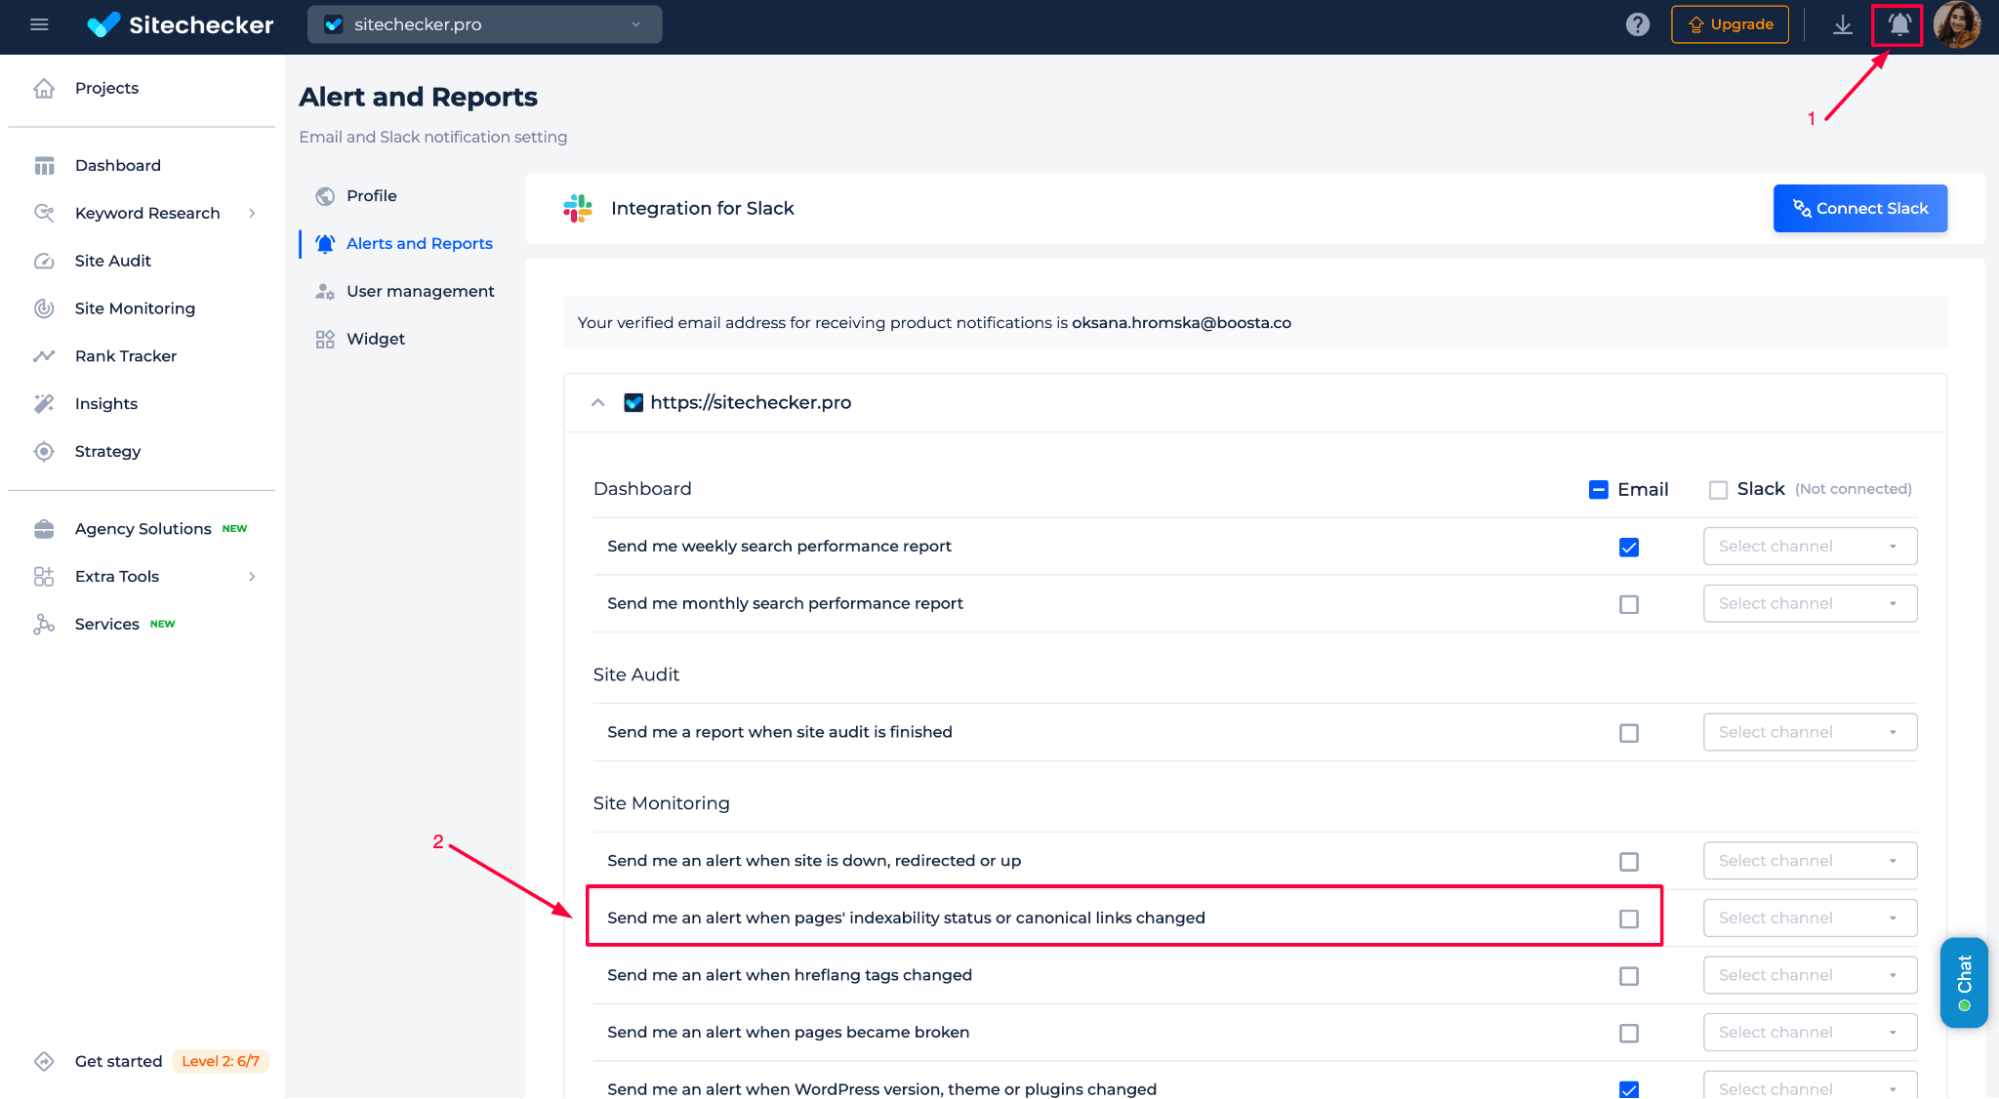
Set up alerts and schedule regular site audits to ensure that no important pages are mistakenly excluded from indexing. This proactive approach helps maintain your site’s visibility in search results.
Eliminate noindex tag problems.
Easily identify and remove 'noindex' tags from important pages to boost indexing.
How to prevent ‘noindex’ tags from being applied unintentionally
✅ Check CMS and Plugin Settings: Ensure that SEO plugins or CMS settings don’t automatically apply the “noindex” tag or the X-Robots-Tag HTTP header to important URLs.
✅ Inspect Code and Templates: Regularly review HTML code and templates to avoid accidental inclusion of the “noindex” directive.
✅ Audit Robots.txt File: Verify that your robots.txt file doesn’t block important pages from being crawled.
✅ Conduct Regular Audits: Perform regular site audits to catch any unintended “noindex” tags.
✅ Get alerts in Sitechecker: Use Noindex Tag Checker to monitor changes in indexing status and set up alerts about any unintended inclusion of “noindex” tags or blocking HTTP headers like X-Robots-Tag.
To further understand how to monitor and manage your site’s index status, watch the video below:
Conclusion
To fix the “Excluded by ‘Noindex’ Tag” issue, start by reviewing affected pages in GSC. Identify pages marked with the “noindex” tag and remove it from the HTML code or CMS settings. Check for other sources, such as robots.txt or server-side configurations, that may block indexing. Submit fixed pages for reindexing in GSC and revalidate the changes. Regularly monitor for future issues using tools like Sitechecker’s Noindex Tag Checker and perform routine site audits to ensure that no important pages are excluded from indexing. This proactive approach helps maintain your site’s search visibility.