What is Google Search Console?
Google Search Console (GSC), formerly known as Google Webmaster Tools, is a free service provided by Google. It offers webmasters and site owners a variety of tools and reports to monitor and improve their website’s visibility in Google Search results.
Purpose and Benefits of Google Search Console:
| Insight into Organic Performance | At its core, GSC is an analytics tool, but it’s different from Google Analytics. While Analytics offers insights into website visitor behavior, GSC focuses on the website’s performance in Google’s search results, offering data on clicks, impressions, and average positions. |
| Indexing Control | GSC lets you submit sitemaps, helping Google understand the structure of your site and index it more effectively. If there are any issues with indexing certain pages, GSC will alert you. |
| Mobile Usability | With mobile search becoming increasingly important, GSC provides reports on mobile usability, highlighting any potential issues your site might have when viewed on mobile devices. |
| Site Health and Security | GSC alerts you to any security issues, such as malware or hacking attempts on your website. It also flags any manual penalties that Google might have applied to your site. |
| Links Report | Backlinks, or external links pointing to your site, are a significant factor in SEO. GSC provides a detailed report on who links to you, which pages they link to, and the anchor text they use. |
| Understand Search Queries | With GSC, you can see which search queries bring users to your site, how often your site appears in search results (impressions), and how often users click on your site from those results (click-through rate). |
A Tool for All:
While the name might suggest it’s only for “webmasters,” Google Search Console is essential for anyone involved in a website’s online presence. This includes:
- SEO Professionals: To monitor and improve search performance.
- Marketers: To understand organic traffic and the performance of specific campaigns.
- Site Administrators: To ensure the site is running smoothly and no server errors are occurring.
- Web Developers: To ensure there are no technical issues with the site, especially concerning mobile usability or structured data.
Google Search Console is not just about understanding your current website performance; it’s also about preparing for the future. With insights on page experience, core web vitals, and more, GSC helps website owners prepare for algorithm updates and shifts in user behavior.
Watch a comprehensive guide for beginners on what is Google Search Console:
How Accurate is Google Search Console Ranking Data?
Google Search Console (GSC) is a reliable tool for monitoring website performance in Google search, yet it has certain nuances affecting its accuracy. Reporting delays can occur, meaning data isn’t real-time. Some reports are based on sampling, which might not reflect every interaction. GSC retains data for up to 16 months, which may limit long-term analysis.
The accuracy of insights also depends on proper data filtering and segmentation. There can be discrepancies between GSC and other analytics tools due to different data collection methods.
Additionally, the average position metric is influenced by search personalization, indicating trends rather than exact rankings. Despite these factors, GSC remains essential for SEO insights but should be complemented with other analytics tools for a comprehensive performance overview.
How Do I Access the New Google Search Console?
Navigating to and setting up the Google Search Console (GSC) is a straightforward process. With its intuitive interface and user-friendly design, the new GSC offers both beginners and seasoned professionals a seamless experience. Here’s a step-by-step guide to accessing the new Google Search Console:
Step 1: Navigate to Google Search Console
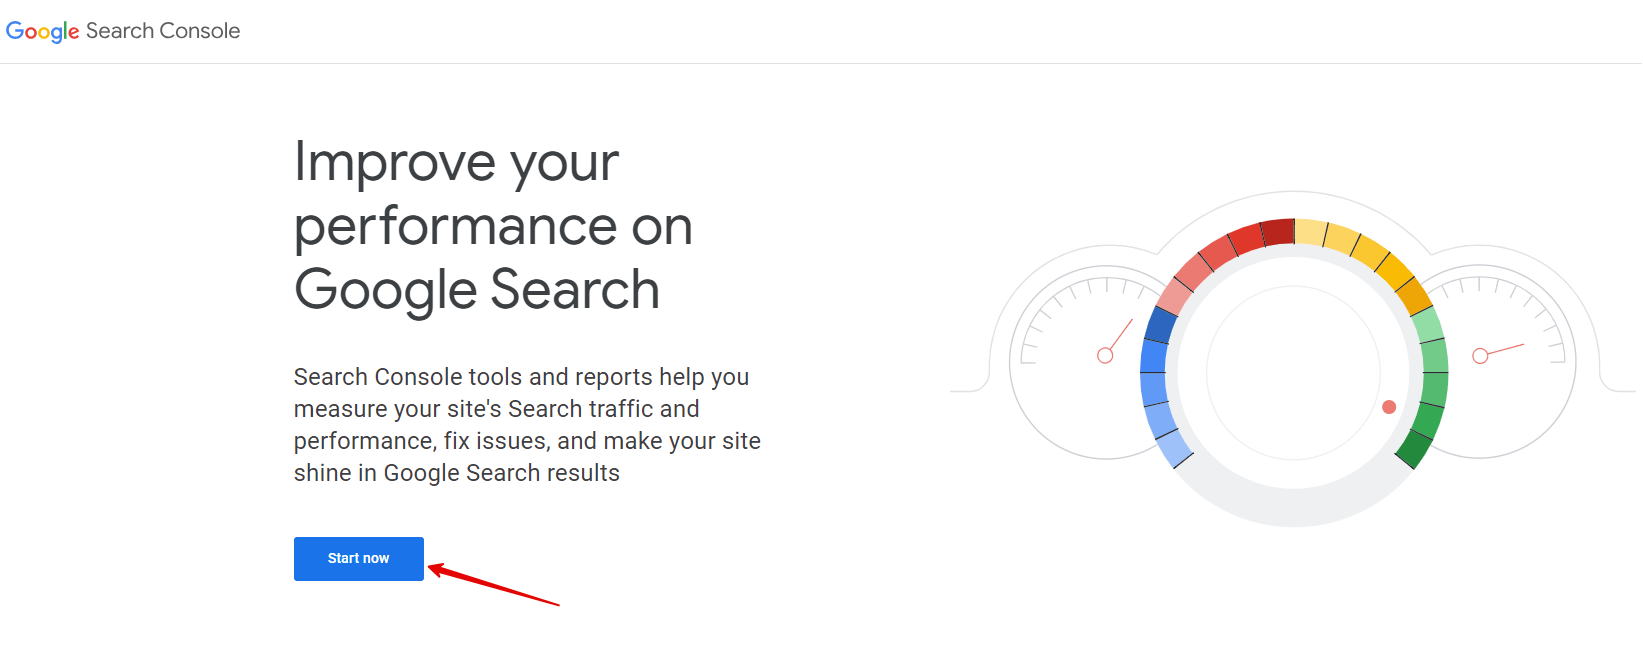
Begin by heading over to the Google Search Console website. Ensure you’re visiting the official site to maintain the security of your information.
Step 2: Sign in with a Google Account
To access GSC, you’ll need a Google account. Click on the “Start Now” or “Sign In” button. If you’re already logged into a Google account on your browser, the system will prompt you to choose that account or use a different one. If you’re not logged in, you’ll be asked to enter your Google account credentials.
Step 3: Set Up a Property
Once logged in, you’ll be taken to the GSC dashboard. Here, you’ll need to set up a “property” – which is essentially the website you want to manage.
– Click on the “Add Property” button.
– You’ll have two options: Domain (inputting the entire domain) or URL prefix (inputting a specific URL). Choose the one that suits your needs best.
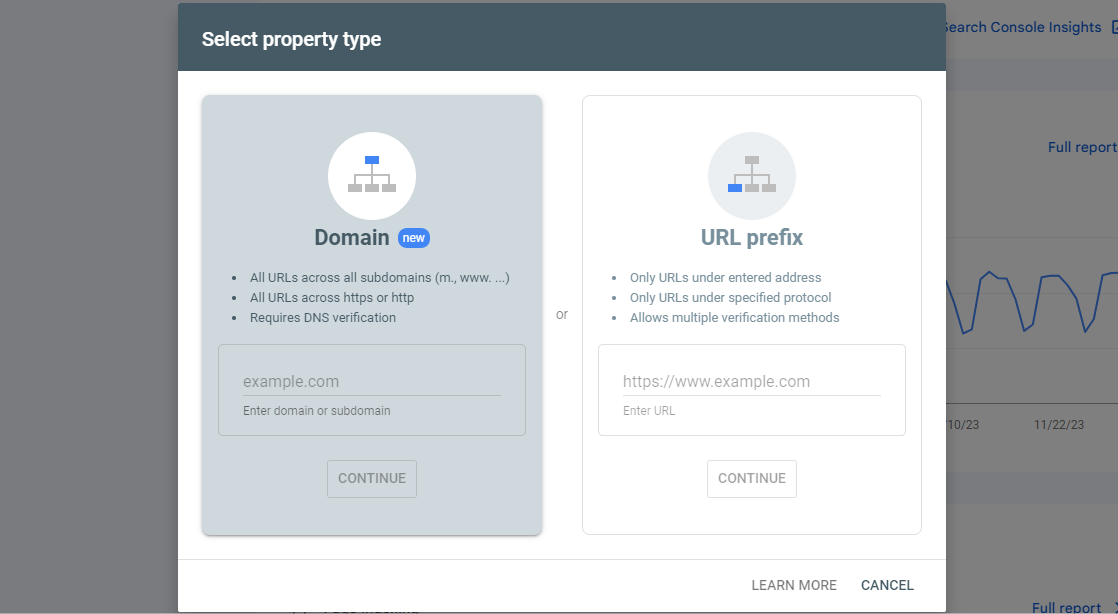
– For a domain property, you’ll need to verify ownership through your domain provider (e.g., GoDaddy, Namecheap). For a URL prefix, you can verify ownership using different methods, such as uploading a file, adding a meta tag, or using Google Analytics.
Step 4: Verification Process
After choosing your property type and entering the required information, you’ll be given instructions to verify your website. This step is crucial, as Google wants to ensure that you’re the rightful owner or administrator of the site you’re trying to manage.
Follow the provided instructions. Once you’ve completed the steps, click on the “Verify” button in GSC. If everything is in order, your website will be verified, and you’ll have access to its data and insights.
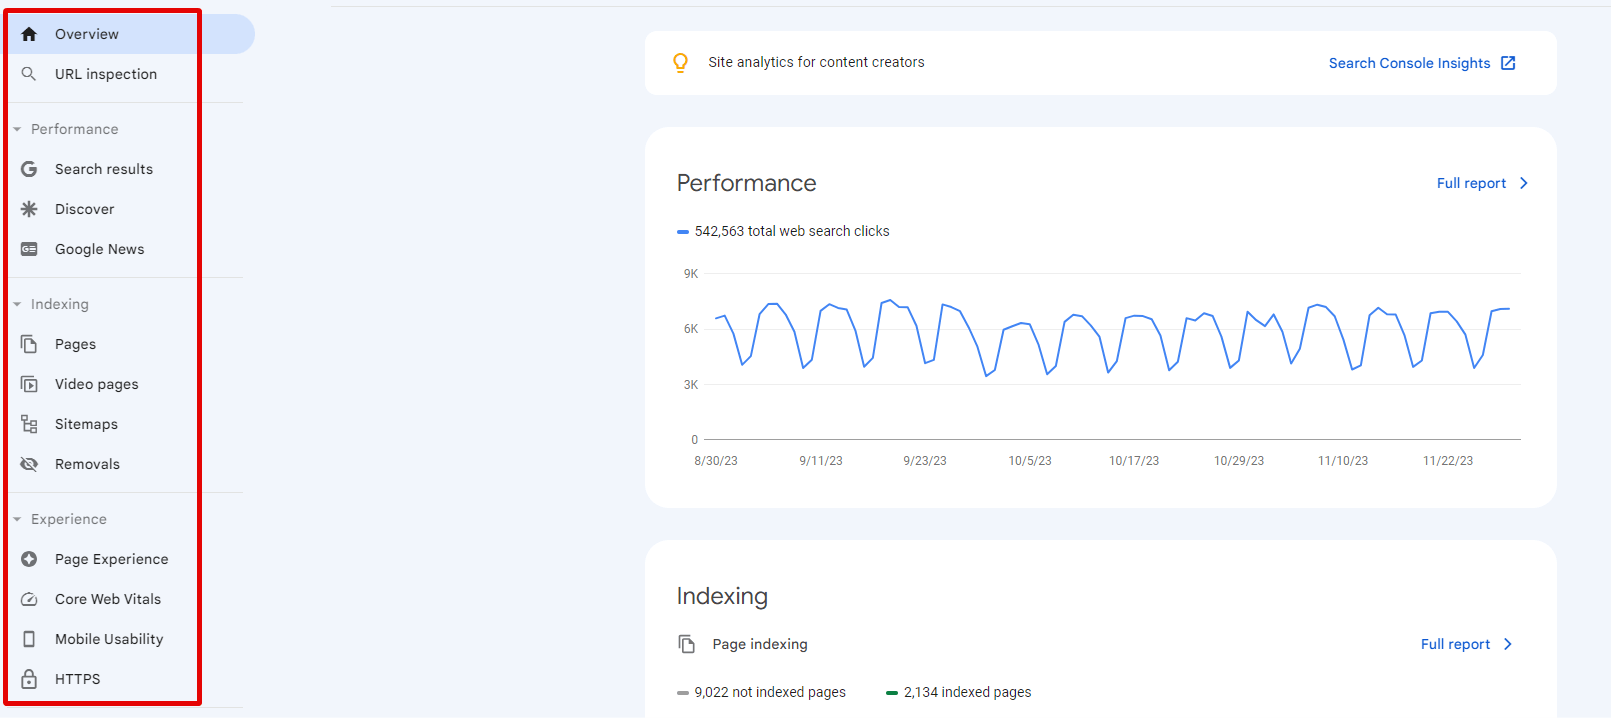
Step 5: Navigating the Dashboard
After verification, you’ll be taken to the GSC dashboard. Here, you can see an overview of your website’s performance, including total clicks, total impressions, and average click-through rate. On the left sidebar, various report sections and tools are available for deeper analysis, such as “Performance,” “Coverage,” and “Page Experience.”
Optional: Setting Preferences
Before diving deep into the data, you might want to set up some preferences:
– Notification Settings: Choose how you want to receive alerts and notifications from GSC.
– User Management: If you have a team, you can grant them varying levels of access to GSC data.
Accessing the new Google Search Console is straightforward and offers a plethora of insights right at your fingertips. Once set up, regularly check in to monitor your website’s health, organic search performance, and any updates or alerts from Google.
Getting Started with Google Search Console
Google Search Console (GSC) is a powerful tool designed to help website owners understand how their site interacts with Google Search. However, to tap into its potential, you first need to set it up properly. Here’s a detailed guide on setting up your GSC:
Setting Up Google Search Console
Before you can start analyzing your website’s data, it’s essential to ensure GSC is correctly configured for your site.
Step 1 — Sign In to Your Google Account
To access Google Search Console, you’ll need a Google account.
- Navigate to the Google Search Console page.
- Click on “Start Now” or “Sign In” located at the top right corner.
- If you aren’t already logged in, you’ll be prompted to enter your Google account credentials. If you don’t have a Google account, you’ll need to create one.
Step 2 — Open Up Google Search Console
Once you’re logged into your Google account:
- Head to the Google Search Console homepage.
- Here, you’ll find an overview of your existing properties (if any) and the option to add a new one.
Step 3 — Add a New Website to Google Search Console
Now that you’re on the main dashboard:
- Click on the “Add Property” button.
- This will prompt you to input the website or domain you wish to monitor and manage with GSC.
Step 4 — Add Your Domain
After clicking “Add Property,” you’ll have two options:
- Domain: This option requires you to verify ownership of the entire domain. You’ll need to add a DNS record through your domain provider. It’s a slightly technical process but provides a comprehensive view of your site, including all subdomains and protocols (http & https).
- URL Prefix: If you want to verify a specific URL or don’t have access to your domain’s DNS settings, choose this option. It’s simpler but less comprehensive.
Select the method that best suits your needs and input the required information.
Step 5 — Verify Your Account (+ Alternative Methods)
Verifying your site ensures you’re the rightful owner or manager.
- Follow the on-screen instructions provided by GSC.
For the Domain method, you’ll likely need to add a TXT record to your domain’s DNS settings.
For the URL Prefix method, you’ll have multiple verification options:
- HTML file upload: Download a verification file and upload it to your site’s root directory.
- HTML tag: Add a meta tag to your website’s home page.
- Google Analytics: Use your existing Google Analytics tracking code.
- Google Tag Manager: Verify using a container snippet.
- Domain name provider: Verify through your domain registration service.
Once you’ve completed the verification process, go back to GSC and click the “Verify” button. If the verification is successful, you’ll gain access to your site’s data and reports within GSC.
With these steps, you’ll have successfully set up Google Search Console for your website. It may take a few days for data to populate fully, so be patient and check back later to explore all the insights GSC has to offer.
Sidenote: Old Search Console vs New Search Console
Google has always strived to enhance its tools, aiming for more functionality and user-friendliness. The transition from the old Google Search Console (formerly known as Google Webmaster Tools) to its new version epitomizes this improvement journey. Let’s delineate the contrasts and novelties introduced.
| Feature/Aspect | Old Search Console | New Search Console |
|---|---|---|
| User Interface | Traditional design with standard navigation. | Modern, intuitive design with streamlined navigation and clearer visual data representations. Makes it easier for users to locate and interpret essential information. |
| Data Access | Limited access to 90 days of query data. | Provides access to 16 months of data, allowing for longer-term trends analysis and year-over-year comparisons. |
| Reports | Offered a range of standard reports. | Introduced several improved and new reports, including the Page Experience report and the Index Coverage report. More in-depth insights into site performance and indexing issues. |
| Issue Identification and Validation | Had basic mechanisms for detecting issues. | Features a robust system for detecting and detailing site issues. Once issues are fixed, users can validate them directly within the platform, providing a more seamless issue resolution process. |
| Integration with Other Google Tools | Basic integration capabilities with other Google services. | Designed for seamless integration with other Google services like Google Analytics, enabling users to quickly correlate data between platforms for a holistic understanding of site performance. |
New Reports & Tools
The revamped Google Search Console furnishes users with several innovative reports and tools tailored for a more in-depth analysis:
- Performance Report: A refined view into your website’s Google Search performance, showcasing metrics like clicks, impressions, and CTR.
- URL Inspection Tool: A deep dive mechanism into individual URLs, granting insights on their indexing status and highlighting potential issues.
- Coverage Report: This offers a granular understanding of the indexed pages and any issues that might hinder Google from indexing pages correctly.
- Page Experience Report: A recent addition that interprets your pages’ alignment with Google’s page experience benchmarks.
Updated/Replaced Features
The new edition of the Search Console has either updated or replaced several of the old version’s features:
- Search Analytics has metamorphosed into the Performance Report, fortified with added data streams and a revamped interface.
- Fetch as Google has been upgraded to the URL Inspection Tool, which provides more exhaustive insights.
- Crawl Errorsreport has transitioned into the Coverage Report offering an aggregated view of pages Google could or couldn’t index.
Removed
In its quest for optimization, the new version of Google Search Console has phased out certain features:
- HTML Suggestions: Earlier, this tool aided in pinpointing potential discrepancies with meta descriptions and title tags.
- Property Sets: This tool previously enabled users to amalgamate multiple properties (like various website versions).
- Android Apps Data: With a refined focus, data and analytics related to Android apps were excised.
How to Use the Old Google Search Console (Webmaster Tools)
Even though the new Google Search Console is fortified with superior capabilities, certain users might still find solace in the old version. Here’s a guide:
- Accessing: Commence by visiting the Google Search Console homepage. Seek a “Legacy tools and reports” option or something akin to revert to the old interface.
- Navigating: Inside, the layout resonates with the previous design. Tools are segregated under categories like “Dashboard,” “Traffic,” and “Google Index.”
- Utilization: Many functionalities mirror their modern counterparts, albeit in a different avatar. For instance, the “Search Queries” under “Traffic” serves a similar purpose as the modern “Performance Report.”
- Progression: Keep in mind that Google’s inclination is towards the new, meaning the old version might eventually be phased out. Acclimating to the newer version is prudent.
Connecting Google Search Console with Other Tools
Modern digital strategies often rely on an ecosystem of interconnected tools. This connectivity maximizes efficiency and provides holistic insights. One such synergy exists between Google Search Console and various other platforms, allowing webmasters and site owners to leverage combined data for more comprehensive analysis.
How to Link Google Analytics With Search Console
Linking Google Analytics with Google Search Console provides you with a seamless view of your search data alongside your website’s analytics. Here’s how you can achieve this:
Step 1 — Access Google Analytics
Log in to your Google Analytics account. If you don’t have one, you’d need to set it up first. Once logged in, select the property (website) you’d like to link to Google Search Console.
Step 2 — Navigate to Admin Settings
On the left sidebar, click on “Admin” (represented by a gear icon). Under the property column (middle column), locate and click on “Property Settings.”
Step 3 — Adjust Search Console Settings
Scroll down to the “Search Console” section in Property Settings. Here, you will find an option to adjust Search Console settings. Click on it.
Step 4 — Link Google Search Console
You’ll be presented with a list of sites you have added to your Google Search Console account. Choose the site (property) that matches the one in your Google Analytics and click on the “Link” button.
Step 5 — Confirm the Linking
Once you’ve linked, you should see the corresponding Google Search Console data available within Google Analytics under “Acquisition” > “Search Console.” Confirm that the data is being fetched correctly.
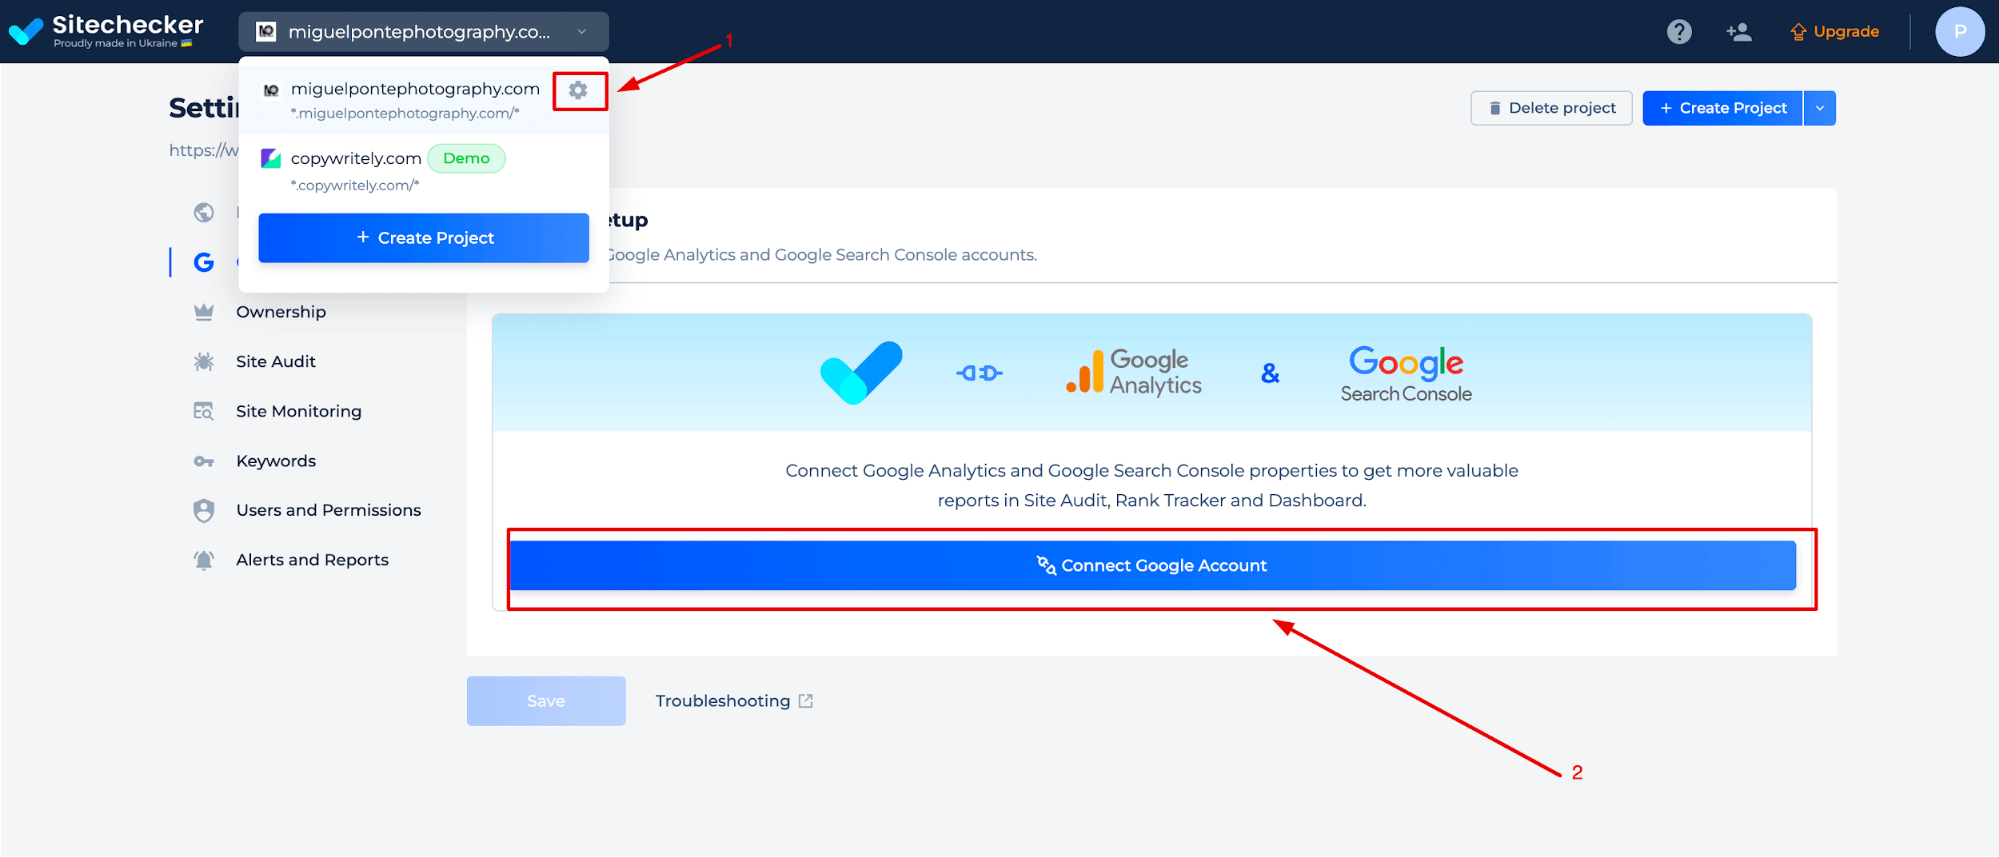
Connect Your Google Search Console Account to Sitechecker
Sitechecker is a tool that offers on-page SEO analysis, website monitoring, and more. Linking it with Google Search Console can enhance the depth of insights it provides.
- Access Sitechecker: Log in to your Sitechecker account.
- Navigate to Settings: Often found in the top right corner or under your account/profile name.
- Locate Integrations: Within settings, find a section labeled “Integrations” or something similar.
- Connect with Google Search Console: You should see an option to link with Google Search Console. Click on “Connect” or “Link” next to it.
- Grant Permissions: Sitechecker will request permissions to access your Google Search Console data. Ensure you grant the necessary permissions for the integration to work.
After successfully linking, you can use Sitechecker to pull data directly from Google Search Console, enhancing the reports and analyses Sitechecker can provide.
Key Features and Reports in Google Search Console
Google Search Console, formerly known as Google Webmaster Tools, is a free service provided by Google that helps you monitor, maintain, and troubleshoot your site’s presence in Google Search results. It offers a wealth of data and reports for site owners and SEO professionals to understand their site’s performance and issues. Let’s delve deeper into its main features and reports.
What Data Can You Get in Google Search Console?
Google Search Console is a reservoir of insights about how your site interacts with Google Search. The primary data categories include:
Queries
The search terms that users typed into Google when your site appeared in the search results. This gives insights into what keywords are driving traffic to your site.
Pages
The individual URLs from your site that appear in the search results. This helps you understand which pages are the most popular and how they perform.
Impressions
The number of times a user saw a link to your site in search results. This metric gives a sense of your site’s visibility.
Clicks
The number of times a user clicked on your site from the search results. A vital metric to measure the actual traffic coming to your site from Google.
Average Position
This indicates the average rank of your site for a query or a page. It helps in gauging your SEO efforts and competitiveness in SERPs.
Average CTR (Click-Through Rate)
The percentage of impressions that resulted in a click. This provides insights into the effectiveness of your title tags and meta descriptions.
Page Indexing Report
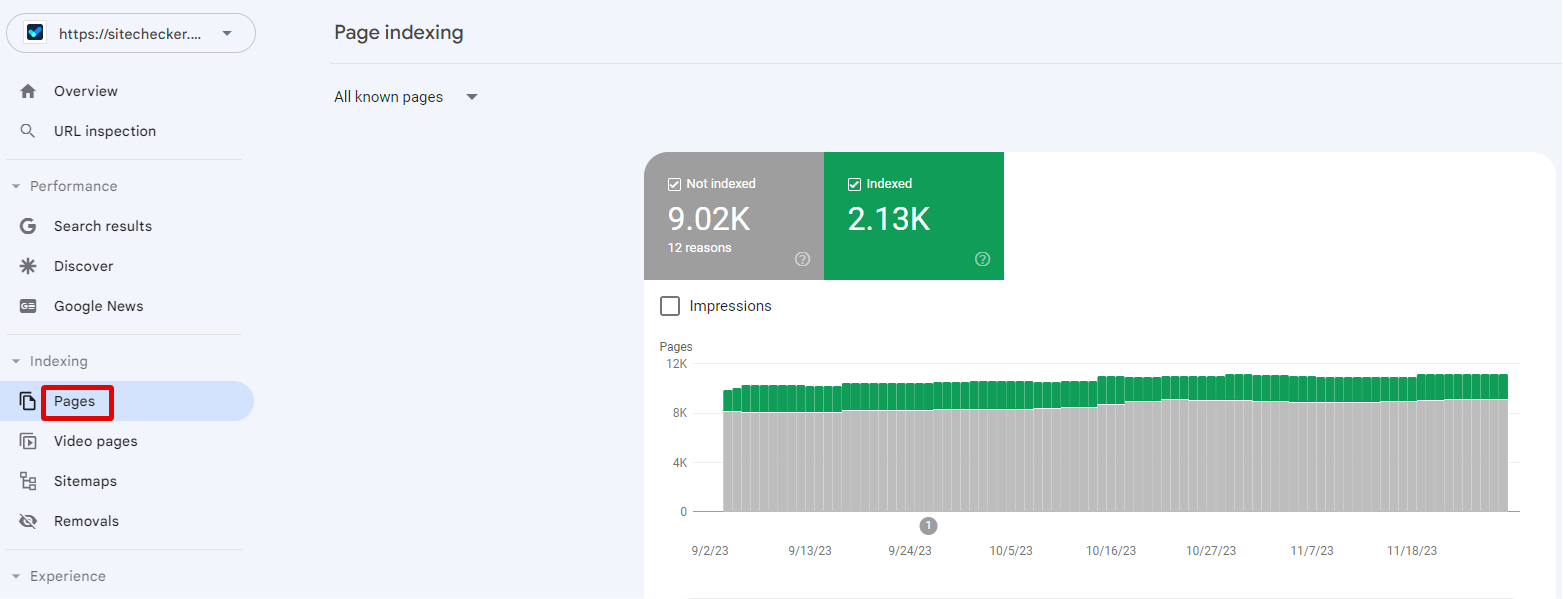
This report provides details about which pages from your website are indexed by Google. It also highlights any problems or issues that might prevent Google from indexing certain pages.
Page Experience Report
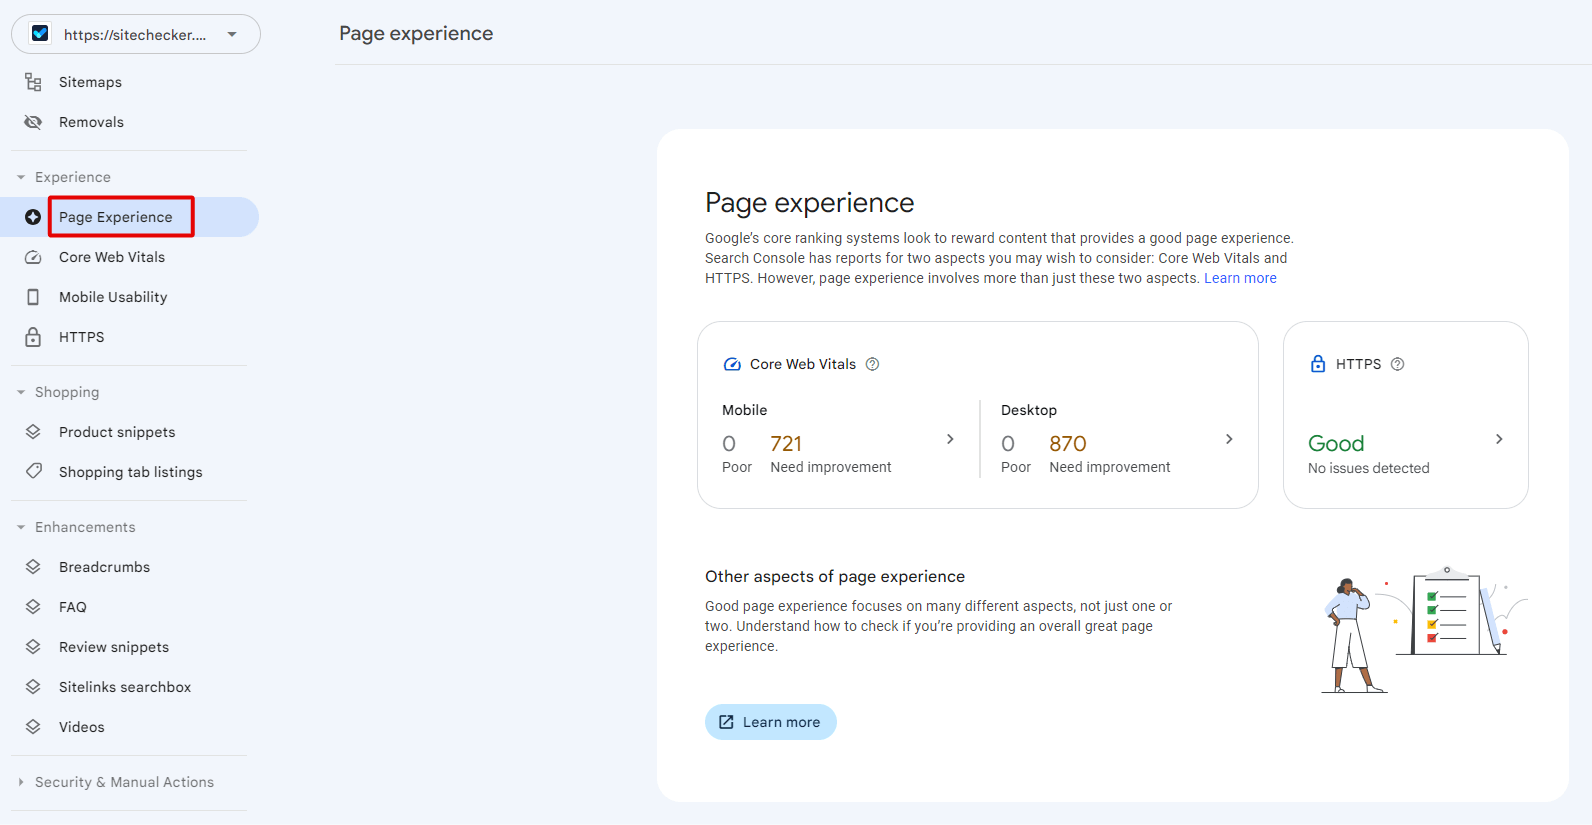
Introduced in light of Google’s focus on user experience as a ranking factor, this report gives insights into how pages on your website align with Google’s page experience criteria, including factors like mobile-friendliness, core web vitals, and HTTPS usage.
Enhancements Report
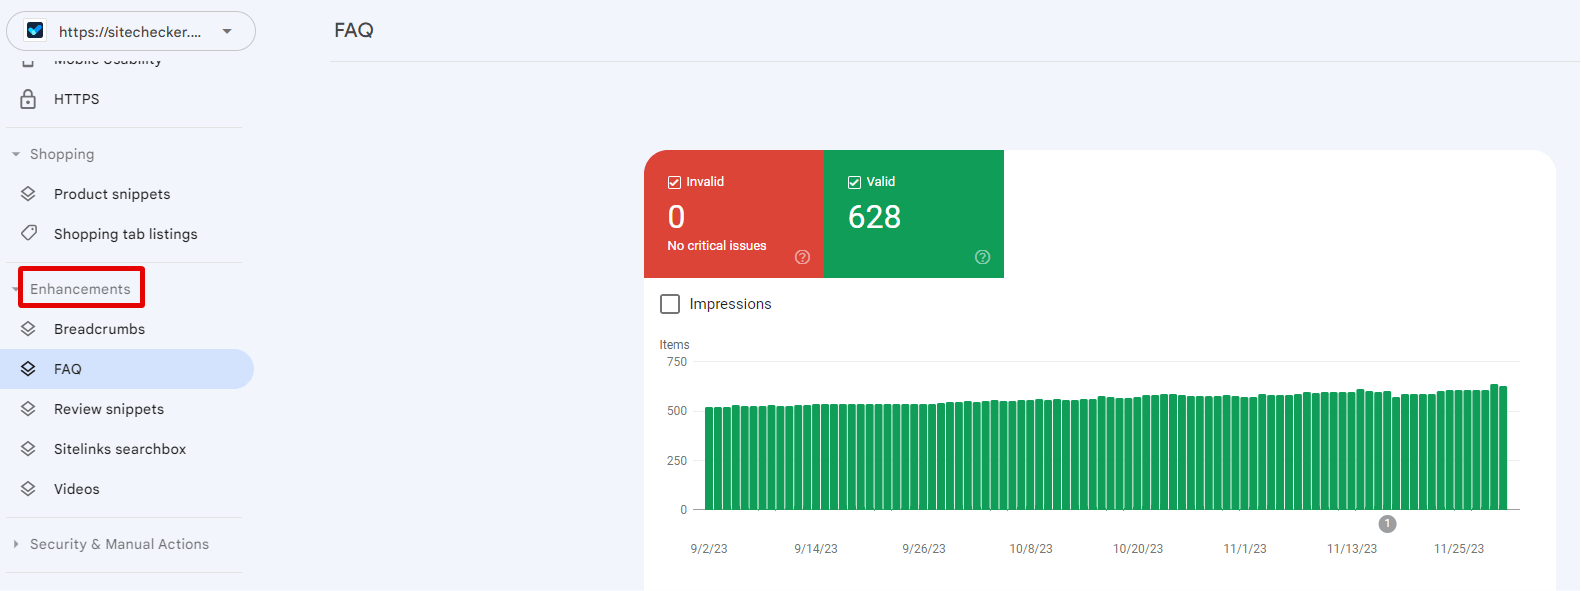
This section provides detailed data on various site aspects that can be enhanced for better search visibility and performance. Topics like mobile usability, structured data, and more can be found here.
Manual Actions Report
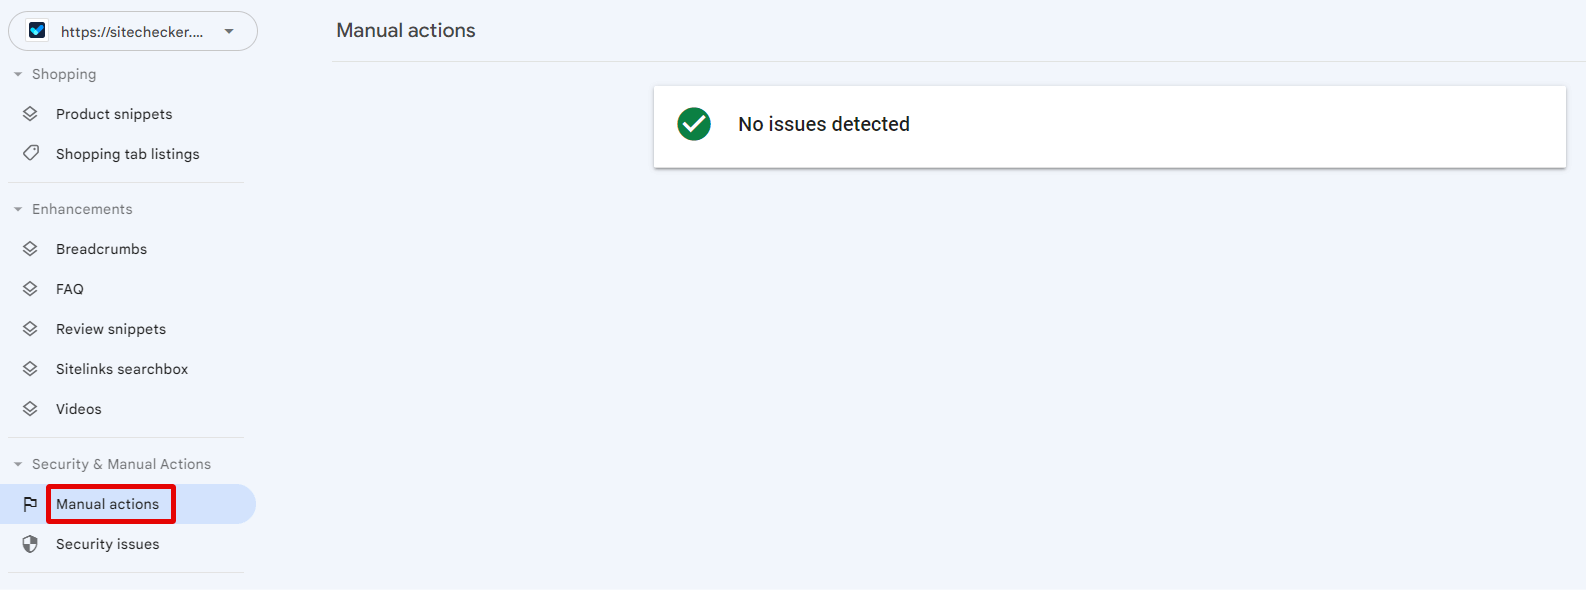
If Google’s reviewers determine that your website is not compliant with Google’s guidelines, manual action might be applied, affecting the site’s search performance. This report notifies and guides you on potential issues and recovery.
Shopping Report
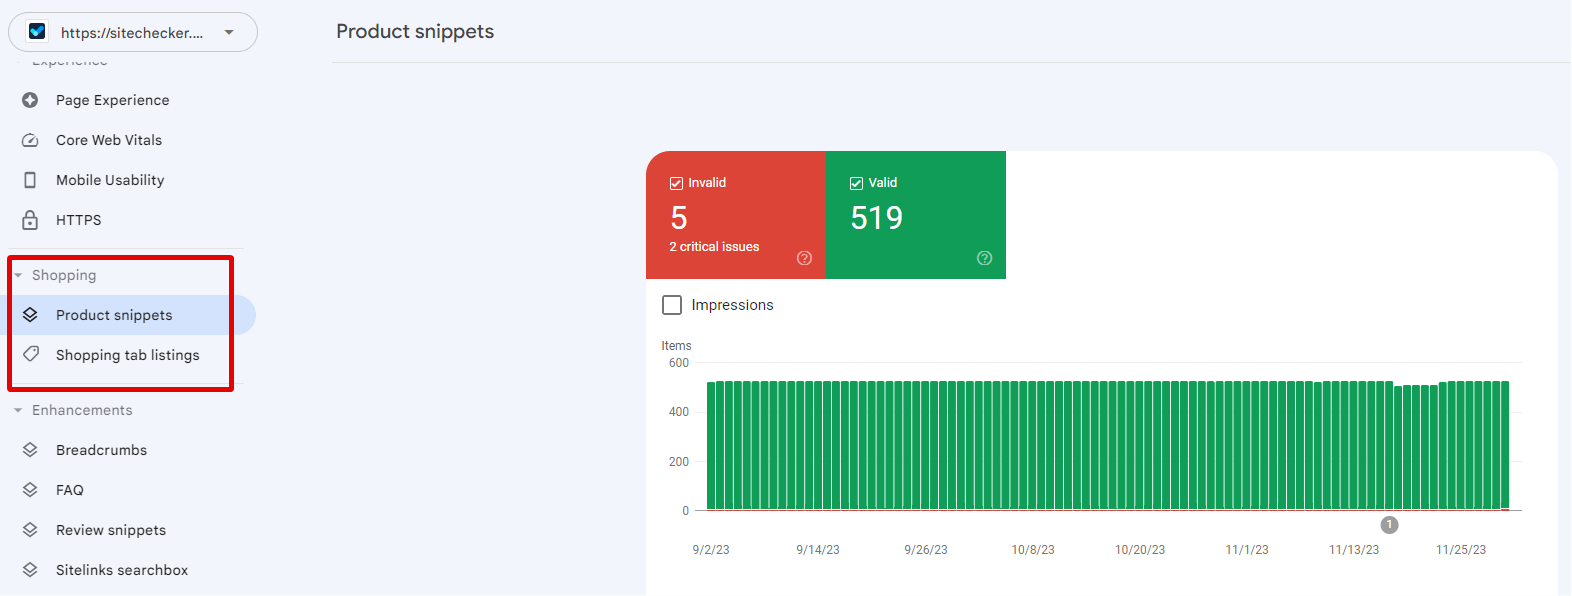
For e-commerce sites, the Shopping report provides insights into the performance and visibility of product-rich results on Google Search.
AMP Report
The Accelerated Mobile Pages (AMP) report provides details on the performance and errors of your AMP pages, ensuring they offer a fast and user-friendly experience.
Using Search Console Metrics
Interpreting the metrics provided by the Google Search Console is essential for website optimization. This section would guide on:
- How to analyze and understand the data.
- Making informed decisions based on these metrics.
- Implementing changes for better search visibility and performance.
Understanding and regularly checking these features and reports in Google Search Console ensures that you’re on top of your website’s health and performance in Google’s search results. It empowers you to make data-driven decisions, rectify issues promptly, and harness the full potential of organic search.
Advanced Usage of Google Search Console
Google Search Console (GSC) isn’t just for beginners. Its suite of tools and reports cater to advanced users, providing in-depth insights into a site’s performance, potential issues, and areas of optimization. Here’s how advanced users can make the most of GSC’s capabilities:
Checking the Health of Your Website With Google Search Console
Ensuring your website’s health is critical for maintaining high search visibility and offering an optimal user experience. GSC provides tools and reports for this purpose:
Causes of Errors
Website errors can stem from various sources, including server errors, crawl issues, or even misconfigurations. By using the ‘Coverage’ report in GSC, you can view a list of URLs that Google could not successfully crawl or that returned an HTTP error.
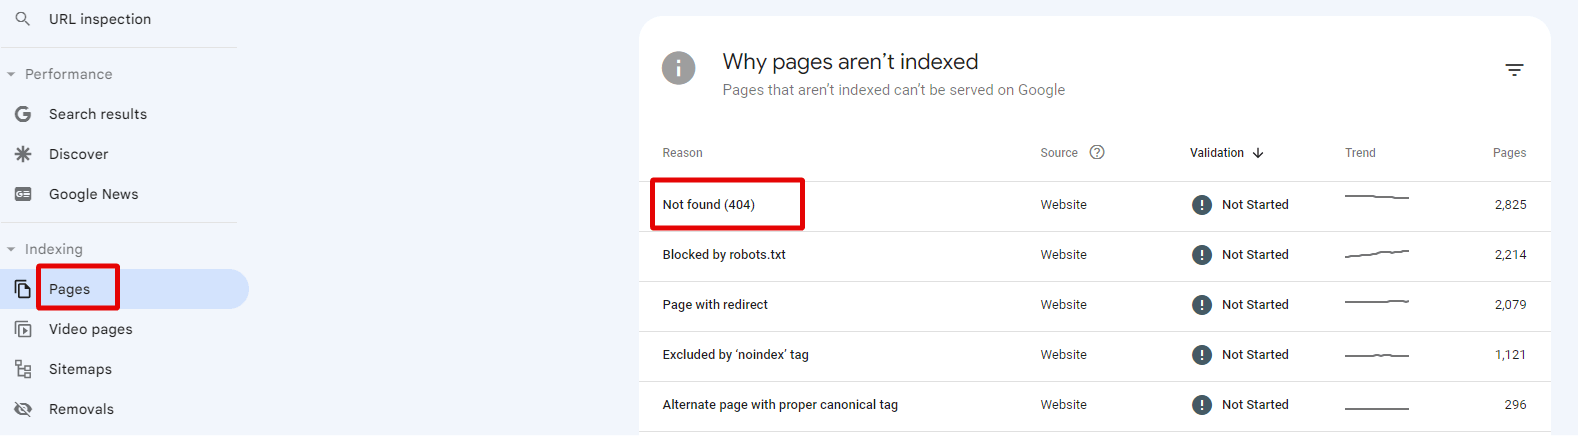
How to Fix 404 Errors
404 errors, which indicate a ‘Not Found’ status, can negatively impact user experience. Here’s how to address them:
- Identify the Errors: Navigate to the ‘Indexing’ report to view URLs returning a 404.
- Determine the Cause: Were pages deleted or moved? Is there a broken link?
- Implement Redirects: If a page has moved, set up a 301 redirect to the new location.
- Update Links: Ensure internal or external links pointing to the old URL are updated.
- Resubmit to Google: Once fixed, mark the error as ‘Resolved’ and request reindexing.
See How Google Views a URL
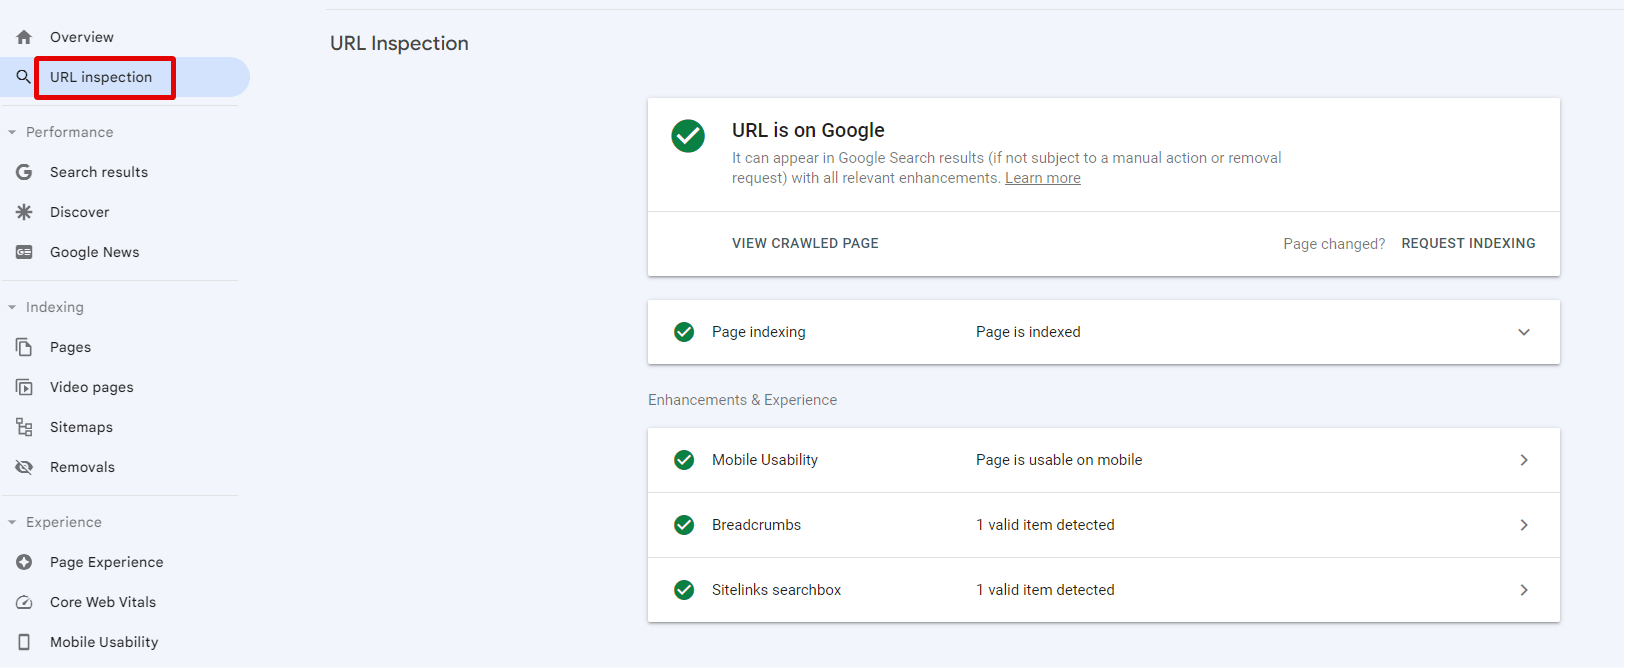
The ‘URL Inspection’ tool in GSC allows users to fetch and render a URL as Google sees it. This is useful for diagnosing indexing issues, checking a page’s canonical version, or seeing how Googlebot views your content. By inputting a URL, you’ll get insights into the page’s indexing status, its last crawl, and any detected enhancements or issues.
Using the Overview Report and other detailed report sections
The ‘Overview’ provides a snapshot of your site’s status, highlighting important metrics and any issues. But GSC’s strength lies in its detailed reports:
Performance Report
This report shows how your site performs in Google Search, providing data on:
- Queries: What terms brought users to your site.
- Pages: Which URLs get the most traffic.
- Countries: Where your audience is located.
- Devices: Whether users visit via mobile, desktop, or tablet.
Link Report
Understand who links to you and how your content is internally linked. This report offers:
- External Links: Which domains link to you the most.
- Top Linked Pages: Your most popular content in terms of backlinks.
- Internal Links: See the link structure within your site.
Other reports, such as the ‘Site Maps’, ‘Mobile Usability’, and ‘Core Web Vitals’, offer insights into different aspects of your site’s relationship with Google Search. Each report provides actionable data to optimize your site for better performance and visibility.
Using Google Search Console at an advanced level requires a deeper understanding of its features, metrics, and implications of the data it presents. By regularly auditing and optimizing based on GSC’s insights, advanced users can ensure their site not only complies with Google’s best practices but also offers a superior user experience.
Managing Permissions and Users
Google Search Console (GSC) provides tools for managing who has access to your property (website) data. This ensures that the right individuals can view, analyze, or modify your site’s settings, enhancing collaboration while maintaining security.
Google Search Console Permissions: Users and Owners Explained
Understanding user roles and permissions is crucial for managing access to your GSC property. These roles determine what actions a user can perform within a property.
Owner
Owners have full control over properties in GSC. They can:
- View all data and reports.
- Modify settings, including site settings and users.
- Take action on any issues or recommendations.
- Verify and remove properties.
Owners can be of two types:
- Verified Owners: They have proven ownership of the property. They can delegate “Owner” status to others.
- Delegated Owners: Given ownership by a verified owner but can’t delegate ownership to others.
User
Users can:
- View most data and some of the settings of the property.
- They cannot view certain information, such as the list of all users for a property or the “Security issues” report.
- They cannot take actions like changing site settings or adding/removing users.
How to Add and Remove Owners/Users in Google Search Console
Managing users and owners ensures that the right stakeholders have the necessary access:
- Navigate to GSC: Open your property and click on ‘Settings’ at the bottom left.
- Access Users and Permissions: Under ‘Property settings’, click on ‘Users and permissions’.
- Add a New User/Owner: Click on the ‘Add User’ button, enter the email address, choose the permission level (Owner/User), and click ‘Add’.
- Remove a User/Owner: Find the email address of the individual you wish to remove, click on the three vertical dots next to their name, and select ‘Remove access’.
Note: Only Owners can add or remove users. Ensure you trust the individuals you’re giving ownership to, as they have substantial control over the property.
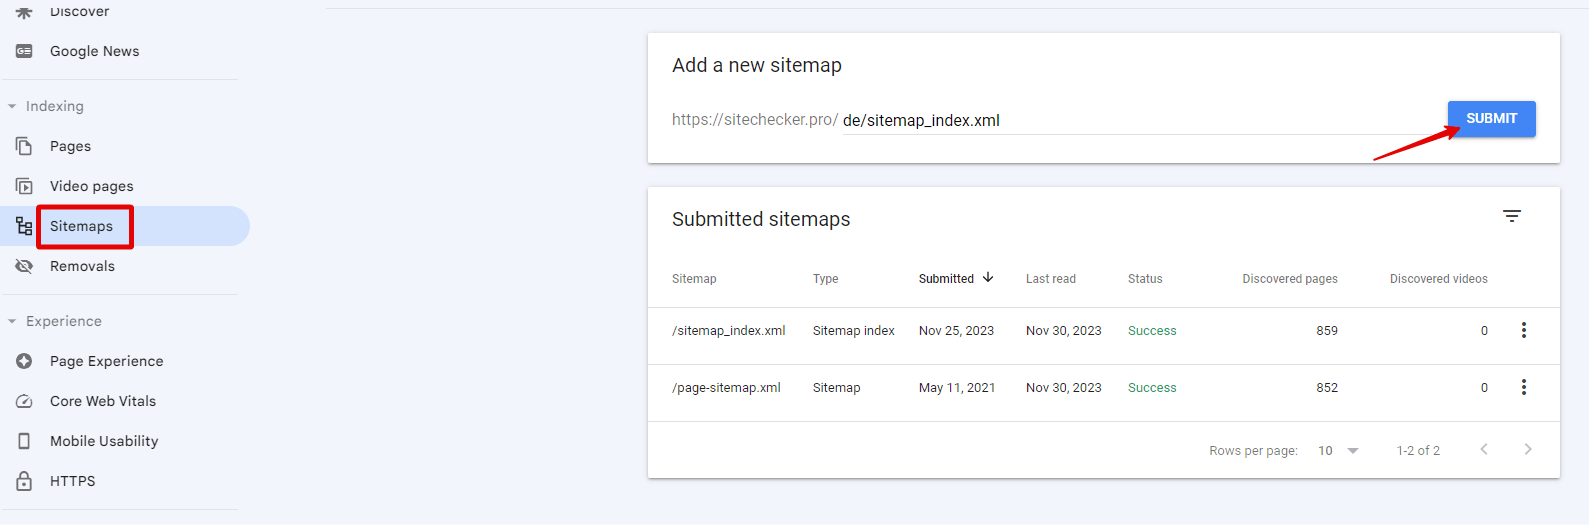
How to Add a Sitemap in Google Search Console
Sitemaps are crucial for helping Google discover and understand your website’s content. Here’s how to submit a sitemap:
- Prepare Your Sitemap: Ensure your sitemap is updated, error-free, and accessible. Typically, it’s located at “yourdomain.com/sitemap.xml”.
- Navigate to GSC: Open your property.
- Access Sitemaps: Under ‘Index’, click on ‘Sitemaps’.
- Submit Your Sitemap: In the ‘Add a new sitemap’ box, enter the URL of your sitemap and click ‘Submit’.
- Monitor for Errors: After submission, GSC will start processing your sitemap. Check back after some time to see if there are any errors or issues.
By regularly updating and submitting your sitemap, you assist Google in efficiently crawling and indexing your site’s content.
Managing users and their permissions, as well as maintaining an updated sitemap, are essential administrative tasks in Google Search Console. By doing so, you ensure that the right stakeholders have appropriate access and that Google has the latest roadmap to your website’s content.
Conclusion
Google Search Console stands as an indispensable tool for website owners, digital marketers, and SEO professionals. Its suite of features offers a comprehensive view of how a website is perceived by Google, providing insights into its performance, potential issues, and areas for optimization. By understanding and leveraging the data GSC offers, users can craft strategies that align with Google’s best practices, ensuring their content is not only discoverable but also offers value to their target audience. As the digital landscape continues to evolve, tools like GSC become even more crucial in bridging the gap between website creators and the search engines that index their content. Whether you’re just getting started or an advanced user, the depth and breadth of information available in GSC make it a must-have in your digital toolkit.